Joining a Meeting
Users can join a meeting using the gloCOM Meeting web application.
Be aware that the web app only supports joining meetings – creating meetings is not supported.
Once the user opens the page, they will be greeted with the following Join Meeting screen
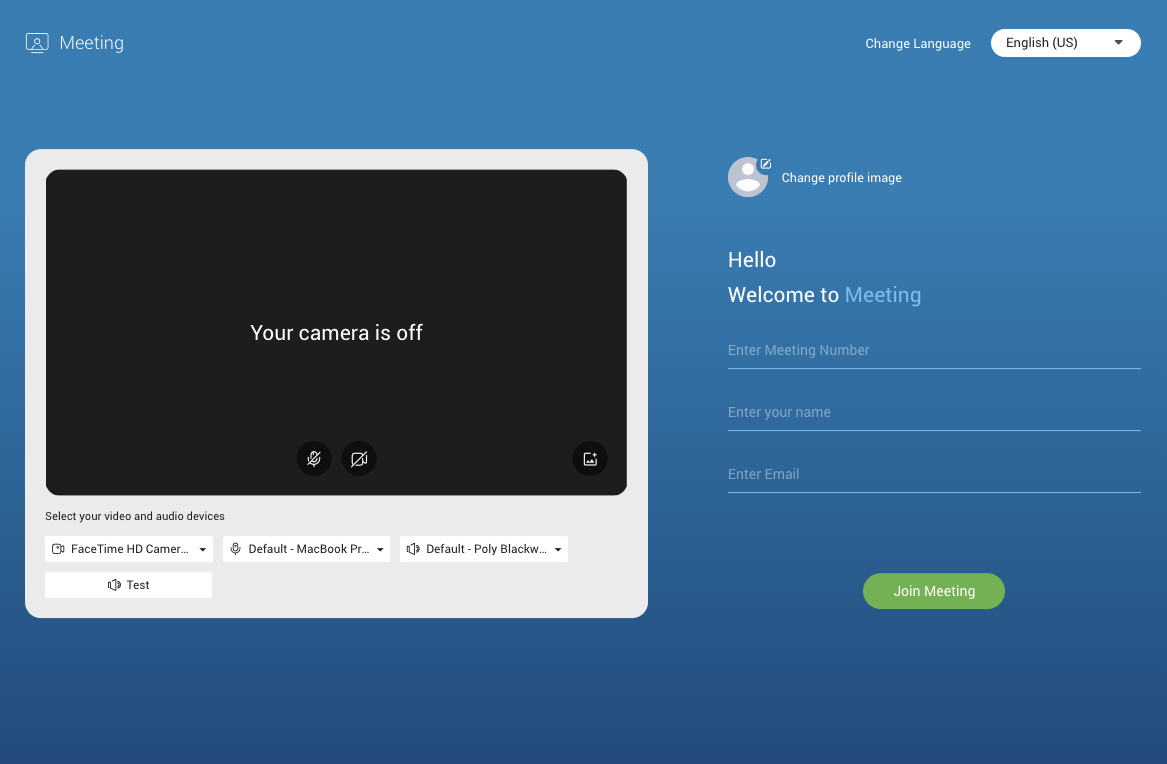
On the right side is the Login data section, while the left side displays the audio and video settings to be used during the meeting. In the upper right corner, users can select their preferred application language. Supported languages include Bosnian, Catalan, English (UK), English (US), Spanish, French, Italian, Portuguese, and Portuguese (Brazilian).
Before switching to explanation of main options here, there will be given basic information about permissions that should be granted in order to use the Meeting web app.
Granting Necessary Permissions
Meeting web app needs permission to:
- Camera – for video communication.
- Microphone – for audio communication
- Screen Recording and Accessibility – for screen sharing and remote control
The user can enable these options as follows:
- Google Chrome by going to: Settings → Privacy and Security → Site settings → Permissions → Camera/Microphone → meeting.bicomsystems.com
- Safari by going to: Preferences → Websites → Camera/Microphone → meeting.bicomsystems.com
- Mozilla Firefox by going to: Preferences → Privacy and Security → Permissions → Camera/Microphone → meeting.bicomsystems.com
- Microsoft Edge by going to: Settings → Cookies and Site Permissions → Camera/Microphone → meeting.bicomsystems.com
If the necessary permissions for camera and/or microphone have not been granted, the user will see a dialogue box asking them to grant the permissions.
Login Information
After the user has granted all necessary permissions regarding audio and video outputs, the next step is to enter following login informations:
- Enter meeting number – number of the meeting provided to the user by the meeting organizer
- Enter your name – represents the name which will be used for a user in the meeting
- Enter Email – user’s email address
Meeting Number and Email are used for authorization purposes.
Meetings can be private or public. For private meetings, the user needs to be invited by an email to be eligible to join the meeting. For public meetings, the user does not need an invitation, and the email field can contain any valid email.
After filling in the fields with the required information, the user can also change their avatar (profile image) if desired. This can be done by clicking on the Change profile image button which allows users to upload a photo from their device. Then, the Join Meeting button should be pressed to join the meeting. Meeting data authorization will follow. If a public meeting exists, or the user is invited to a private meeting, the authorization will be successful, and the user will join the meeting. All services will be joined automatically as well.
If the authorization is unsuccessful, the user will be redirected back to the join screen, and a message will appear informing them that the join details are incorrect.
If the user is distributed a direct link to the meeting, the user will already have the meeting number filled in when accessing the page. If user was joining meeting via web app before, name, email and avatar will also be filled out.
Audio and video settings
On the right side of the screen, the user can set up their audio and video meeting settings:
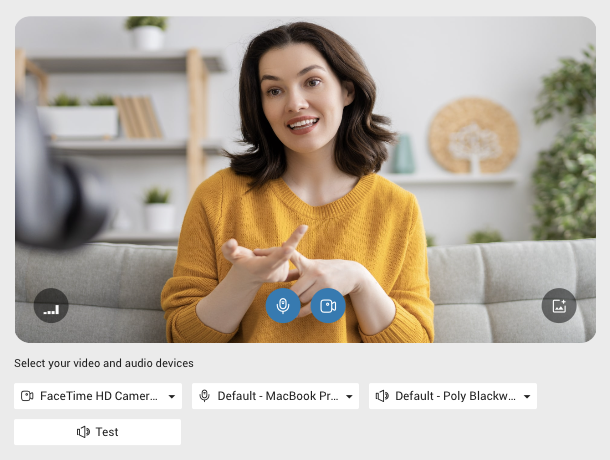
The following microphone and camera settings will be used when the user joins the meeting:
- Mute/Unmute – Enables or disables the user’s microphone.
- Enable/Disable the camera – Enables or disables the user’s camera.
Additional settings allow the user to configure devices, background effects, etc:
Selecting a video device allows the user to choose which video device will be used during the meeting. The desired device can be selected from the dropdown list.
Selecting audio output device allows the user to choose which audio output device will be used during the meeting. The desired device can be selected from the dropdown list.
Selecting audio input device allows the user to choose which audio input device will be used during the meeting. The desired device can be selected from the dropdown list.
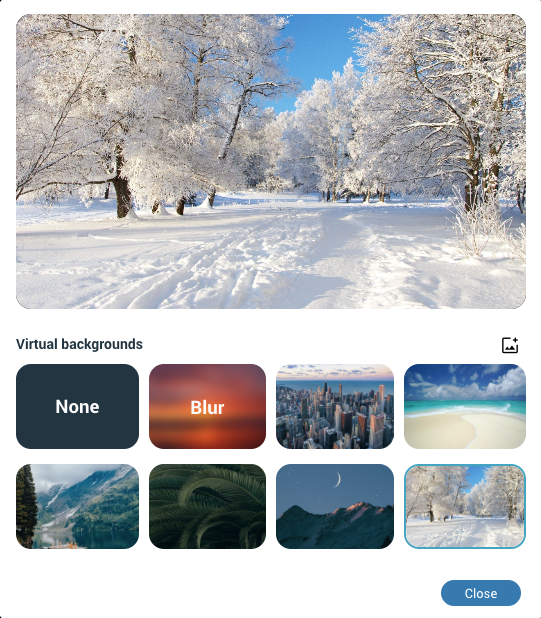
Background effects allows the user to blur or replace their background. By clicking the background effects button, a new screen will appear with various options, including uploading a custom image.
Test speaker plays a test sound to confirm that the selected audio output device is working correctly.
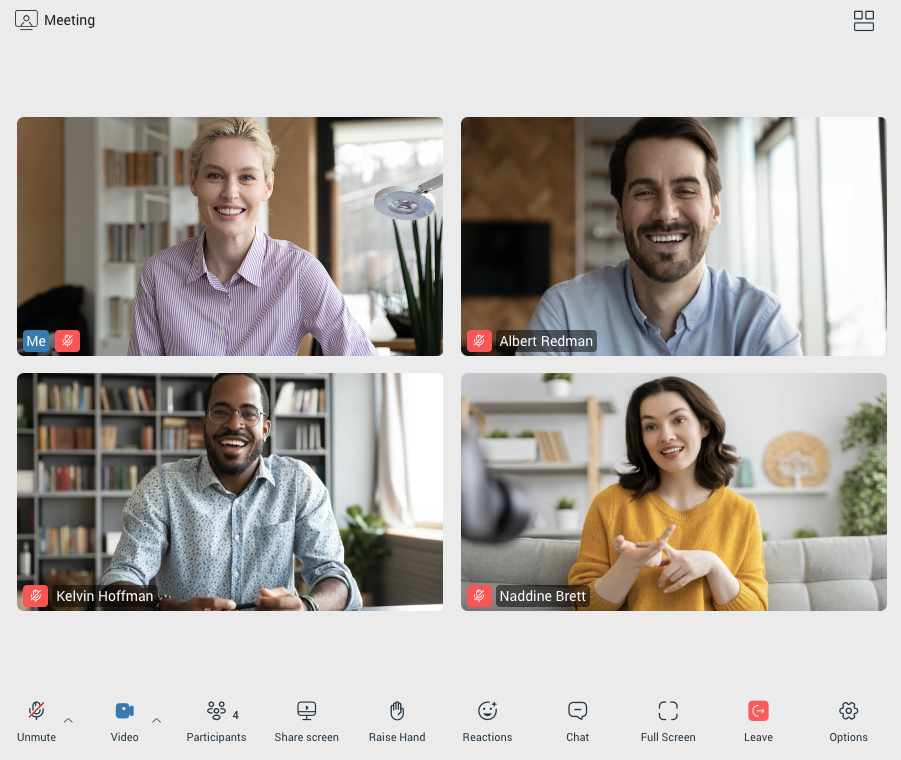
Meeting interface
Once a user has successfully joined a meeting, they will be presented with the meeting interface. The meeting interface is designed to provide an intuitive and easy-to-navigate layout, with all the essential tools and controls needed for a smooth meeting experience.
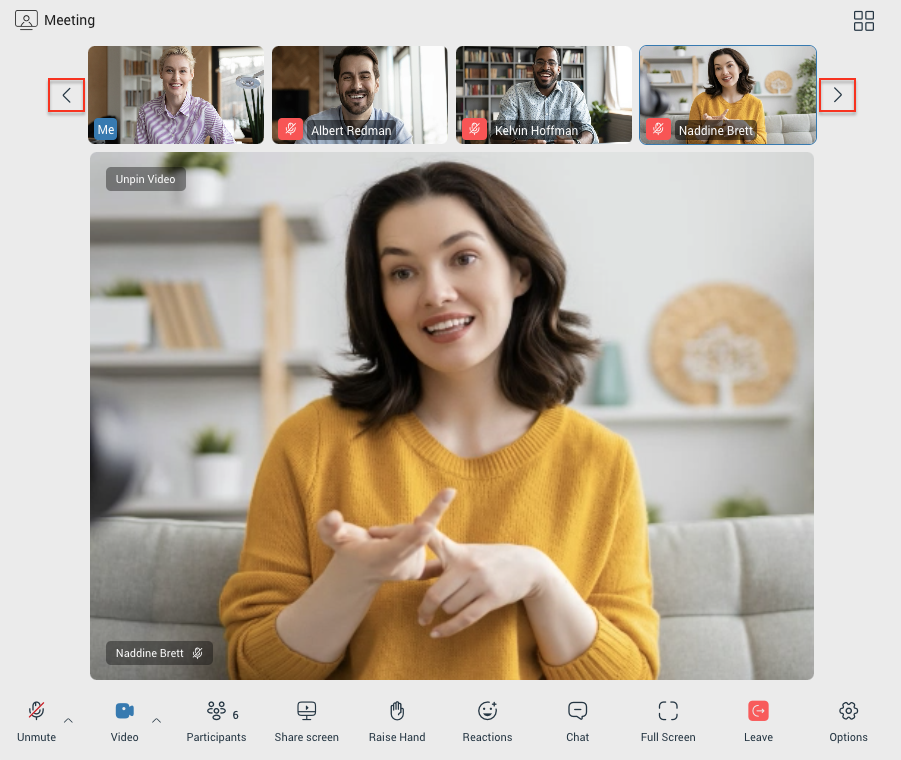
Default view when the user joins the meeting is Speaker view.
In Speaker View, the meeting interface consists of the following sections:
- Top Section: Contains the Participants Carousel, where users can see the avatars or initials of the active participants, their name and their audio status. The carousel allows quick navigation between participants.
- Main Section: Displays the Pinned Participant or Speaker, the main focus of the meeting, typically the person speaking or sharing content. This area adjusts dynamically depending on who is actively speaking or sharing their screen.
- Meeting Toolbar: Provides various controls for managing the meeting. This includes tools for muting/unmuting, camera control, chat, screen sharing, and other settings related to the meeting.

Grid/Speaker view
The user is able to change their view of the participants, they can either use the grid or speaker view. The grid view will show more participants in a grid fashion, while the speaker view will put the focus on one of the participants. The button to switch between Speaker and Grid mode is located in the upper right corner.
Pin/Unpin video
If the user is in Speaker View, they can pin a participant to make that participant’s video the primary video in the main section. By pinning, the video of the selected participant will remain visible regardless of who is speaking. To unpin, the user can simply click the unpin button, or double-click on the participant’s video in the Participants Carousel returning the main section to dynamic Speaker View.
Highlight Speaker
If a participant is talking, the user will be able to see that there is a moving icon in their participant bubble
List all video participants in grid/speaker view
List all video participants in grid or speaker view using arrows:
Me video stream is always pinned to first positon.
Grid view size
The grid view in the meeting will automatically change the number of video streams based on the number of participants in the meeting.
It follows the following conditions:
- Up to 45 participants = grid size 12 (user + 11)
- 46 – 60 participants = grid size 9 (user + 8)
- Over 60 participants = grid size 6 (user + 5)
Meeting toolbar
Default meeting toolbar (without screen sharing started) looks this way:

Mute/Unmute
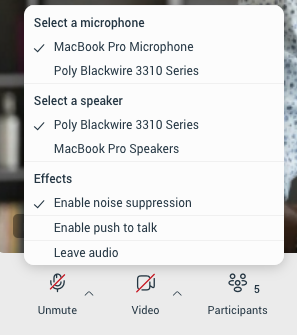
Once a participant has joined the audio of the meeting they can freely mute or unmute themself by clicking on the mute/unmute icon in the meeting toolbar. The current state (muted or unmuted) is one that is displayed in the user’s toolbar. Additionally, by clicking the up arrow next to the Mute/Unmute button, user can:
- Switch between available audio devices (e.g. microphones or speakers).
- Enable or disable noise suppression to reduce background noise.
- Enable or disable the Push-to-Talk option, allowing the participant to hold the space key to temporarily unmute.
- Leave audio, disconnecting from the meeting’s audio stream.
Video sharing
Participants can share video during the meeting if a video capturing device is connected to their computer. To enable video sharing, the participant must first allow camera permissions in their browser or operating system when prompted. Once permissions are granted, the user can enable or disable the video device during the meeting at any time by clicking on the Video icon.
Additionally, by clicking the upward-pointing arrow next to the Video icon, the user can change their video device or enable background effects, allowing them to apply a virtual background.
Participants
The user can view the list of people invited to the meeting by clicking the Participants icon in the meeting toolbar. This icon also includes an indicator showing the total number of participants currently in the meeting.
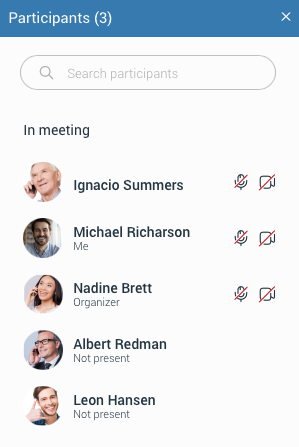
The participant list displays:
- Participants’ names
- Audio and video statuses
- Avatars
Above the participant list, there is a Search Participants input field for quickly finding specific participant.
For participants who are not present, a “Not Present” label will be displayed. Their audio and video icons will be hidden. Once a participant joins the meeting, the label disappears, and their audio and video icons appear to indicate their status.
Share screen
The user can press the Share Screen button to share their screen with the other participants in the meeting. The user will have the option to share either:
- Their entire screen
- A specific window
- A tab from their browser
To use the screen sharing feature, the user must grant screen recording permissions
When the user starts sharing:
- Other participants will see a label indicating that screen sharing is starting, along with the presenter’s name.
- The meeting toolbar updates to include Pause and Stop Sharing buttons for the presenter.
- By default, the screen-sharing preview is enabled for the presenter and can be toggled via a button in the top-right corner of the app.
- An option to Hide/Show Carousel will appear in the top-right corner of the app allowing users to toggle the carousel visibility while screen sharing is active. The default state of this option can be set in the app’s Preferences under the Meeting section.
- While screen sharing is paused, the viewers will be provided with a clear notification that the screen sharing is paused.
- Additionally, if the user shares a web browser tab, a message appears on the shared tab informing them that it is being shared. The message also includes a direct link to the meeting tab, allowing the user to quickly switch back and coordinate between tabs more easily:
Clipboard Sharing
This option is no longer available starting from Meeting Web v7.5
Google Chrome web browser
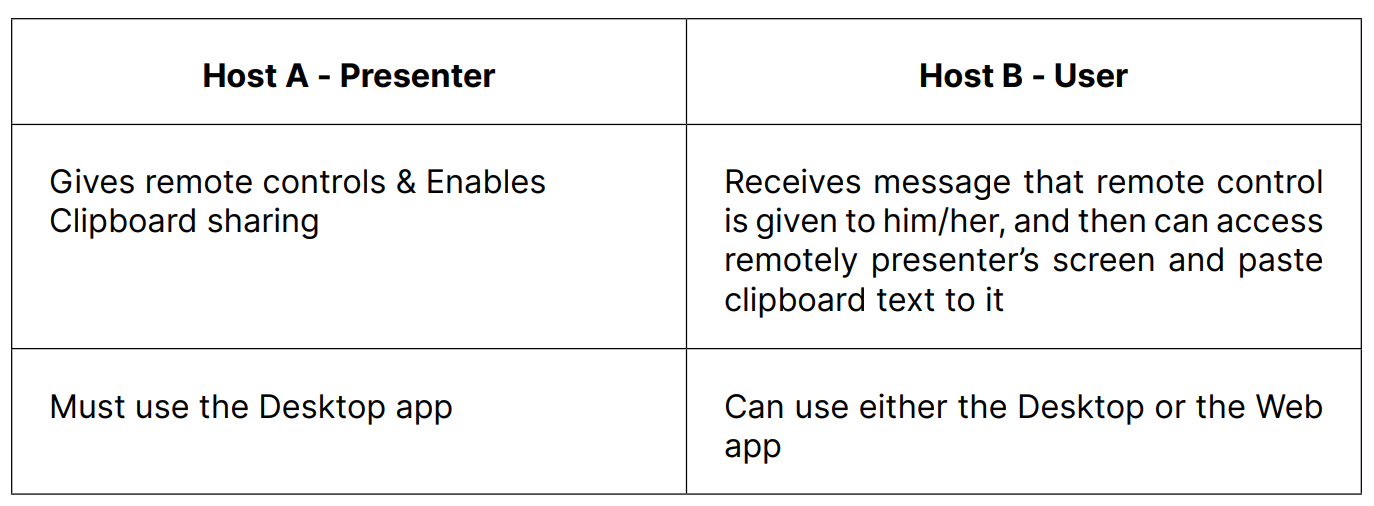
This feature allows web users to copy the current clipboard text while using remote control in a gloCOM meeting and paste it on the remote-controlled host. Clipboard sharing is available in screen-sharing mode and can be enabled or disabled only from the desktop application, but it can be used from both desktop and web applications.

To enable this option, the presenter on the desktop application should grant remote control and enable clipboard sharing for web users. Afterward, the web user will receive a notification that remote control is enabled. The web user can then copy text to their clipboard and paste it on the presenter’s side using the remote control.
When using this option in a web browser for the first time, the user will be asked to grant the necessary permissions.

Safari web browser
The Safari web browser handles clipboard sharing differently when pasting to a remotely controlled host.
In Safari, the user needs to first copy some text to the clipboard. Then, the user should open the Options menu in the Meeting main tab and press “Send clipboard text.” After this, the Paste pop-up button will appear (see the screenshots below). The user should press this button and then paste the clipboard text to the remotely controlled host.
Please note that this option is only visible on Safari when both remote control and clipboard sharing are granted by the presenter.


Firefox web browser
The Firefox web browser does not support clipboard sharing.
Note: The presenter using the web application cannot grant remote control or enable clipboard sharing for web or desktop users. In other words, it is not possible to take control of someone’s computer or access their clipboard if they are participating in the meeting via the web app. Only presenters using the desktop app can grant remote control and enable clipboard sharing for web and desktop users.
Raise Hand
The Raise Hand provides a simple way for participants to get the speaker’s attention without interrupting or disrupting the meeting. Users can access this option from the main Meeting toolbar. Upon clicking the Raise Hand icon in the toolbar, a confirmation popup will appear, requiring the user to confirm their action by clicking on the popup icon.
When participants raise their hands:
- A Raised Hand icon appears in the upper left corner of their video stream on the Meeting screen (visible in both carousel and grid views).
- Their names are added to a separate Raised Hand list, displayed above the Participant List. This list shows raised hands in chronological order.
- Organizers and Co-organizers can lower a participant’s raised hand by clicking the Raised Hand icon next to their name in the Raised Hand list.
Reactions
In-meeting reactions allows users to visually express themselves during the meeting by using a variety of emoticons like laughing, celebrate, applause and more.
Users can access reactions by clicking the Reactions icon in the main Meeting toolbar, which opens a menu of available emoticons. When a reaction is selected, an animated icon floats upward from the left side of the screen, with the sender’s name displayed below it.
Users can show/hide reactions from others by selecting the Show/Hide Reactions option under the Options button in the main Meeting toolbar. Reactions are enabled by default.
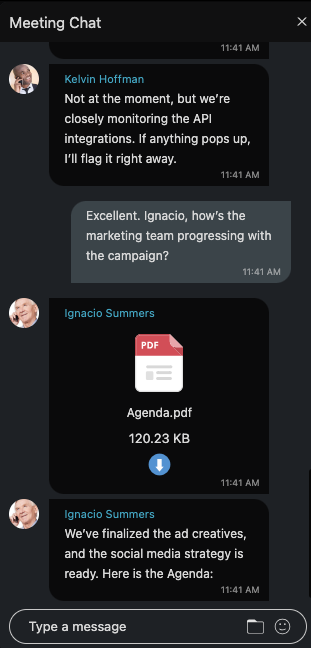
Chat
The in-meeting Chat enables users to send and receive real-time messages with other participants. In addition to text, users can share files and include emojis to enhance their communication.
The chat supports previews for common image formats, such as PNG, SVG, JPG, and others. For unsupported image formats, like ICO, a generic image icon is displayed, while non-image files are represented by a file icon. Users can click on any file within the chat, and the file will be downloaded to their device.
Incoming messages in the chat window will display the sender’s name, avatar (if available), and the time the message was sent, providing clear context for every message.
A visual indicator on the Chat button in the control bar alerts users about unread messages. This indicator only appears when the chat sidebar is closed, ensuring users are notified even if they aren’t actively viewing the chat.
Fullscreen
The Fullscreen option in the meeting control bar allows users to toggle fullscreen mode during a meeting. This ensures a flexible viewivng experience, enchaning focus when needed while allowing users to return to the default interface seamlessly.
Leave
Clicking Leave will prompt the user to confirm their departure from the meeting. Once confirmed, the user will be removed from the meeting.
When a user joins a meeting as an organizer or co-organizer from the web app and clicks the Leave button in the meeting toolbar, they are presented with a dialog asking whether they want to:
- Leave: Allows the user to exit the meeting without ending it for others.
- End: Ends the meeting for all participants and closes the session. (This option is only available to organizers and co-organizers.)
- Cancel: Closes the dialg box and returns user to the meeting.
Options
Clicking the Options button in the meeting toolbar opens the options menu.
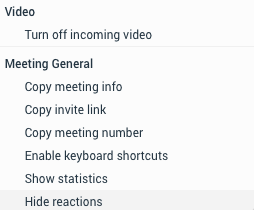
Turn off Incoming Video
This option disables all active video streams from other participants.
Copy Meeting Info
Copies the meeting details to the clipboard, including:
- Subject: The meeting subject.
- Time: The scheduled time of the meeting, including the time zone.
- Join Meeting Link: A URL to join the meeting.
- Meeting Number: The unique identifier for the meeting.
- Dial: Additional information for joining the meeting via phone (if applicable).
Copy Invite Link
Copies the meeting join link to the user’s clipboard.
Copy Meeting Number
Copies the meeting number to the clipboard.
Enable Keyboard Shortcuts
Users can enable keyboard shortcuts by selecting this option under the Options menu. Once enabled, shortcuts will be displayed when hovering over buttons in the control bar.
Alt + A: Mute/Unmute microphone
Alt + V: Turn camera on/off
Alt + U: Toggle participants list on/off
Ctrl + Alt + H: Raise/Lower hand
Alt + H: Toggle chat on/off
MacOS Note: Use the Option key instead of Alt
Shortcuts only work when the meeting screen is in focus.
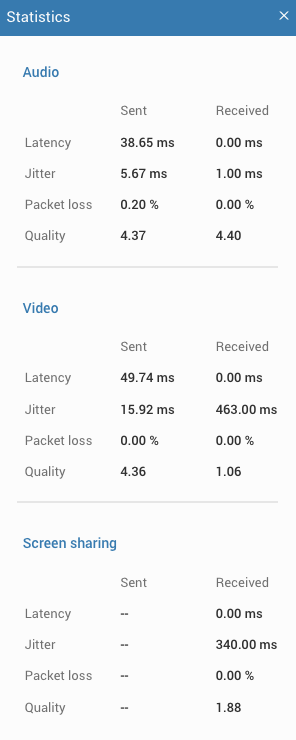
Statistics
Displays the network connection quality.
Hide/Show reactions
Hides/Shows reactions from other participants. By default, reactions are enabled.
Multiple meeting co-organizers
Meetings can include multiple Co-organizers. When Co-organizers join via the web app, they will have a “Co-organizer” tag displayed in the participant list. They are granted special permissions, such as the ability to lower the raised hands of other participants and to end the meeting.
Bad internet connection indicator
If the user’s internet connection is poor to the point where it affects the audio and video quality of the joined Meeting, the following notification will be displayed in the upper left corner of the meeting screen:

Pre-expiry notification
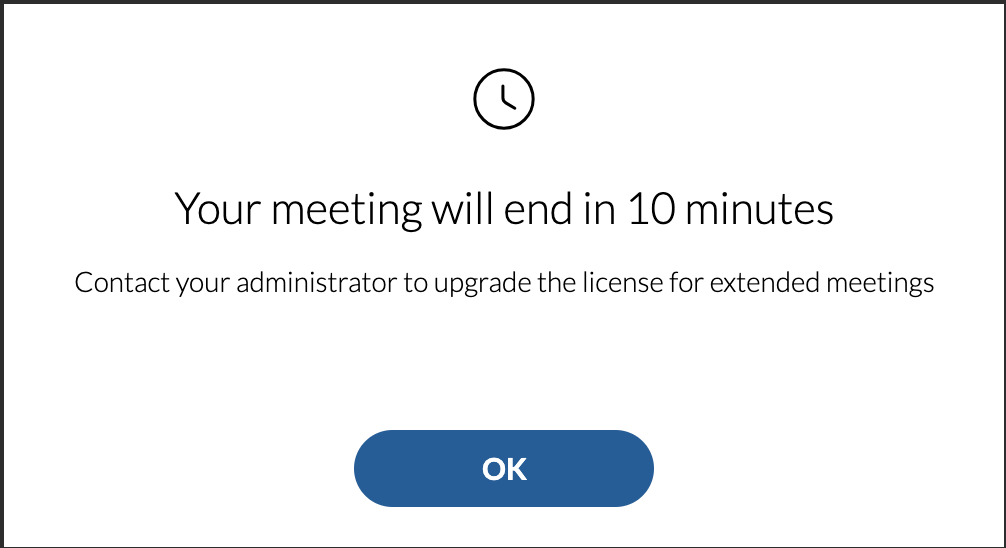
Pre-expiry notification is a feature designed to automatically send a notification to all meeting participants ten minutes before the end of the maximum meeting duration based on the type of license/package. This notification serves as a gentle reminder that the meeting is approaching its conclusion. If the message is not closed, it will automatically count down the time until the end of the meeting. Also, if someone joins the meeting less than ten minutes before the end, they will get a message with the exact time remaining for that meeting.
Note: This message appears only on the Meeting screen!
But, if a web user participant allows notifications in the web browser for the Meeting site, they can get a banner notification message in the upper right corner indicating that the Meeting will end in 10 minutes. After that, the user can switch to the Meeting screen and see the original message. This way, the user does not have to be on the main meeting tab to be informed about the end of the meeting. They can be on another web browser, doing something else on their machine and even have the Meeting web browser tab minimized, etc.