Dialer
Dialer allows lists of data to be loaded into a database. The application will then run and dial these numbers based on the algorithm or settings entered by the Admin. The Agent’s interface of the Dialer displays Agents with specified information on each call. The data is customizable through the Admin login page.
Campaigns
The dialer is managed through Campaigns.
Every Campaign has lists of Leads and associated Agents (members). The Campaign is in charge of dialing Leads and connecting them with Agents and other types of Destinations. Same as in Queue, the Admin has a lot of possibilities to choose how the Campaign will perform dialing and bridging.
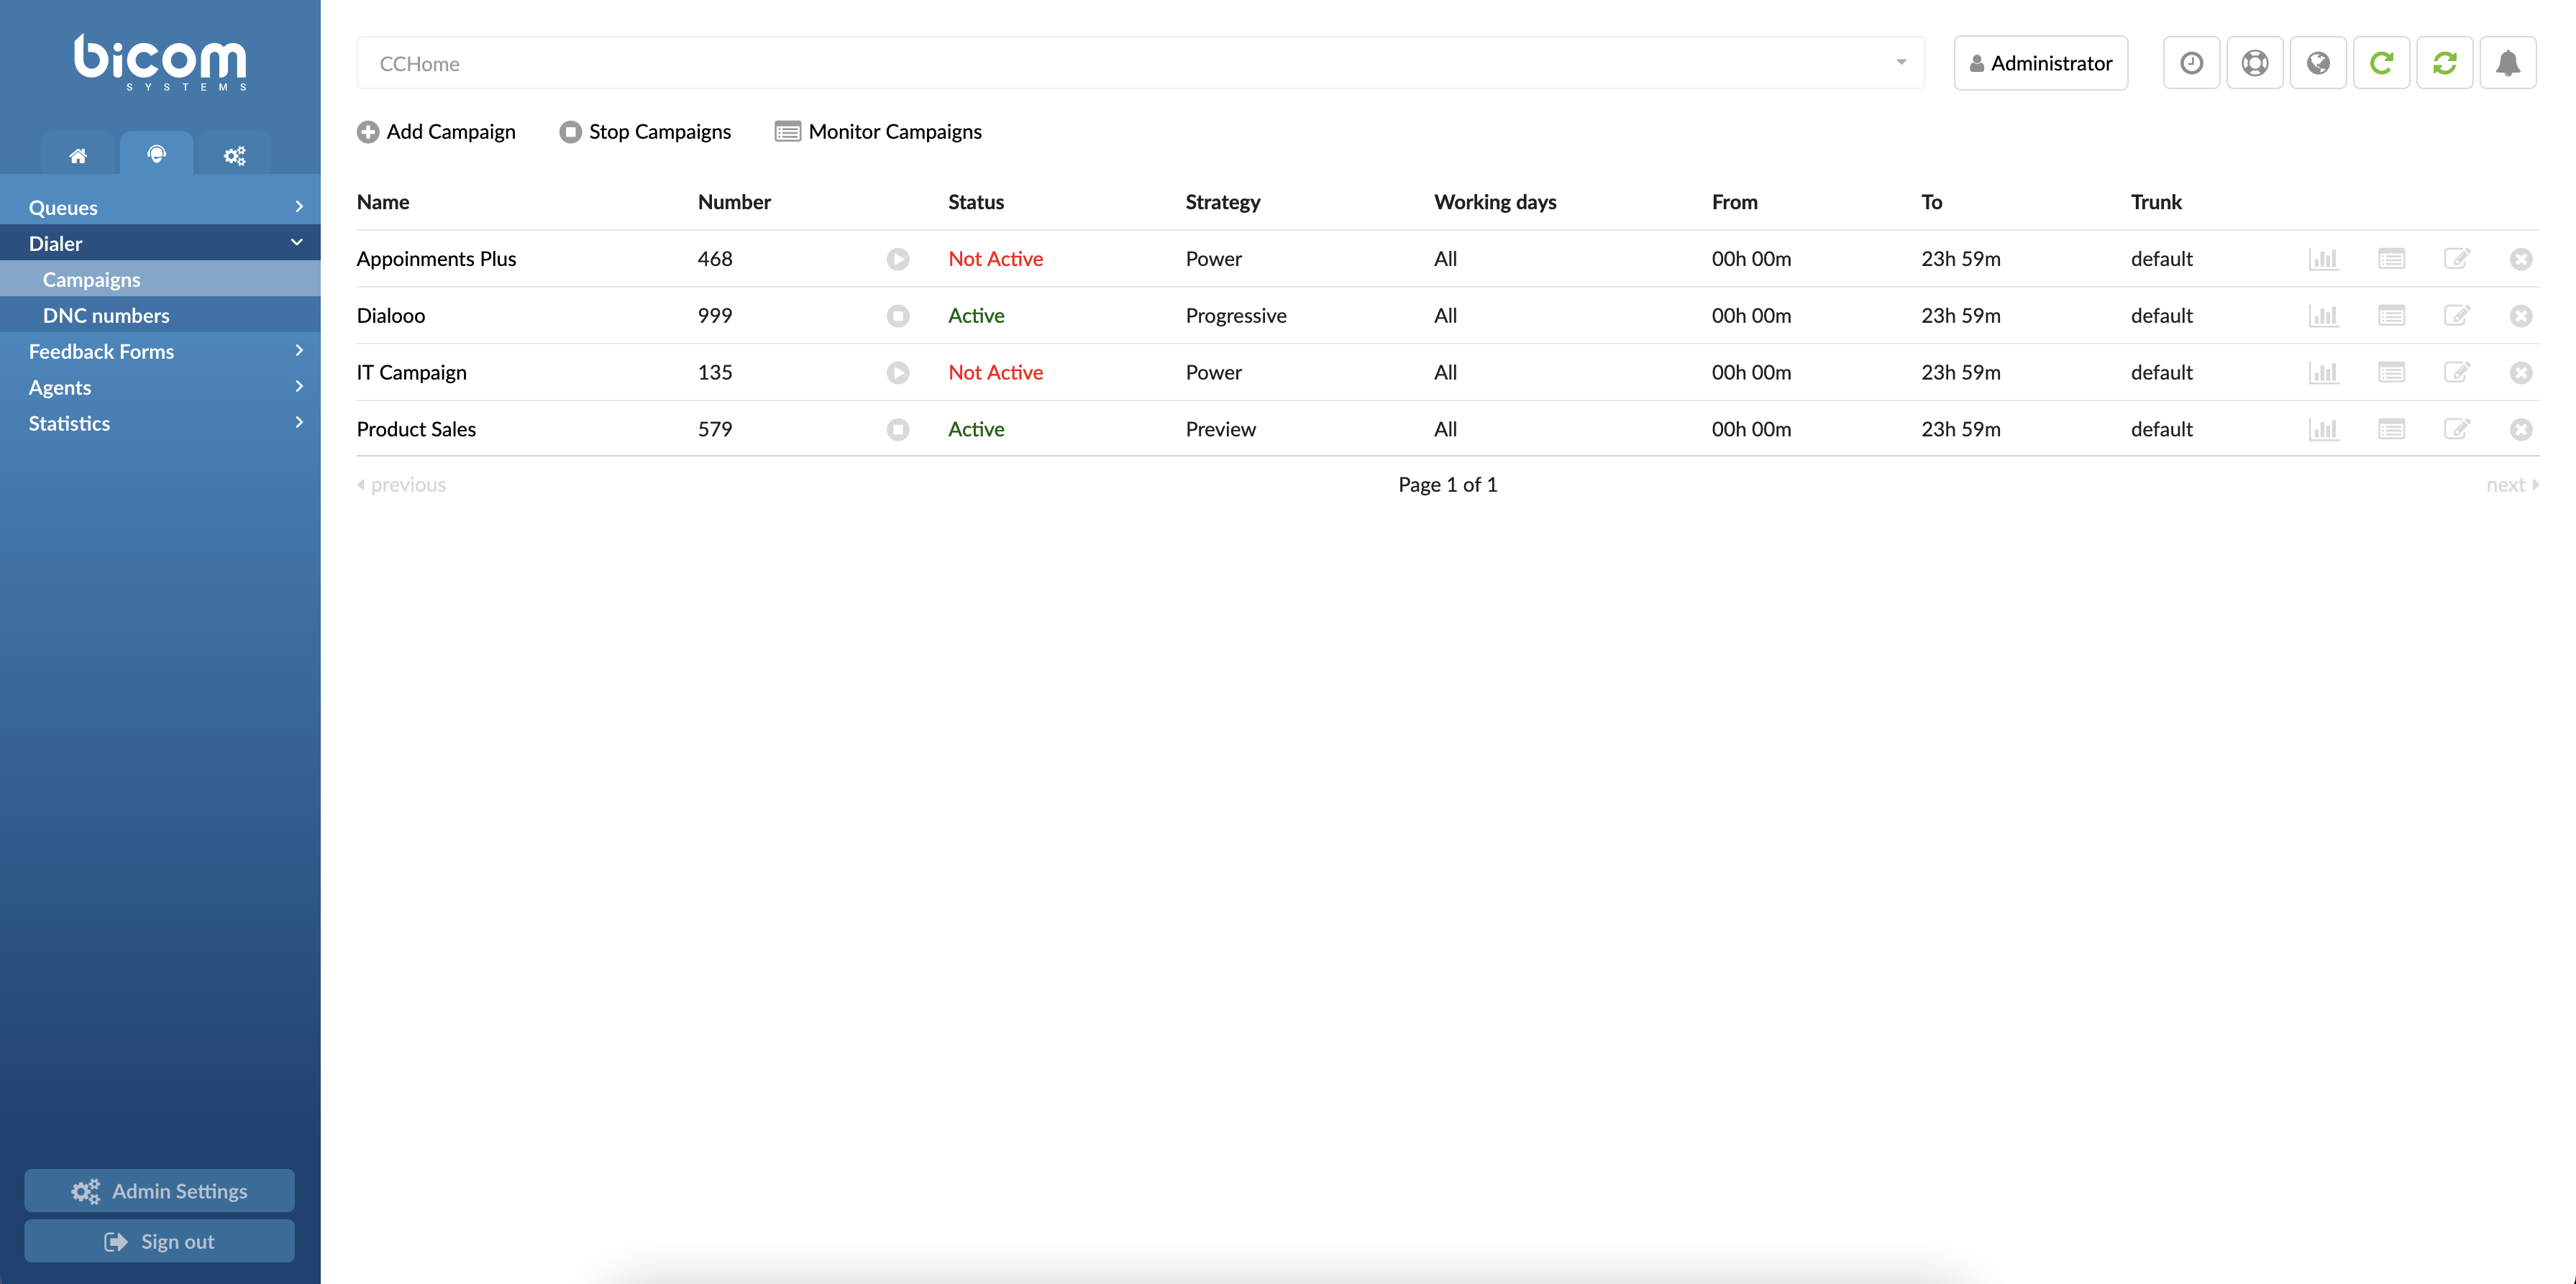
By selecting Campaigns from the left menu, the page will show all the Campaigns. Users can, from here, Add, Edit, and Delete Campaigns. The page contains the following information:
- Name
The name of a Campaign.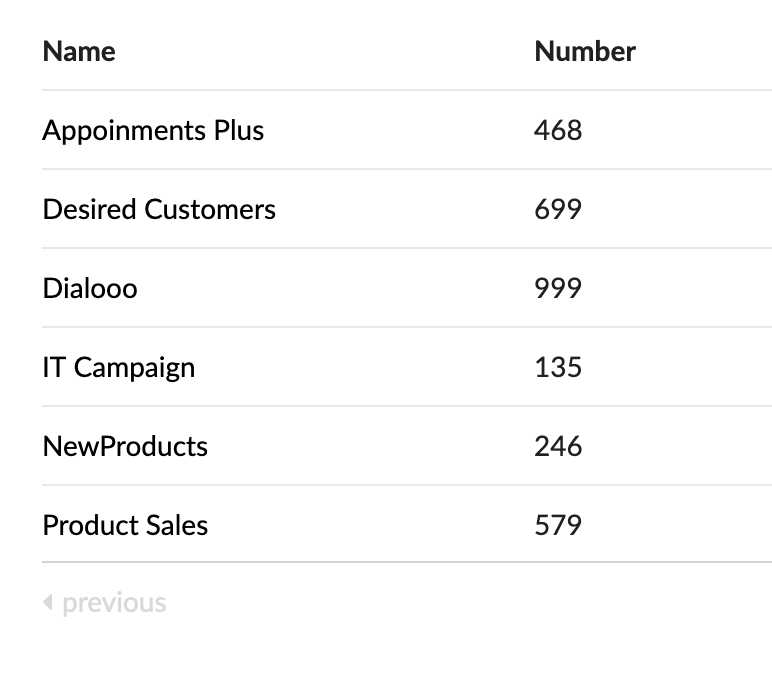
(E.g., Appointments Plus)
(Display)
- Number
The number of a Campaign.
Status – Icon
(E.g., 246)
(Display)
- Status
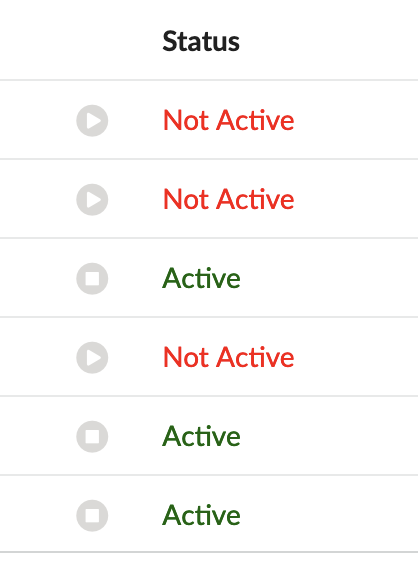
The field is affected by starting or stopping a Campaign. To start or stop the specific Campaign, a user has to click the ‘Start/Stop’ icon on the left side of the ‘Status’ column. (Please refer to the screenshot.) Once the button is clicked, the ‘Status’ changes accordingly to Active or Not Active. Active means that the current Campaign is running and is ready to serve Agents with Leads.
(E.g., Active)
(Display)
- Strategy
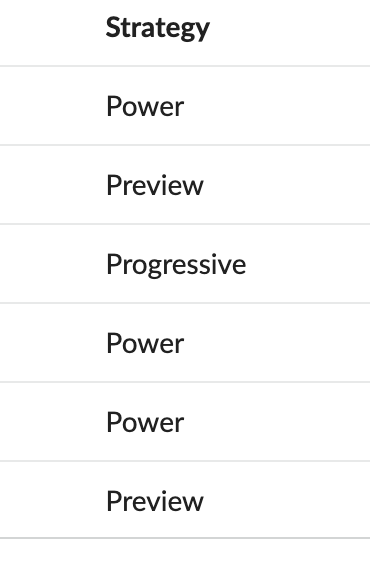
The current Strategy used by a Campaign.
(E.g., Preview)
(Display)
- Working days, From, To
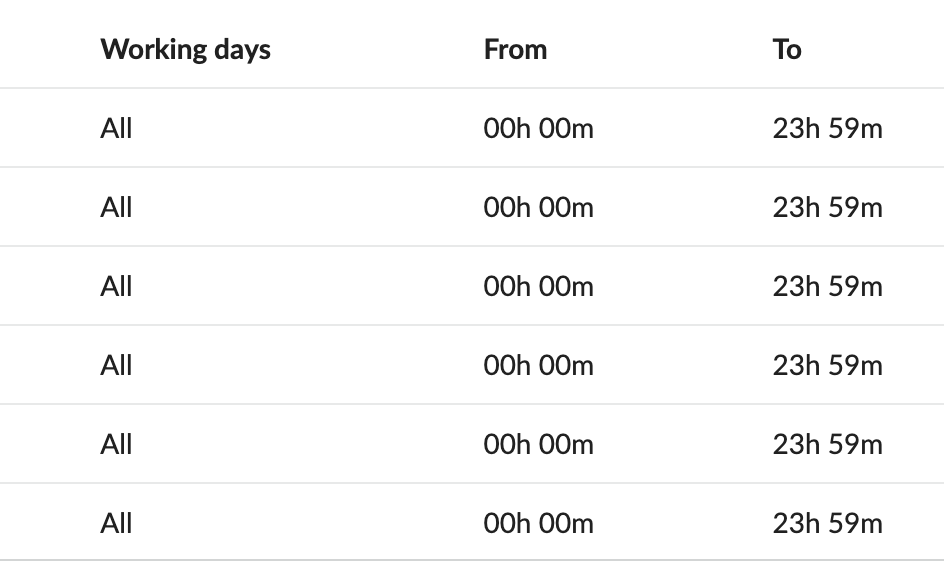
Describes the Operation Times of a Campaign.
(E.g., All, 00h 00m, 23h 59m)
(Display)
- Trunk
The trunk that a Campaign is using.
(E.g., default)
(Display)
Monitor Campaign Lists
This page gives customers an overview of data regarding the current Campaign. The page is refreshed every 5 minutes by default.
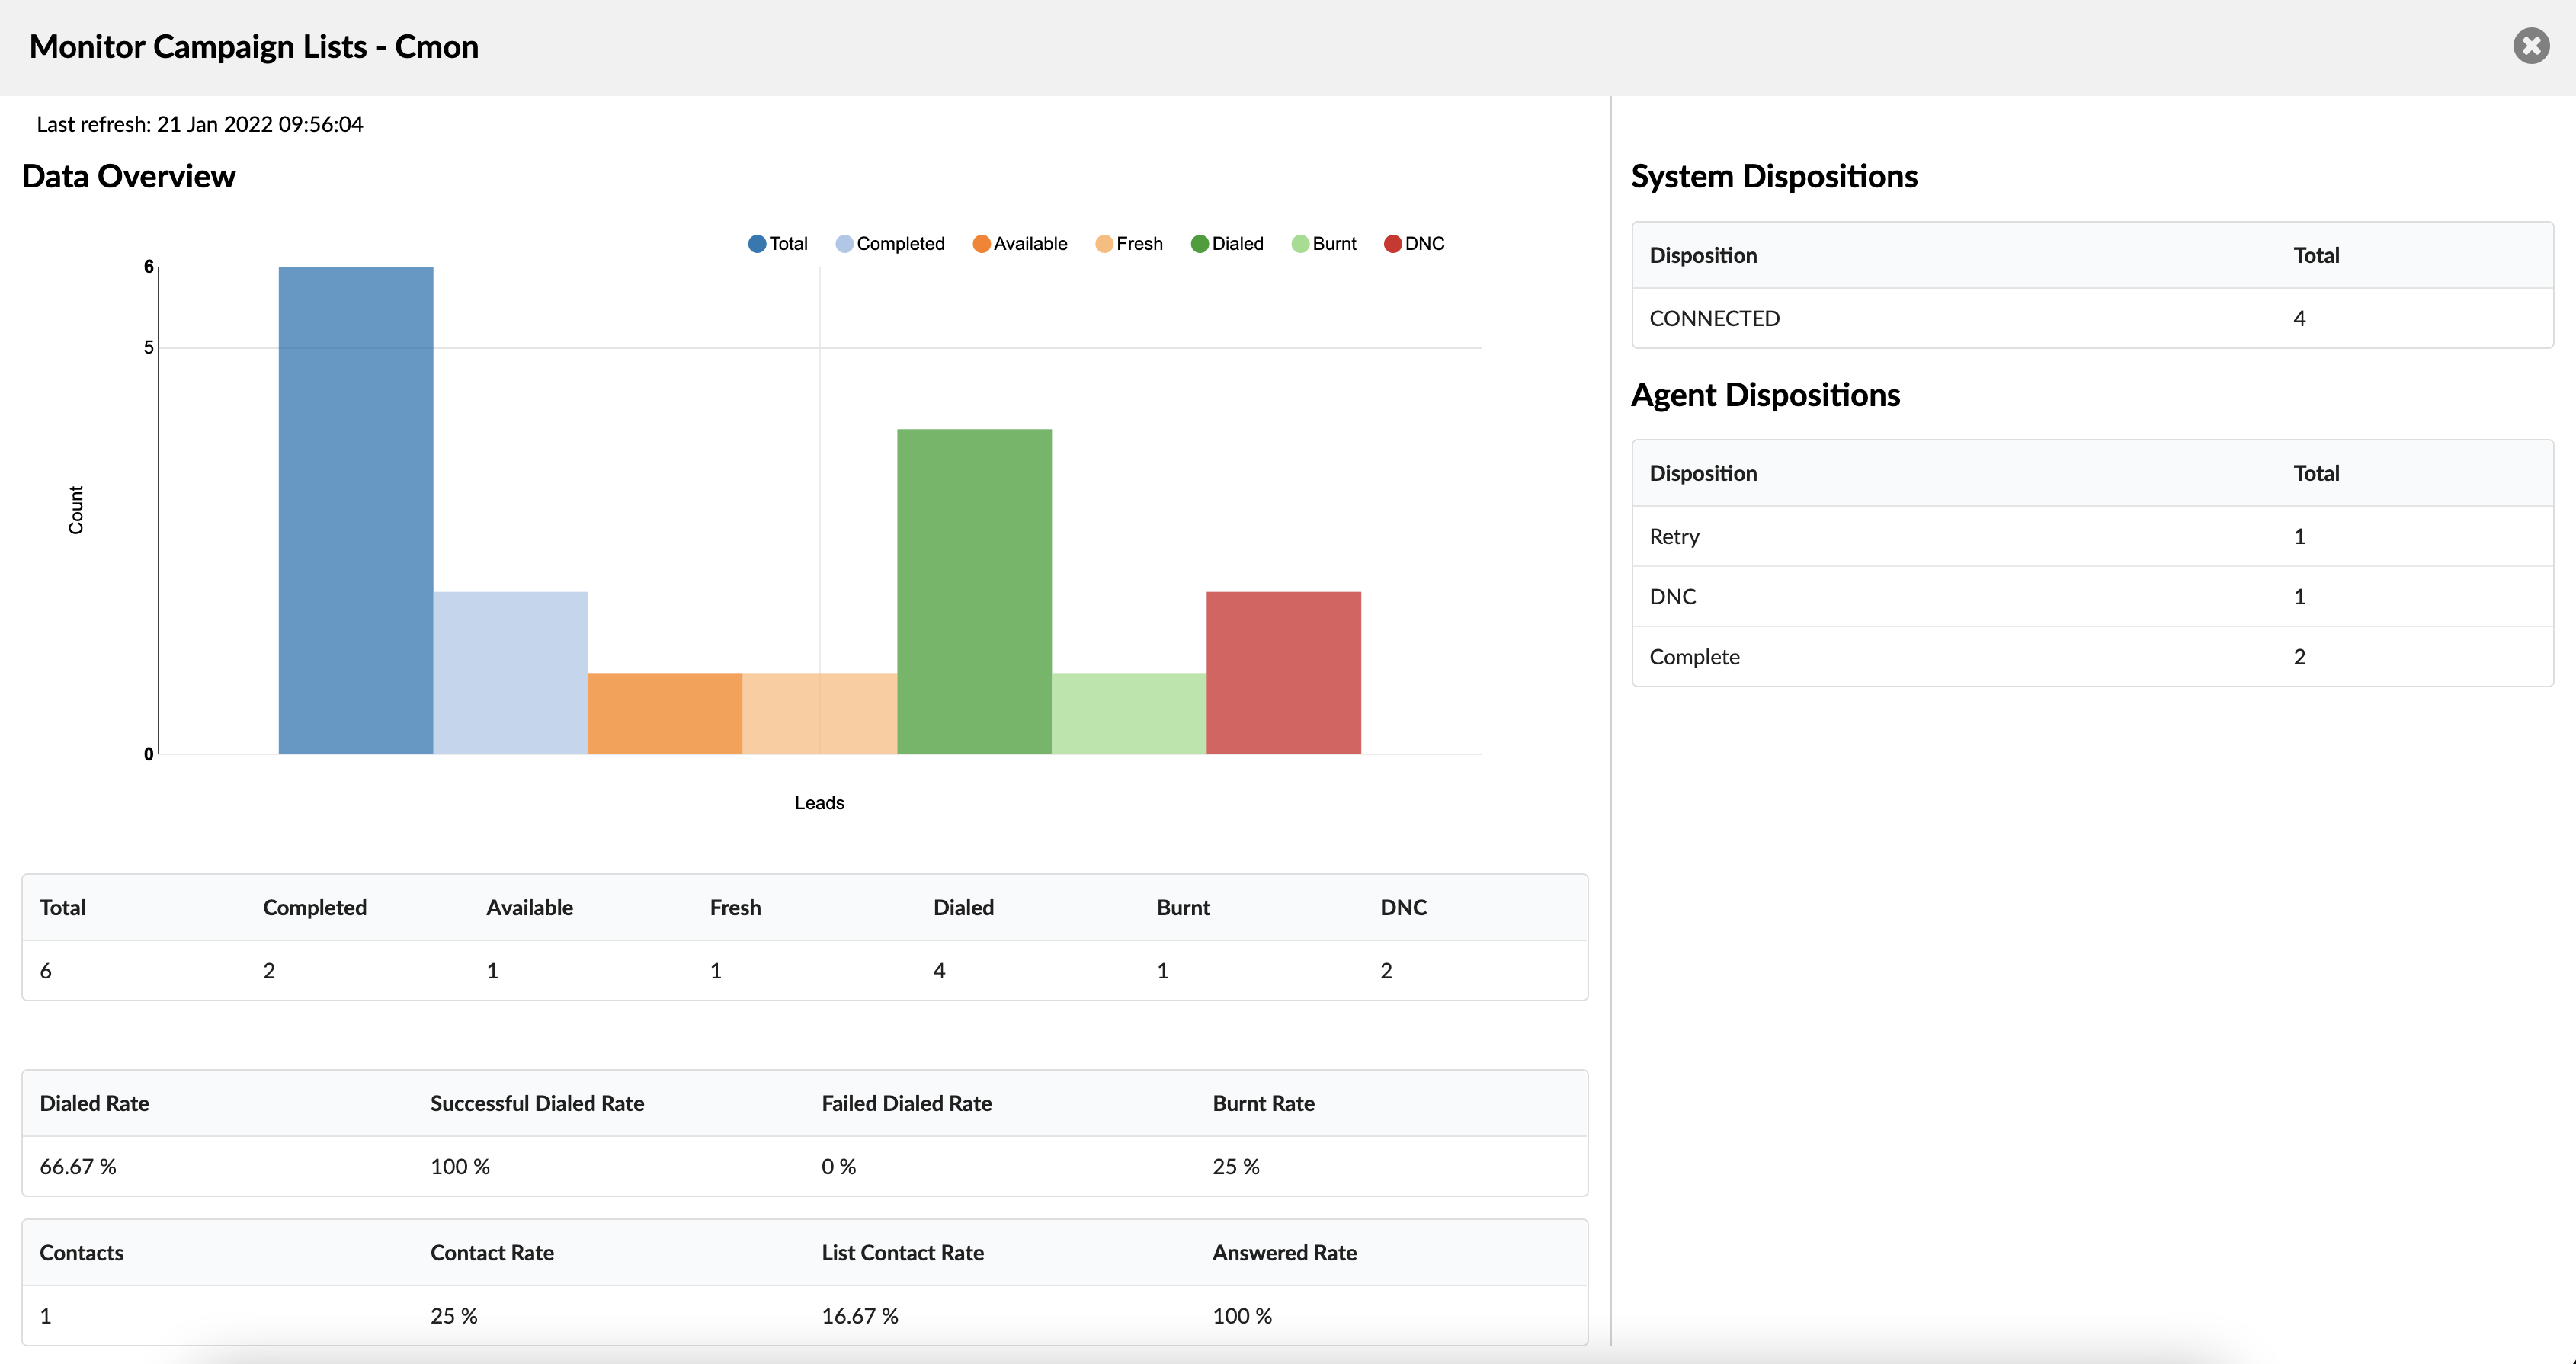
Monitor Campaign Lists
- Total
Displays total numbers in CSV files.
(E.g., If one campaign has multiple CSVs files, it shows total numbers in all CSVs.)
(Display)
NOTE: This applies to all activated CSVs.
- Completed
Displays the number of calls that were selected as disposition ‘Completed’.
(E.g., 2)
(Display)
- Available
Displays the number of still available records for the Dialer to dial.
(E.g., 1)
(Display)
- Fresh
Displays the number of records that were never dialed.
(E.g., 2)
(Display)
- Dialed
Displays the number of records that were dialed by the Dialer.
(E.g., 4)
(Display)
- Burnt
Displays the number of members that were dialed a maximum number of retries.
(E.g., 26)
(Display)
NOTE: Please note that burnt numbers will not be called again by the Dialer.
- DNC
Displays the total count of numbers that were added as DNC numbers.
(E.g., 16)
(Display)
NOTE: DNC stands for ‘Do Not Call’.
- Contacts
Displays the number of calls displelled with a disposition with CONTACT = “Yes”.
(E.g., 5)
(Display)
- Contact Rate
Displays the percentage of CONTACTS = yes divided by the number of dialed records.
(E.g., 38.46%)
(Display)
- List Contact Rate
Displays the percentage of CONTACTS = yes divided by the number of total records.
(E.g., 17.86%)
(Display)
- Answered Rate
Displays the percentage of answered calls (Answered calls/dialed).
(E.g., 53.85%)
(Display)
- System Dispositions
The ‘System Dispositions’ section shows the Statistics overview of Leads marked in different Dispositions from the system.
- Agent Dispositions
The ‘Agent Dispositions’ section shows the Statistics overview of Leads marked in different Dispositions from Agents.
Monitor Campaign
This page provides Real-Time Campaign Monitoring.
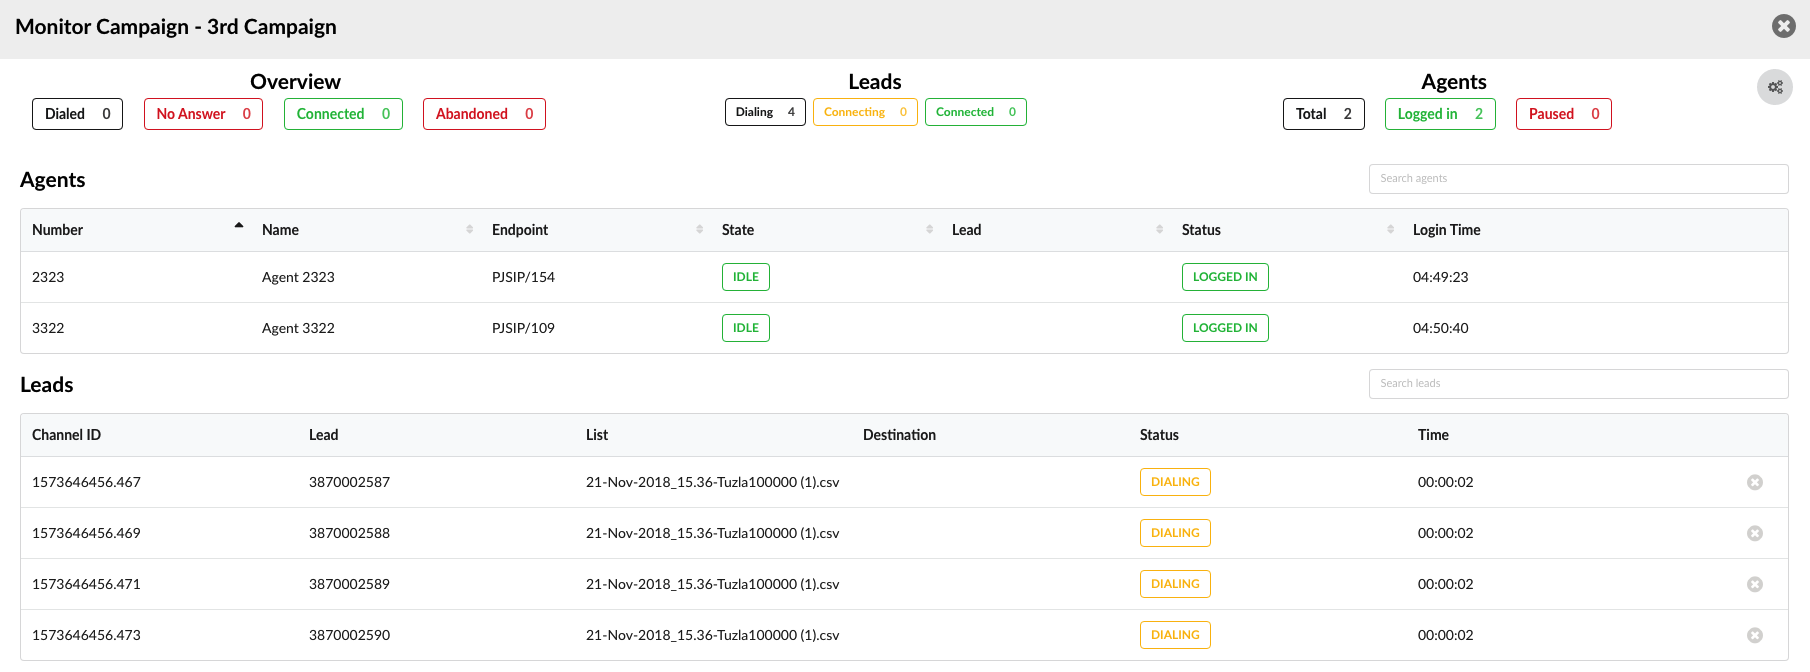
Monitor Campaign
- Overview
Statistical data for the current day. Users can see how many Leads are dialed, connected, abandoned, or unanswered.
NOTE: This data is refreshed every 10 seconds by default.
- Leads
Real-time data on active Leads. Users can see how many Leads are currently in the dialing, connecting, or connected state. The table gives detailed information about each active Lead.
- Agents
Real-time data on active Agents. Users can see how many Agents are currently logged in or paused. The table gives detailed information about each active Agent.
Monitor Campaigns
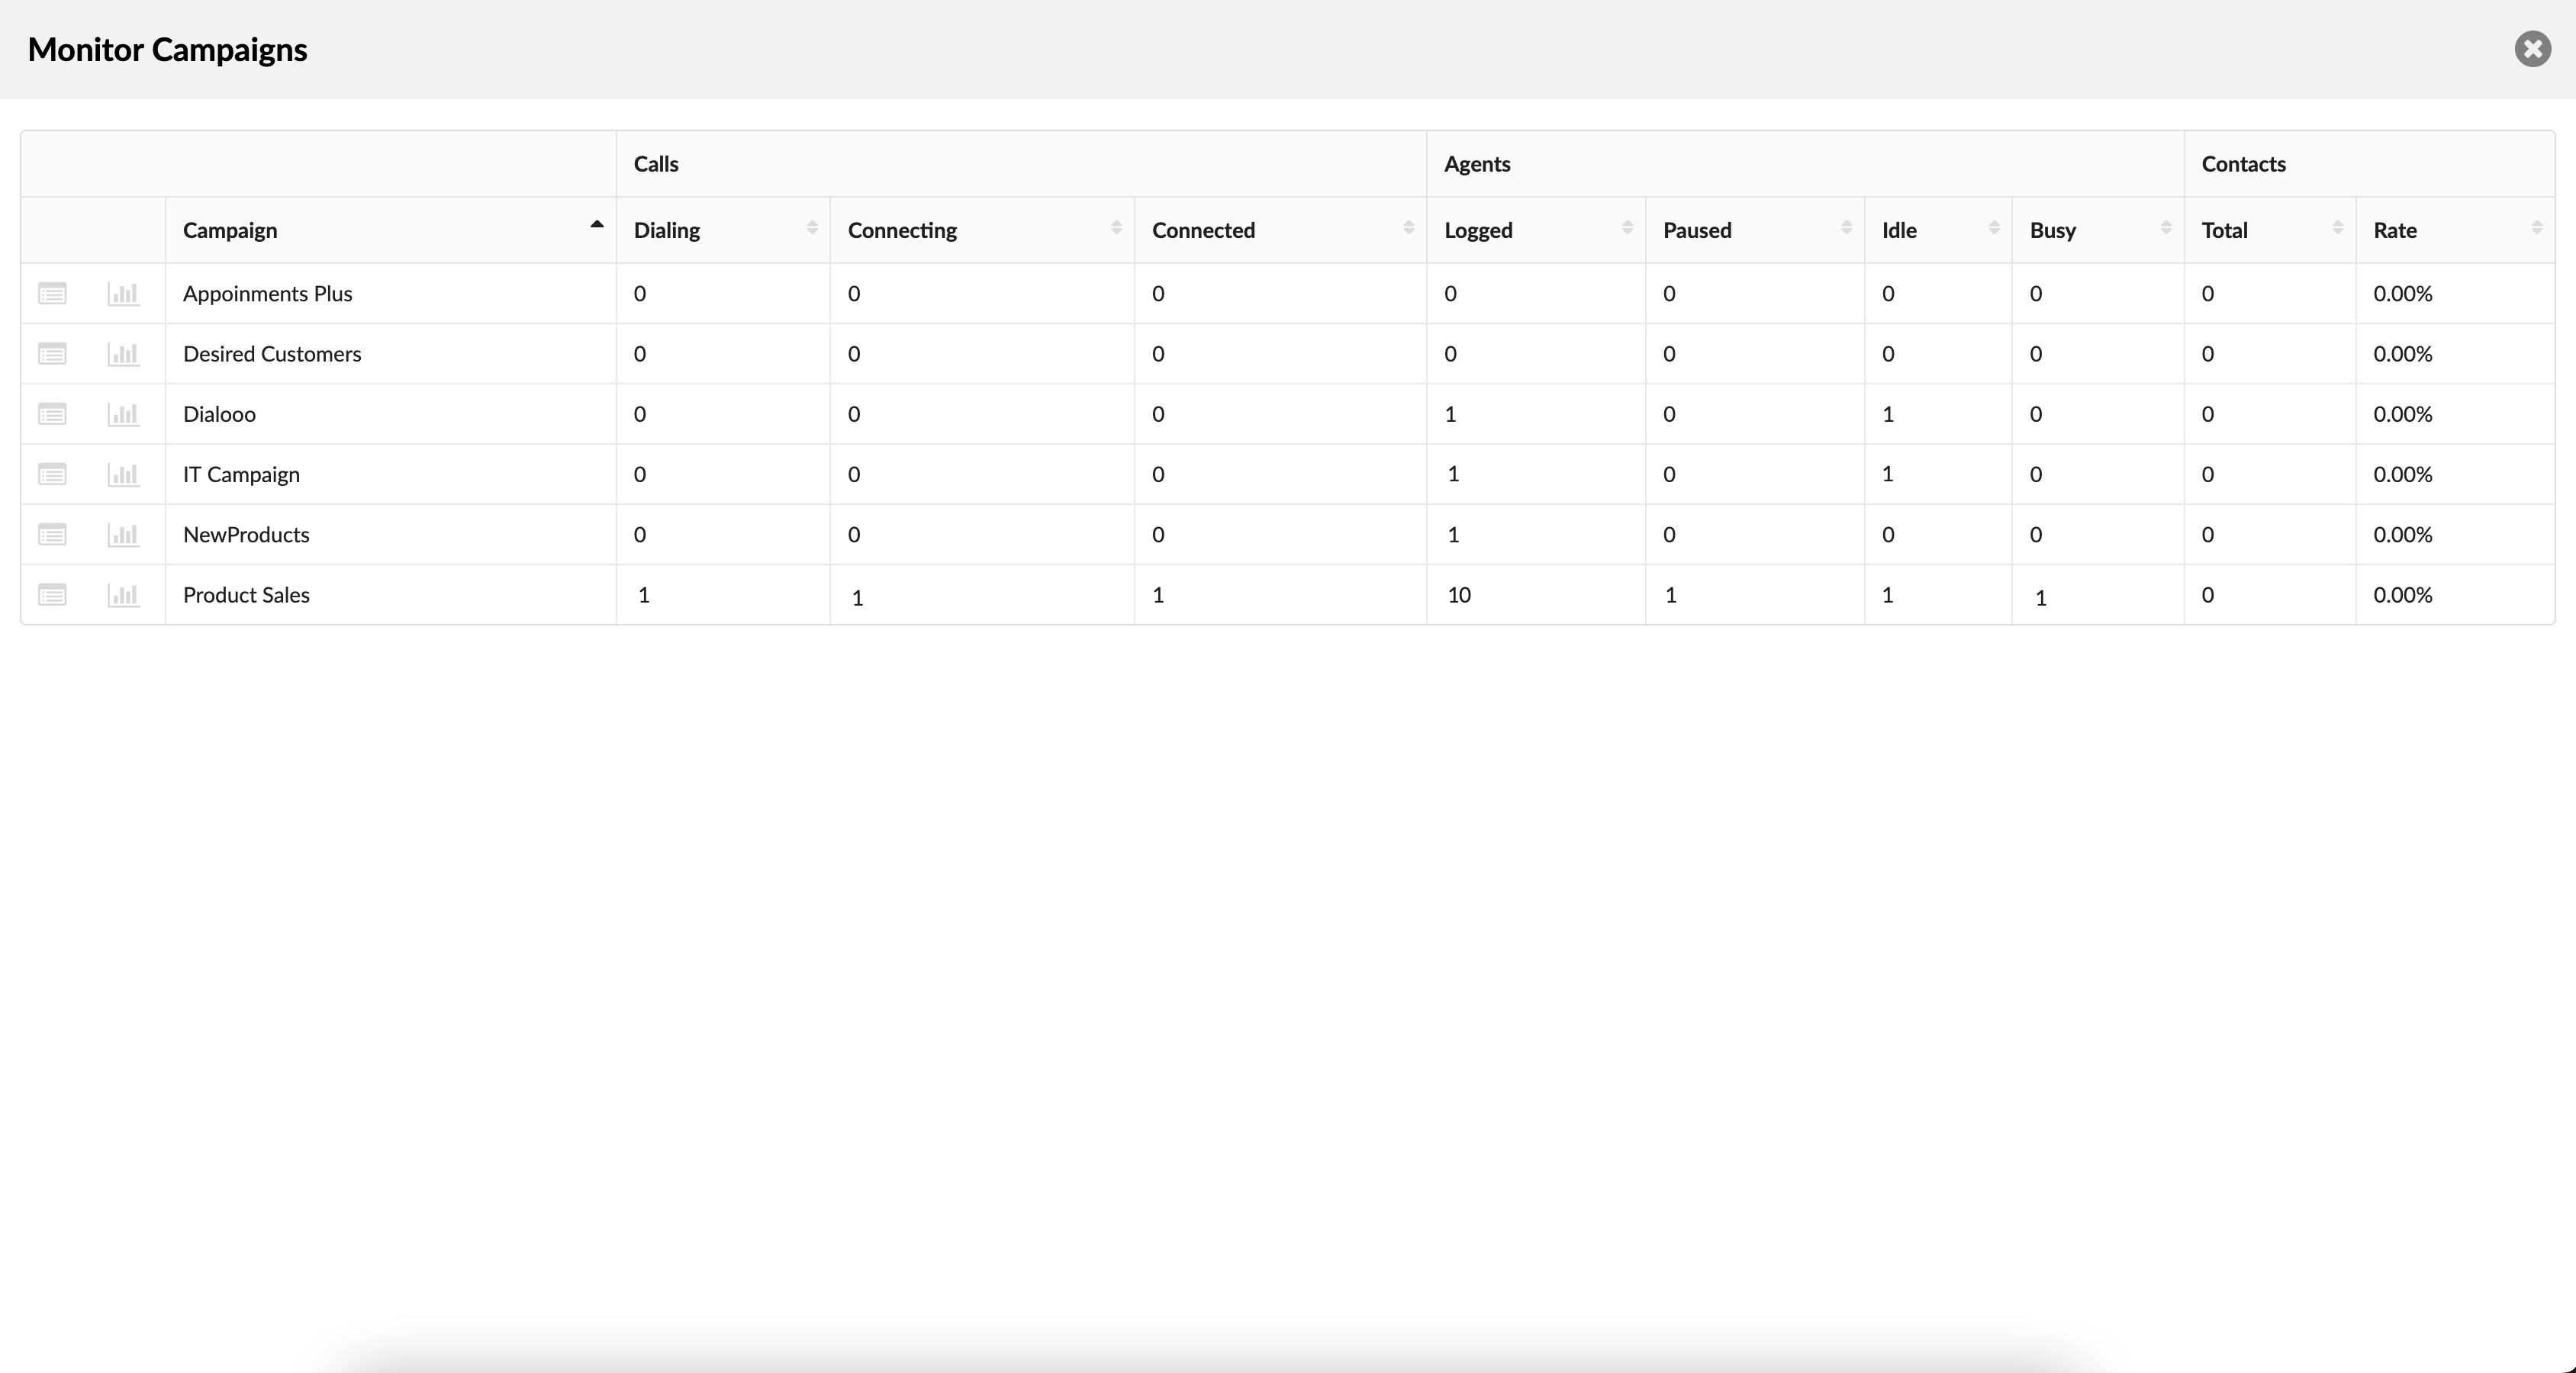
Once users click the ‘Monitor Campaigns’ button, they will be prompted to a different page that provides detailed information gathered while monitoring Campaigns. It can enable users to access information regarding all Campaigns found on the system. The overview of data will allow for a more straightforward monitoring process and provide better insight into the status of Calls, Agents, and Contacts regarding Campaigns, respectively.
Calls
The Calls section shows all details regarding the calling procedure.
- Dialing
This represents the number of calls being dialed at the moment. If the ringing is successful and a call is in progress, it will be immediately moved to the ‘Connected’ row.
(E.g., 1)
(Display)
- Connecting
The number of calls connecting.
(E.g., 1)
(Display)
- Connected
The number of successfully connected calls.
(E.g., 2)
(Display)
Agents
The Agents section refers to the status of Agents and how many of them are logged in to the system or currently on pause.
- Logged
Number of Agents logged in to the system.
(E.g., 2)
(Display)
- Paused
Number of Agents on pause.
(E.g., 0)
(Display)
- Idle
Number of Agents with the ‘Idle’ status. These Agents are taking no action now but are not on pause.
(E.g., 0)
(Display)
- Busy
The Number of busy Agents who are currently on a call.
(E.g., 2)
(Display)
Contacts
The Contacts section consists of the two following columns.
- Total
The number of contacts reached.
(E.g., 0)
(Display)
- Rate
Refers to the percentage of workload that has been done in Campaigns respectively, so that it enables users to compare the workload of Campaigns on the system.
(E.g., 20.3%)
(Display)
Edit & Delete Campaigns
 Edits the Campaign configuration.
(E.g., Click to edit a Campaign configuration)
(Button)
 Deletes a Campaign from the system.
(E.g., Click to delete a Campaign from the system)
(Button)
Stop Campaigns

Once clicked, all Campaigns listed are stopped.
(E.g., Click the button to stop all Campaigns.)
(Button)
Add Campaign
After pressing the ‘Add Campaign’ button, users will be prompted to the page where they can edit the Campaign.
(E.g., Click the button to add the Campaign.)
(Button)
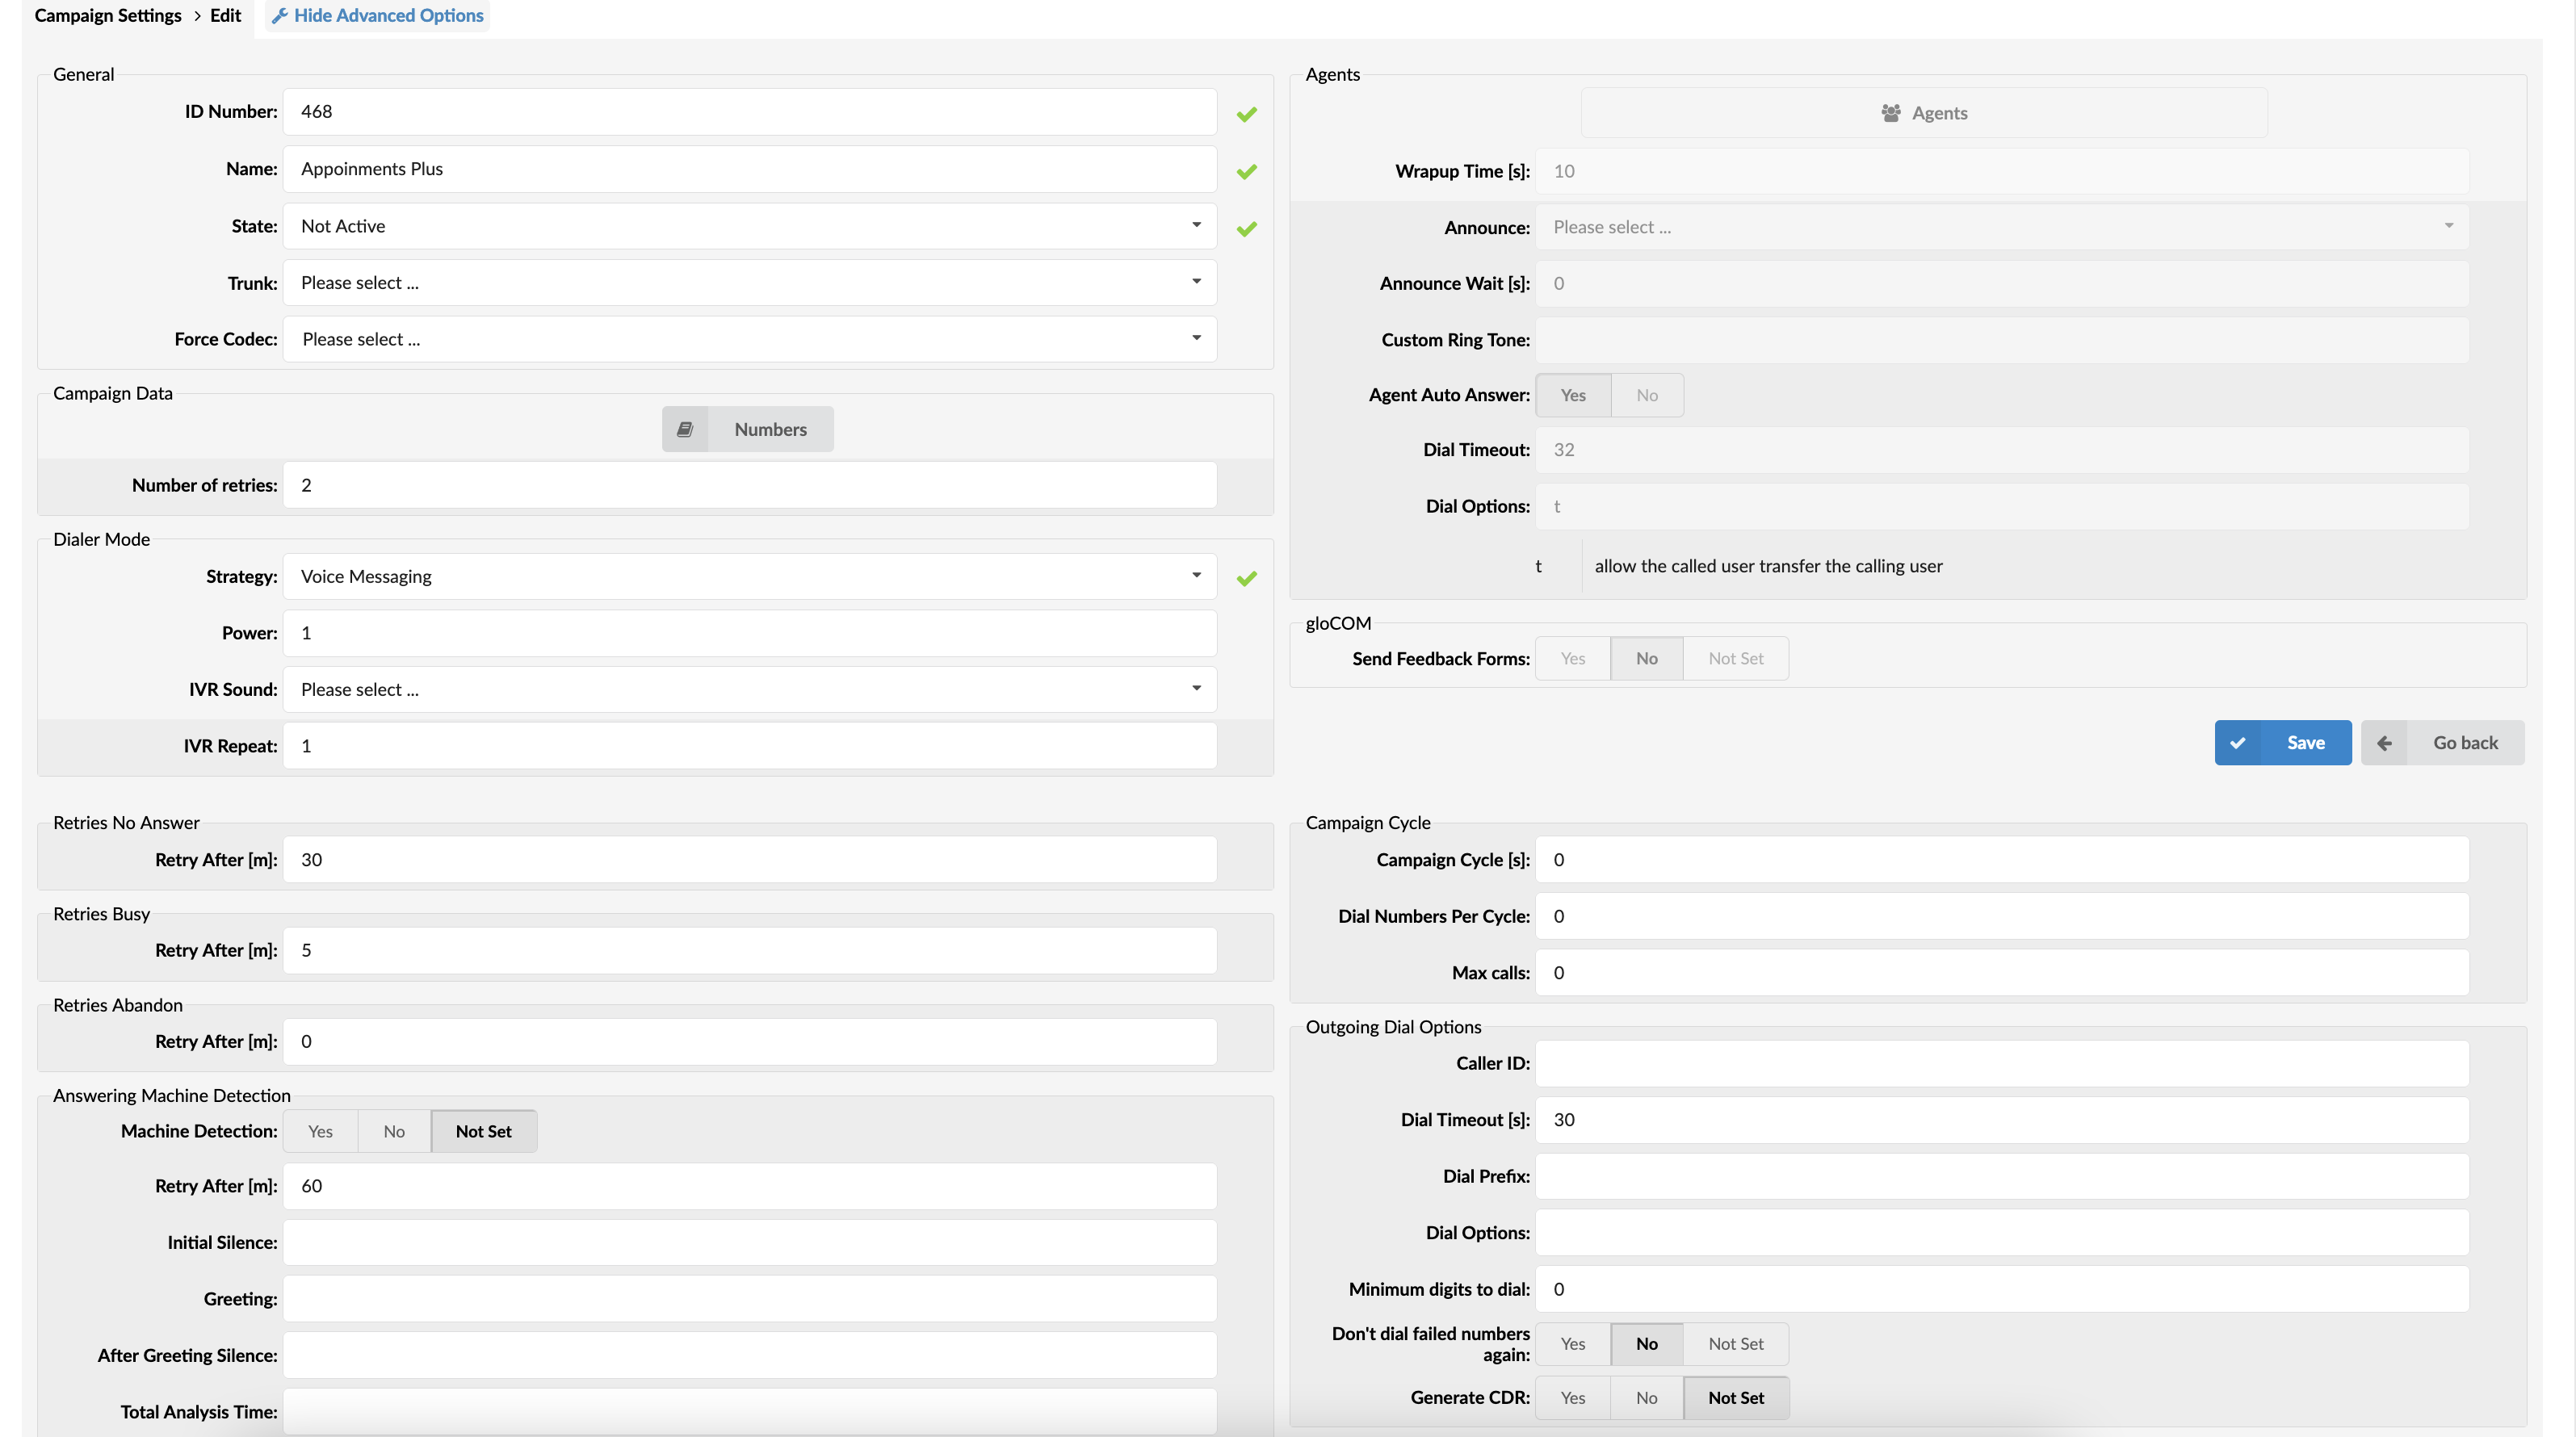
General
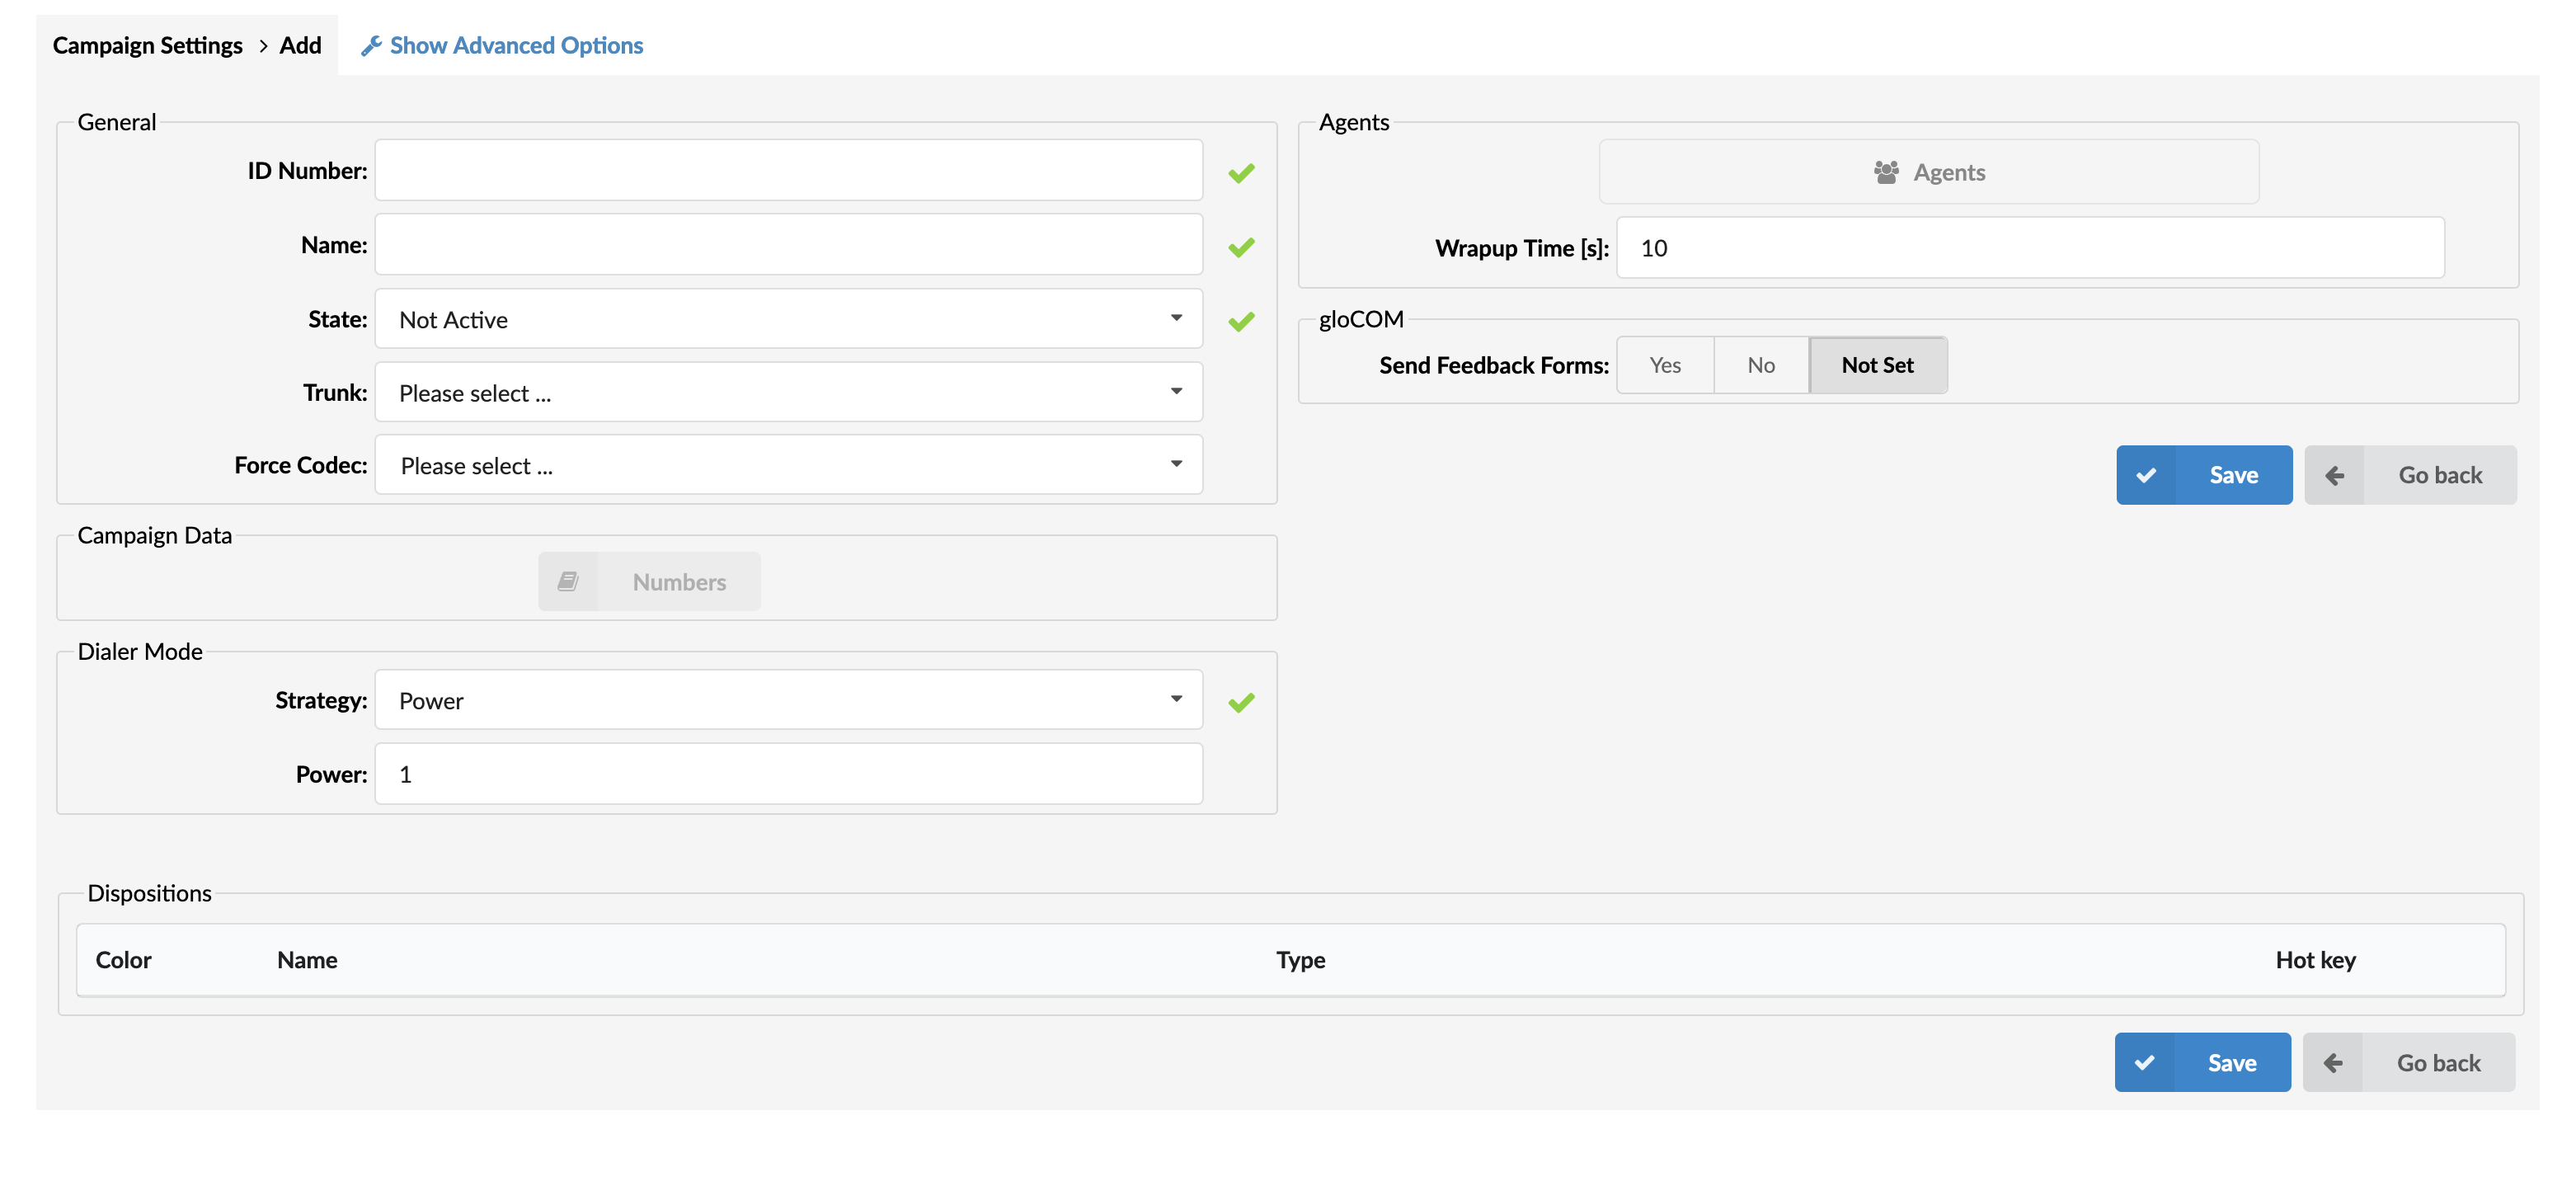
Add Campaign
- ID Number
This field represents the Campaign ID in a numerical form.
(E.g., 100)
([0-9])
- Name
Name of the Campaign. The name should describe the Campaign in a few words.
(E.g., Sales Campaign)
([a-z])
- State
Clicking the drop-down menu prompts users to change the Campaign’s state.
(E.g., Changing the ‘State’ from Active to Not Active will stop or start the Campaign.)
- Trunk
A Campaign can be forced to use only one Trunk. If nothing is specified, it will use other available Trunks.
(E.g., Click the drop-down to choose the Trunk to be forced on this Campaign.)
- Force codec
A specific codec can be chosen to be forced on the Campaign.
(E.g., Choose a codec to be forced on the Campaign from the drop-down menu.)
- Recording
This option is used for recording calls. It is only used with strategies that use Agents as Destinations.
(Option buttons)
Campaign Data

Campaign Data
- Numbers
Numbers to be dialed under this Campaign.
(E.g., Click the ‘Numbers’ button and be prompted to a different page where a CSV file can be uploaded.)
(Button)
NOTE: All fields will be wrapped with quotes in the CSV file when downloaded.
Advanced Options
The Agents section contains additional options. They are visible once “Show Advanced Options” is clicked.
Dialer Mode
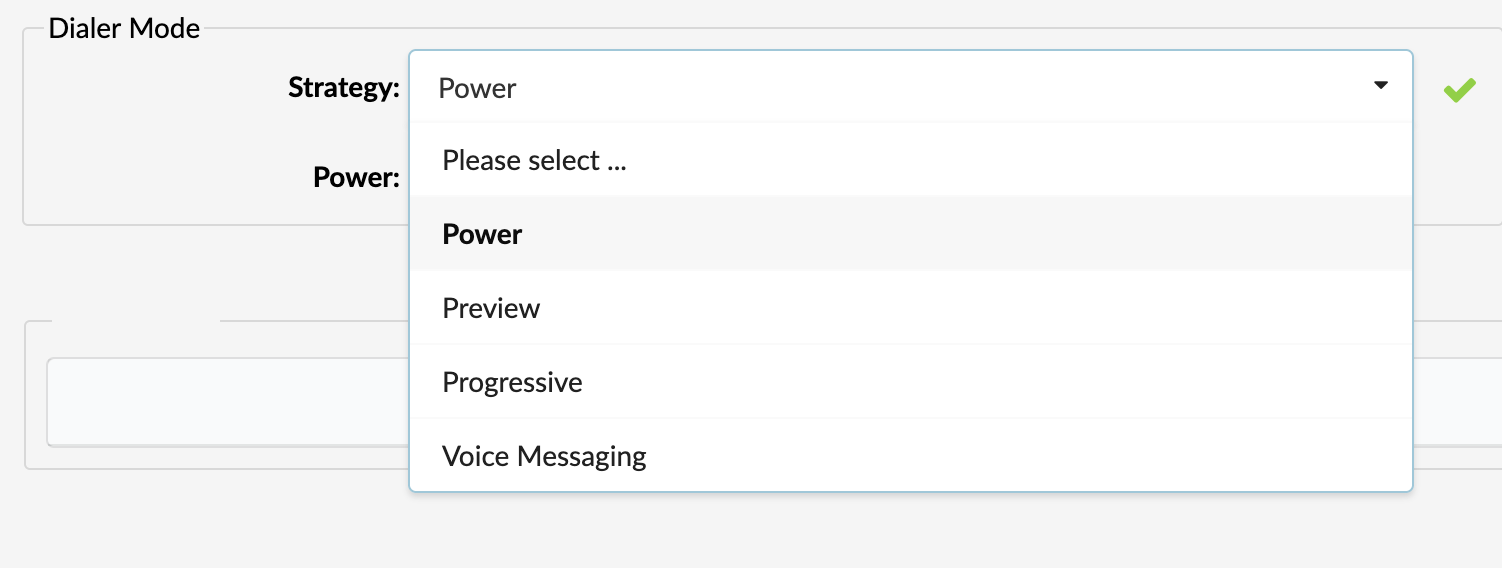
Campaigns can have different strategies.
Click the drop-down menu to select one from the four currently supported strategies:
- Power Strategy
- Preview Strategy
- Progressive Strategy
- Voice Messaging Strategy
Additionally, Campaign follows restrictions like calls per second and max calls. So, users can have ten leads dialed in one cycle. Also, if users define the number of max calls, the Campaign will not dial Leads until the number of active calls is smaller than the number of max calls.
Power Strategy

- Power
Represents the number of Leads to dial for each Agent.
When using the Power strategy, the Campaign dials Leads based on Idle Agents multiplied by the power number.
It works as follows:
1. The Campaign fetches Leads based on power.
2. The Campaign dials ‘Leads’ for each Agent x power.
3. The Agents are placed in the pool.
4. First, the Lead who answers will be connected to one of the Agents, and others will be dropped.
Preview strategy

This strategy allows an Agent to preview some details about Leads before s(he) decides to dial them. An Agent can fetch the next Lead from Campaign lists, and once s(he) chooses to make a call, the Dial button should be pressed. After it is pressed, Dialer will try to connect the Agent with the Lead.
For this strategy to be applied, gloCOM Client is needed.
Progressive strategy

This strategy works the same way as the Preview strategy, with the only difference being that the Agent has a certain timeout in which s(he) must perform a dial. If the Agent does not perform dial inside the desired time frame, the system will automatically dial the number.
- Preview Timeout [s]
Denotes how long the system will take before it automatically dials the Lead for the Agent.
Voice Messaging strategy
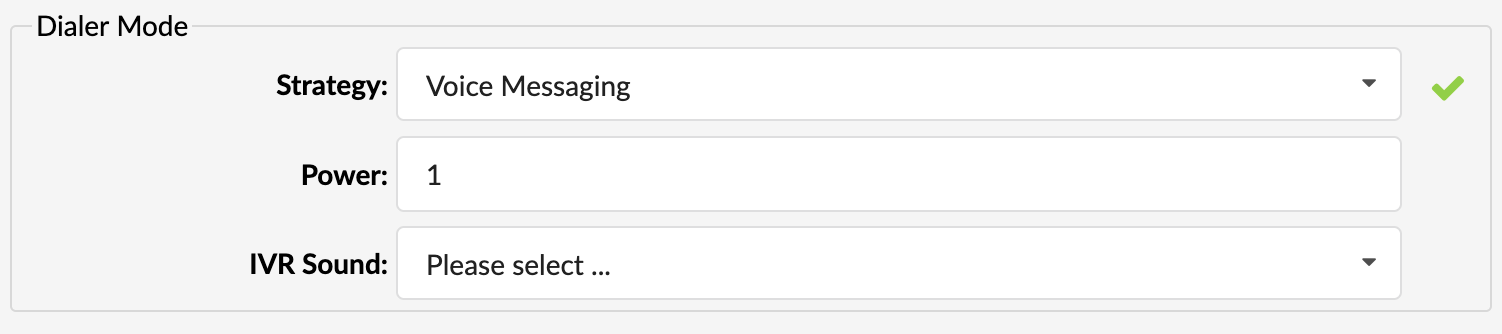
This strategy automatically plays the message to Leads. Additionally, it records DTMF pressed during the message.
- Power
Represents the number of Leads to dial for each Agent
- IVR Sound
Selecting sound files. Files need to be prefixed with dialer-vm-ivr
- IVR Repeat
Represents the number of repeats for the sound
NOTE: Sounds need to have the dialer-vm-ivr prefix in their name so the system can recognize the sound file.
Retries No Answer

Retries No Answer
- Retry After [m]:
Time in which the Campaign will try to call again if the current Lead’s Disposition is No Answer.
(Retry for No Answer is in minutes.)
(E.g., 30)
([0-9])
Retries Busy

Retries Busy
- Retry After [m]:
Time in which the Campaign will try to call again if the current Lead’s Disposition is Busy.
(Retry for Busy is in minutes.)
(E.g., 5)
([0-9])
Retries Abandon

Retries Abandon
- Retry After [m]:
Time in which the Campaign will try to call again if the current Lead’s Disposition is Abandon.
(E.g., Retry for Abandoned is in minutes.)
(E.g., 0)
([0-9])
Answering Machine Detection
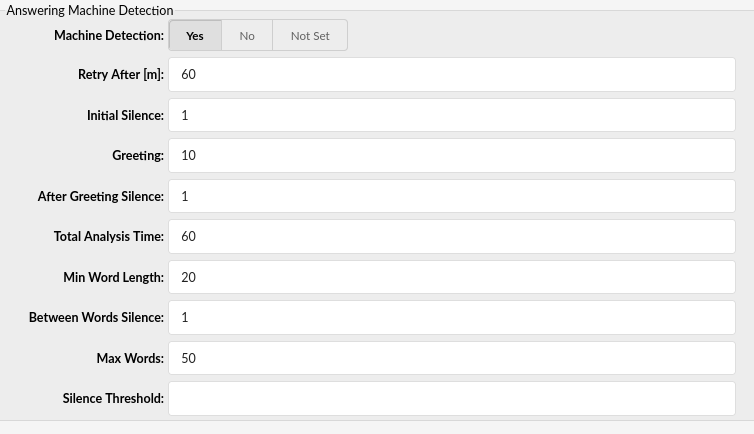
Answering Machine Detection
- Machine Detection
Choose whether this feature is ON or OFF. For each Lead’s answer, the Dialer will run AMD to avoid connecting the Agent with the answering machine. Click ‘Yes’ to enable this feature or ‘No’ to disable it.
(E.g., Yes)
(Option buttons)
- Retry After [m]
It is the same as ‘Retry-After for Busy’ and ‘Retry-after for No Answer’. In this case, if the Answering machine is detected, the number will be redialed. The option is set in minutes.
(E.g., 60)
([0-9)]
- Initial Silence
Duration of Initial Silence.
(E.g., 1)
([0-9)]
- After Greeting Silence
Silence duration after Greeting.
(E.g., 1)
([0-9)]
- Greeting
Voice duration – Greeting.
(E.g., 10)
([0-9)]
- Total Analysis Time
Total time taken for Analysis.
(E.g., 60)
([0-9)]
- Min Word Length
Word count – minimum number of words.
(E.g., 20)
([0-9)]
- Between Words Silence
Refers to the minimum duration of silence after a word to consider the audio that follows for a new word.
(E.g., 1)
([0-9)]
- Max Words
Word count – maximum number of words.
(E.g., 50)
([0-9)]
- Silence Threshold
The average level of noise from 0 to 32767, which if not exceeded, should be considered silence.
([0-9)]
Agents
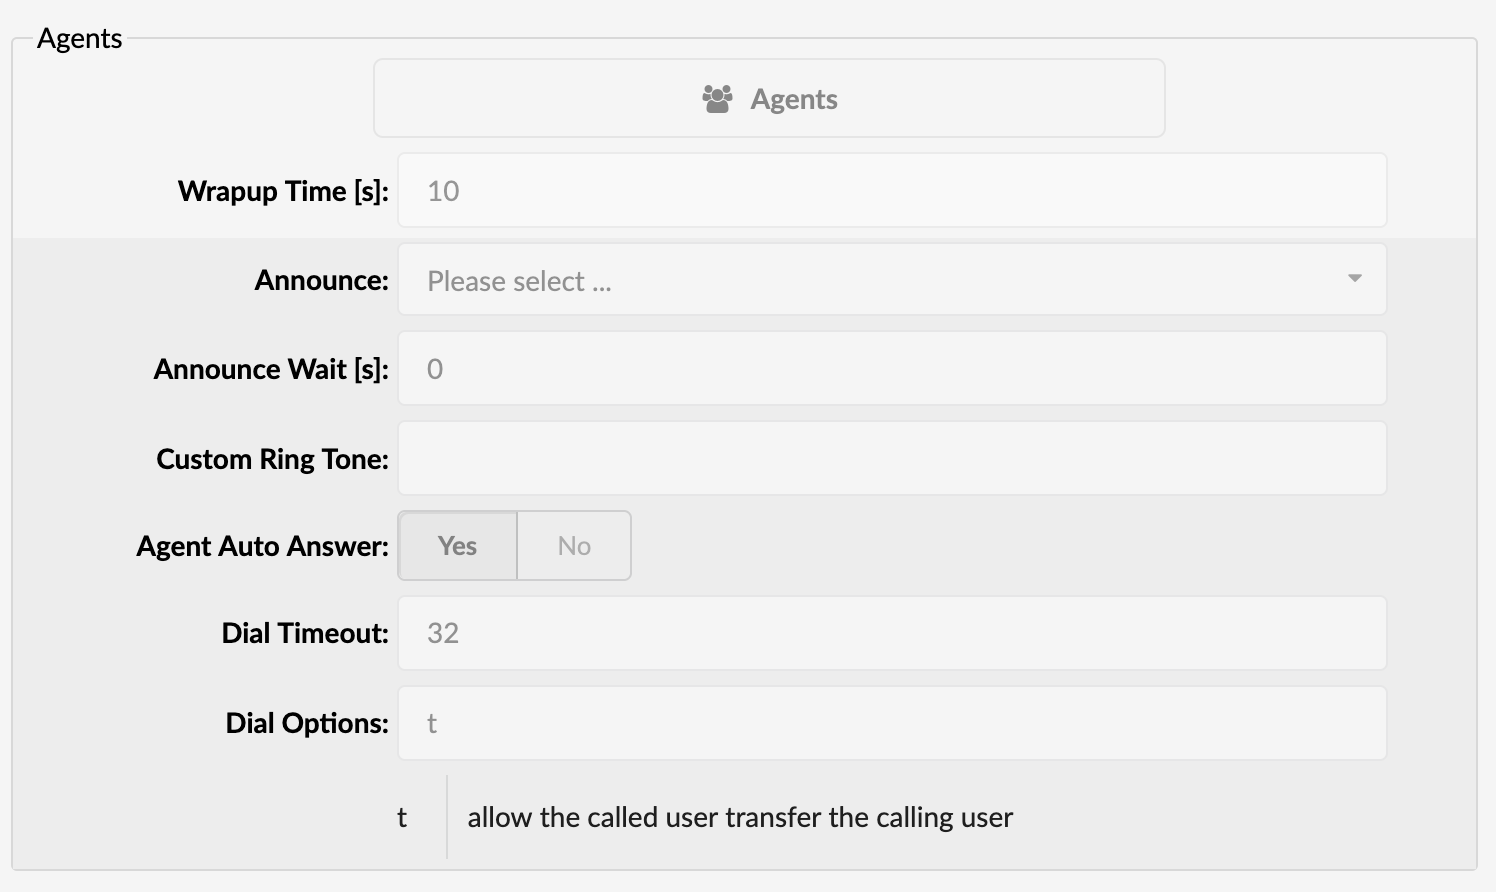
- Agents
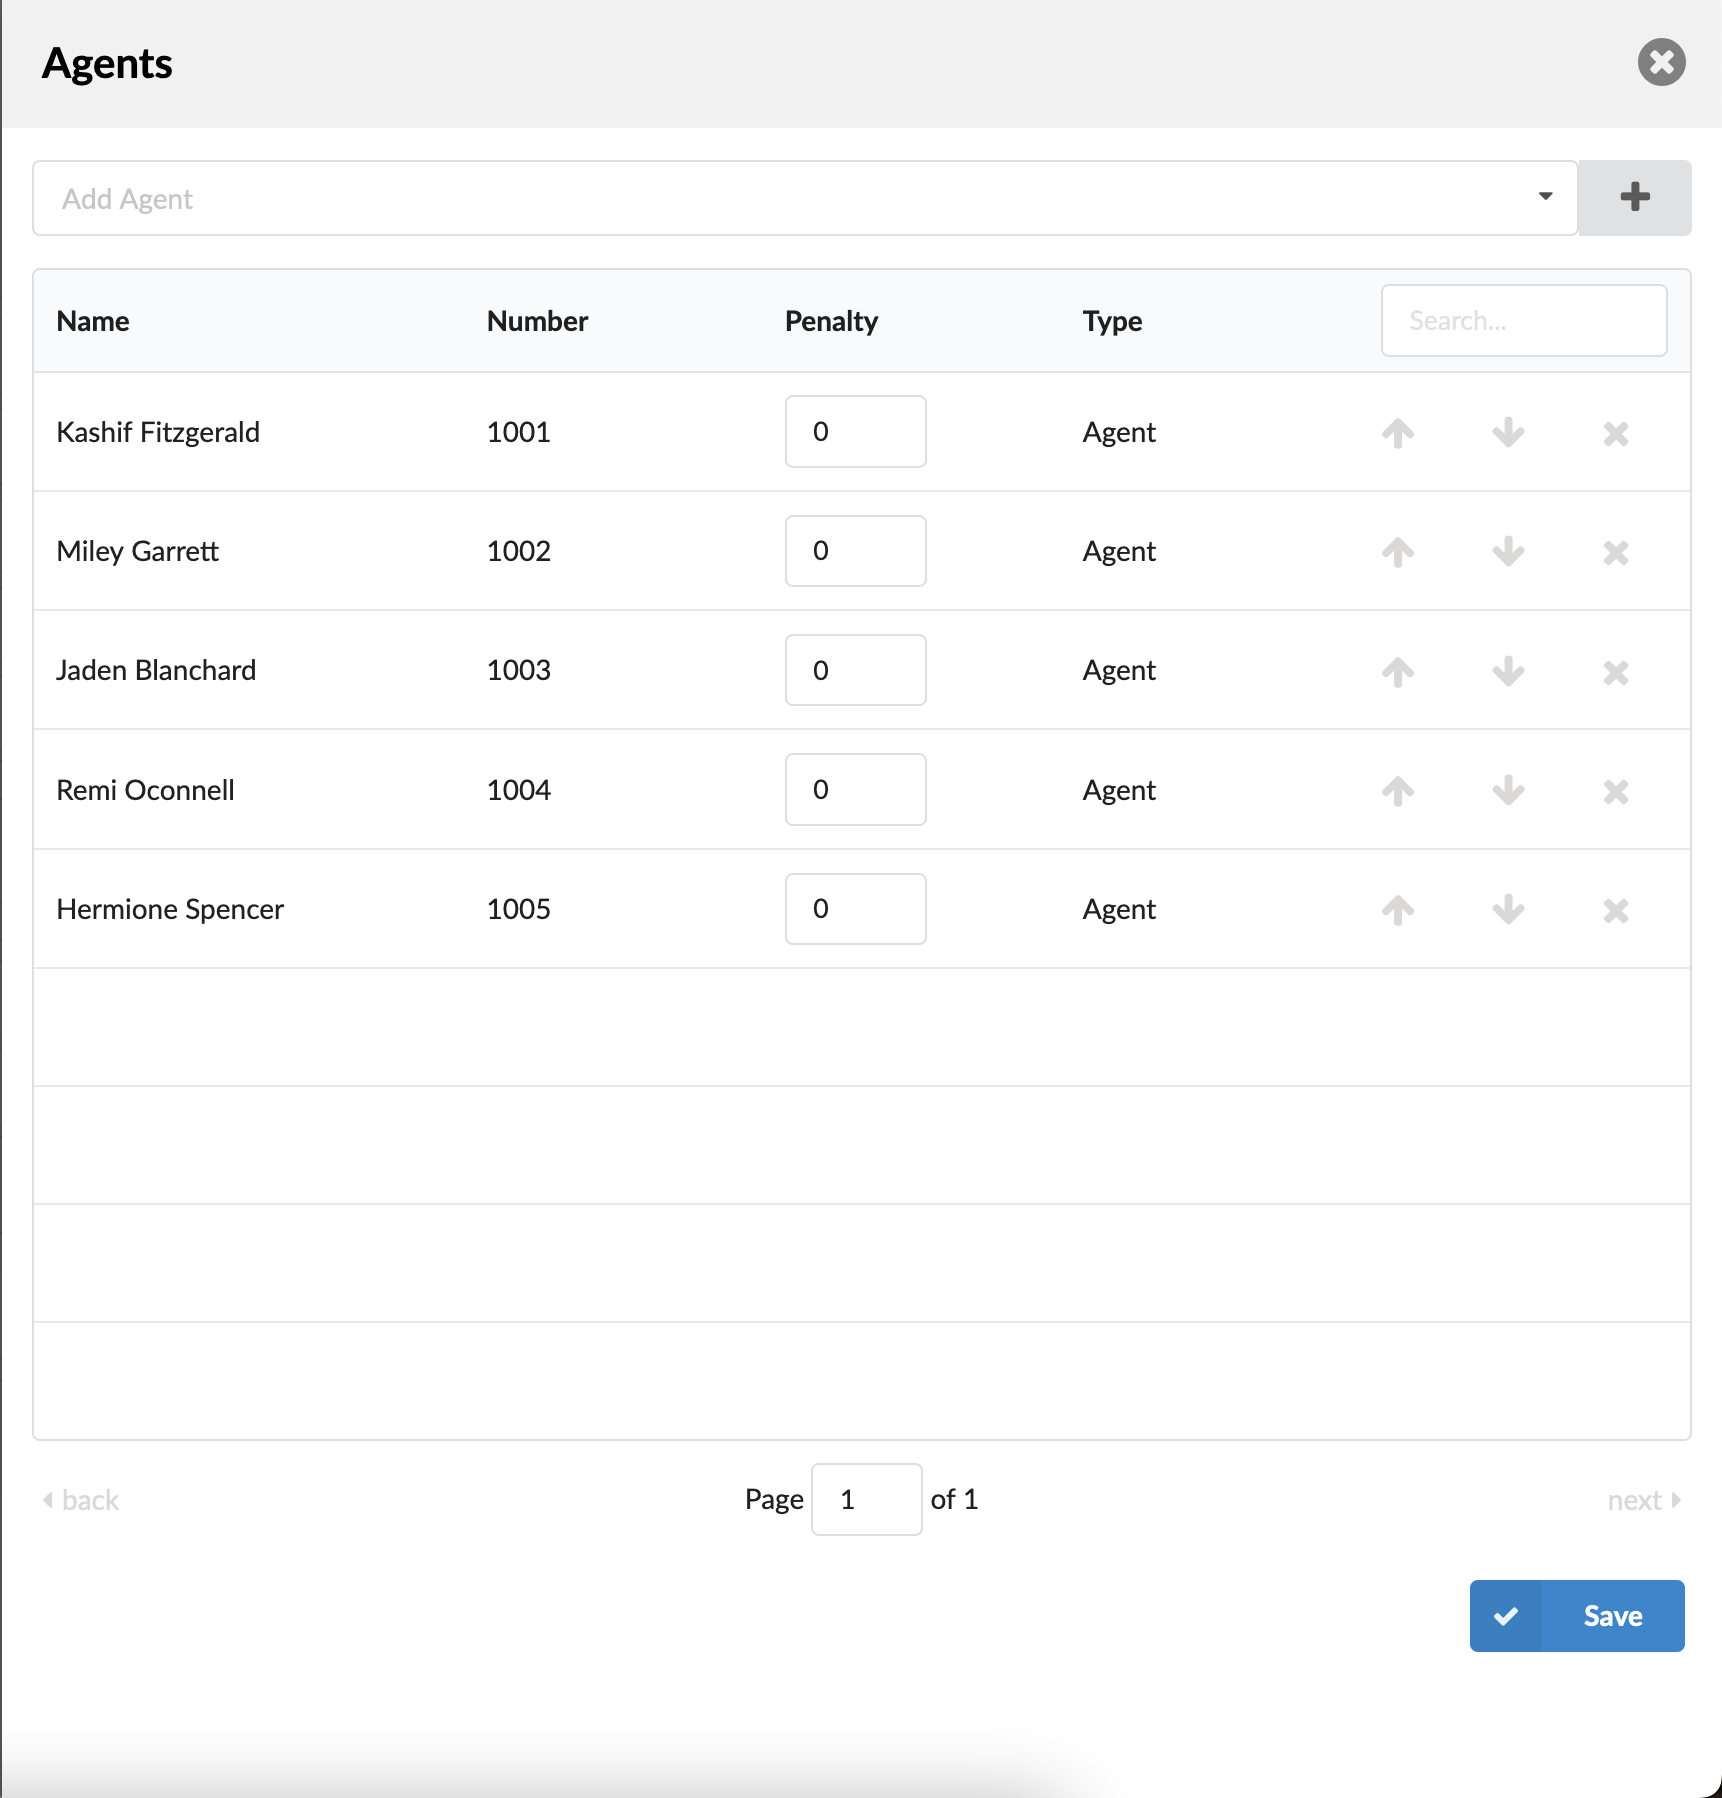
After clicking the button, users will be prompted to a new window in which they can add and manage the Campaign’s agents.
(E.g., Click the ‘Agents’ button to manage the Campaign’s agents.)
(Button)
- Select Agents
A drop-down menu where users can select one or more Agents/Agents Groups to add to the Campaign’s agent list.
(E.g., Agent/1003, Agent/1004, Agent/1005, Agent/1008)
(Multi select)
 Adds selected Agents/Agents Groups to the Campaign’s agent list.
(E.g., Click the button to add selected Agents/Agents Groups.)
(Button)
The table contains the following details:
- Name
Agent’s name.
(E.g., Agent 1003)
([0-9][a-z])
- Number
The number of Agents on the system.
(E.g., 1003)
([0-9])
- Penalty
This value can be set per Agent, so the system can decide which priority to use when sending calls to Agents.
(E.g., Users can set values between 0 and 10 where 0 represents the highest and ten the lowest priority.)
([0-10])
NOTE: If the Agent does not pick up, it will not automatically go to the next Agent available. It will keep ringing until the call is picked up. It will only go to the next Agent if the current Agent is either ‘Busy’ or ‘Unavailable’.
- Type
Campaign’s member Type.
(E.g., Agent)
(Display)
- Search
Search Campaign’s agents.
(E.g., Provide a search phrase here to filter the records.)
([a-z][0-9])
- Move up
 Move a Campaign agent one place up in the Campaign’s list.
(E.g., Click the button to move the Agents up across the list.)
(Button)
- Move down
 Move a Campaign agent one place down in the Campaign’s list.
(E.g., Click the button to move the Agents down across the list.)
(Button)
- Remove agent
 Delete an Agent from the Campaign’s list.
(E.g., Click the button to delete Agents from the list.)
(Button)
- Wrap-up Time [s]
After a successful call, will determine how long to wait (time interval in seconds) before sending a new call to a potential free agent.
(E.g., 10)
([0-9])
- Announce
Play the announce sound before connecting to the Lead (Preview and Progressive strategies are supported.)
(E.g., Please select…)
(Select box)
- Announce wait [s]
Time in seconds to wait before playing the Announce.
(E.g., 0)
([0-9])
- Custom Ring Tone
Dial the Agent with a custom ringtone.
(E.g., custom-ringtone-1)
([0-9][a-z])
- Agent Auto Answer
The callback Agent’s endpoint will use an auto-answer feature instead of ringing. (This works only for the supported device and is turned on by default.)
(E.g., Yes)
(Option buttons)
- Dial Timeout
Defines how long the Dialer will ring the Agent.
(E.g., 32)
([0-9])
- Dial Options
The Dialer will dial the Agent with these options.
(E.g., t)
([a-z])
NOTE: Agents will not be able to use Enhanced Services when receiving calls from the Dialer.
gloCOM

This section contains options related to gloCOM.
- Send Feedback Form:
Defines whether Campaigns should send gloCOM Feedback Forms. It gives users control over the Campaign level defining whether Agents are to deal with Feedback Forms.
(E.g., No)
(Option buttons)
Campaign Cycle
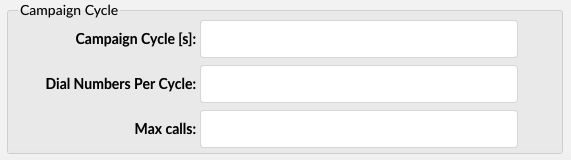
Campaign Cycle
- Campaign Cycle [s]
This field describes how long the Campaign will sleep before the next cycle of dialing. The default value is 8 seconds.
([0-9])
- Dial Numbers Per Cycle
Maximum number of Leads to be dialed per Cycle.
(E.g., 5)
([0-9])
- Max calls
Maximum concurrent Leads a particular Campaign can have.
(E.g., 8)
([0-9])
Outgoing Dial Options
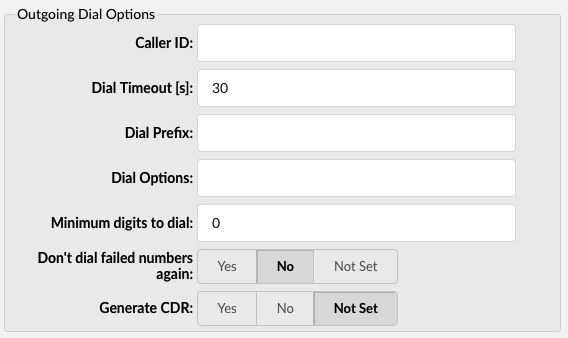
Outgoing Dial Options
- Caller ID
Defines which outgoing Caller ID the Campaign will use.
(E.g., ExampleCallerID)
- Dial Timeout [s]
A time that Dialer will ring the Lead.
(E.g., 20)
([0-9)]
- Dial Prefix
This is the prefix that should be added when dialing numbers. So if the Campaign has the number ‘123456’, where a user can set ‘387’, the Campaign will dial the number ‘387123456’.
(E.g., 387)
([0-9)]
- Dial Options
Which options to apply when the Dialer is dialing Leads.
- Minimum digits to dial
A minimum number length allowed in order to dial numbers.
(E.g., 0)
([0-9)]
- Don’t dial failed numbers again
If the numbers have failed for some reason, set the Dialer not to dial them again.
Failed numbers are those with the following statuses: “CHANUNAVAIL”, “CONGESTION”, and “FAILEDDIAL”.
(E.g., No)
(Option buttons)
- Generate CDR
The Dialer will generate Asterisk CDR entries.
(E.g., Not Set)
(Option buttons)
NOTE: Turning this feature ON is a performance penalty and should be used only if users want to debug Trunks.
Operation Times
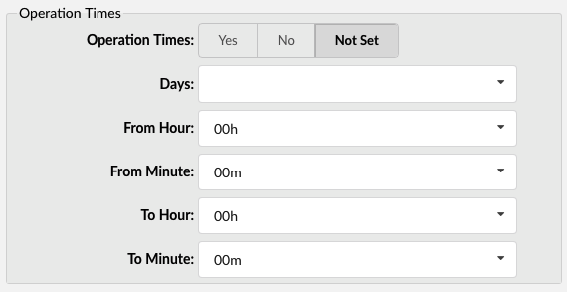
Operation Times
- Operation Times
Click to enable or disable operation times in the Campaign.
(E.g., Yes, No, Not Set)
(Option buttons)
- Days
A drop-down where users can select the days for which Operation Times will be applied.
- From Hour
A drop-down where users can select the starting hour for which Operation Times will be applied.
- From Minute
A drop-down where users can select the starting minute for which Operation Times will be applied.
- To Hour
A drop-down where users can select the ending hour for which Operation Times will be applied.
- To Minute
A drop-down where users can select the ending minute for which Operation Times will be applied.
Recording

- Record calls
Select whether to record Campaign calls
(E.g., Yes/No)
(Options button)
NOTE: Please note that if the ‘Record calls by default’ option are enabled on the system in the ‘Call Recordings’ section under ‘Servers’, it will be applied to all campaigns created on the system. Additionally, users can enable or disable this option for each Campaign respectively.
- Silent
Select whether Agents and users will be notified that the call recording has started.
(E.g., If set to ‘Yes’, the sound notifying that the call is being recorded will not be played. If set to ‘No’, agents and users will be notified that the call is being recorded.)
(Options button)
Dispositions

These are Dispositions that Agents can see in the gloCOM. Dispositions can be applied at the end of each call.
 Adds a Disposition and enables users to edit it.
(E.g. Click to add a Disposition.)
(Button)
- Color
Set a different color of Disposition for better visual signalization. This is used on gloCOM interface, when presenting a list of Dispositions to Agents. ‘Color’ helps Agents to find and select Dispositions accurately.
(E.g., #589683)
(#[0-9])
- Name
Set a preferred Name for the Disposition.
(E.g., Personal Callback)
([a-z])
([0-9])
- Type
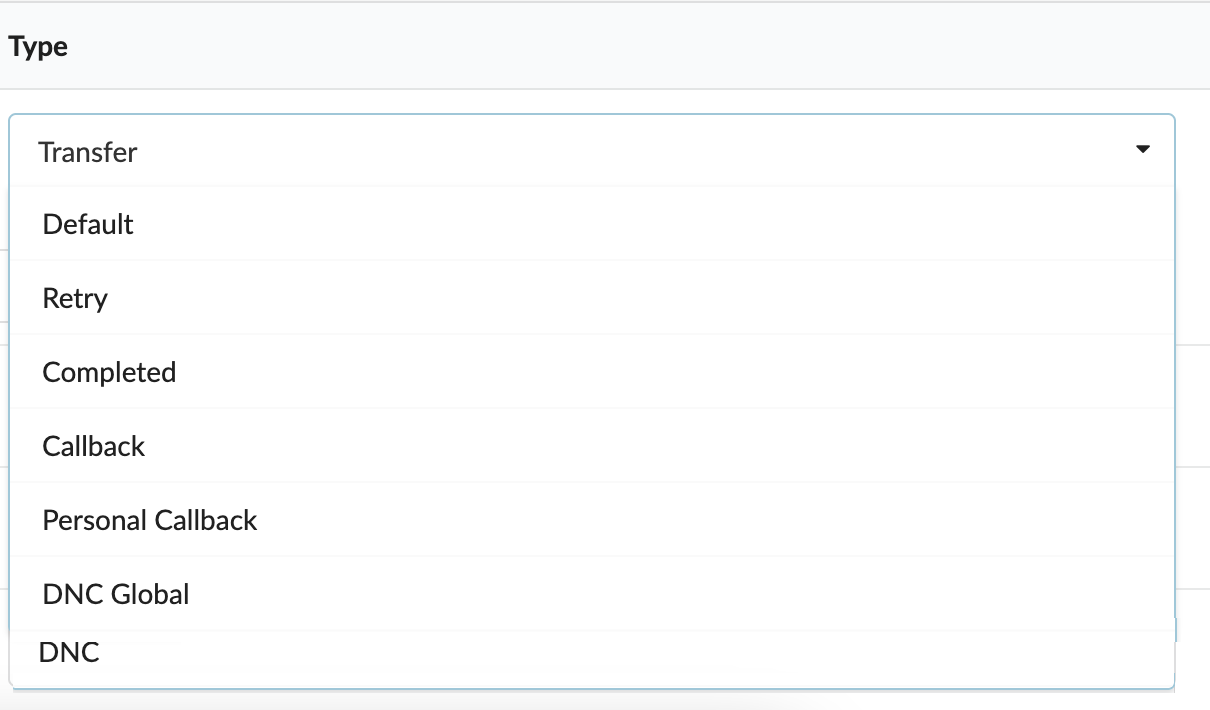
Select the Type of the Disposition.
(E.g., Personal Callback)
([a-z])
([0-9])
There are eight readily available Dispositions:
1. Default
No action.
2. Retry
Retry dialing a Lead again after ‘Retry Time’.
3. Completed
If the Agent sets this disposition to a specific number, that number will no longer be called inside the Campaign. The selected numbers will not appear on the DNC numbers page, and resetting the Campaign will reset this ‘Completed’ list. DNC will remain and will not be called.
4. Callback
An Agent can schedule a callback. Dialer will redial/provide this Lead to the Agent at a specific time.
5. Personal Callback
An Agent can schedule a callback. Dialer will redial/provide this Lead only to the Agent that acquired this callback at a specific time.
6. DNC Global
Mark a Lead as ‘Do not call for the whole system’.
7. DNC
Mark a lead as ‘Do not call for this Campaign’.
8. Transfer
Transfer a Lead to another selected Campaign’s list with a different Disposition.
- Contact
The Default, Retry, Callback, and Personal Callback Dispositions can have a Contact flag set to ‘Yes’. When selecting one of these Dispositions, an Agent indicates that s(he) has made a successful contact.
Users can see this information in ‘Real Time Statistics’ on ‘Monitor Campaigns’. This is useful when tracking the overall progress of Agents and the contacts made. Users can also filter their CSV with these Dispositions and have those contacts saved for future usage.
(E.g., Yes, No)
(Select box)
- Hot Key
Refers to Keyboard shortcuts that Agents use to select a particular Disposition faster. This feature can significantly improve Agent’s performance. When using Hot Keys, Agents do not have to use the interface.
(E.g., 2)
([0-9])
- Delete Disposition
The user can delete a Disposition from the system. Once clicked, a warning message will pop up saying “Deleting disposition will cause lost of data. Are you sure you want to remove disposition?”.
(E.g., Click to delete a Disposition from the system.)
(Button)
NOTE: Please note that the Agents’ Dispositions overwrite the system’s Dispositions, so none of these will apply if Agents have set their Dispositions.
Numbers
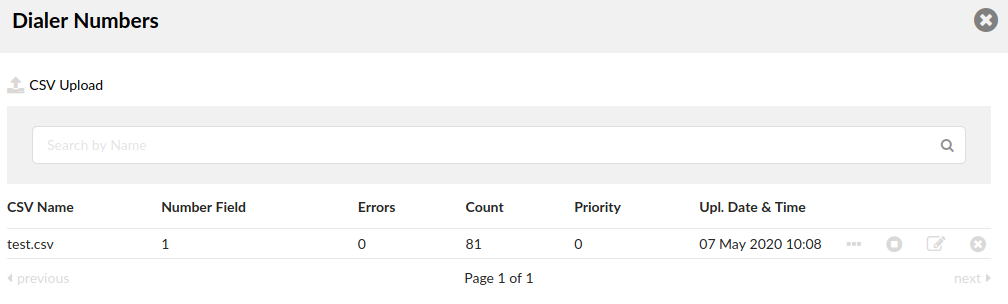
Dialer Numbers
The Numbers page allows users to control and edit the Numbers list.
- CSV Upload
Upload the CSV list. Once clicked, users will be prompted to a different window and asked to Enter column index for number and/or Enter column index for name. The latter field is optional.
(Button)
TIP: A simple CSV file is uploaded, containing two rows. The first row represents CSV headers, and the second one displays information about Numbers. For details, please refer to the example below. Information on which column is used for Numbers should be specified in the system, and the index starts from 1. Additionally, the ‘Name’ column can be used, so it will be shown to Agents while making a call.
Example:
Number, First Name, Last Name, Address, Age
100, John, Doe, Somewhere Some Street, 22
- CSV Name
Name of the CSV file uploaded. Once clicked, it opens the ‘Edit CSV’ page.
(E.g., ‘test.csv’)
(Button)
- Edit CSV
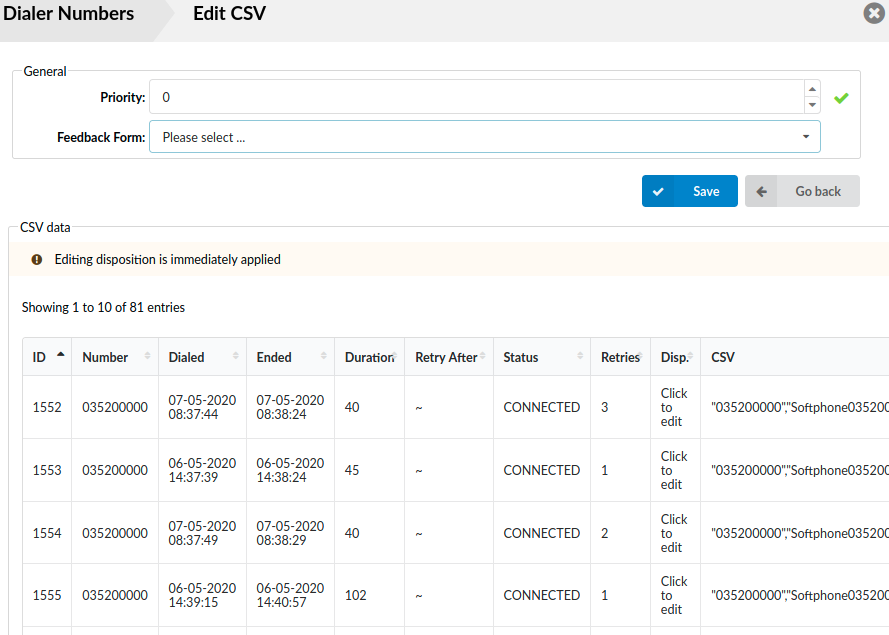
Once users upload their CSV files, they can click the preferred file and be prompted to a different page, ‘Edit CSV’. From here, they can select ‘Priority’ and a ‘Feedback form’, or additionally edit the ‘CSV data’ section.
- Priority
Setting a higher priority for the CSV file will result in a Campaign using this specific CSV file compared to others.
(E.g., 2)
([0-9])
- Feedback Form
Select the Feedback Form sent to Agents when Leads are dialed from this list.
(E.g., Test)
(Select box)
The ‘CSV data’ section allows for additional changes to the file. The fields are as presented below:
ID – defines the internal ID in a database.
Number – represents a Lead’s number when dialing.
Dialed – refers to a timestamp when a Lead was dialed.
Ended – refers to a timestamp when a call to a Lead ended.
Duration – shows the duration of a call.
Retry After denotes that the next dial must happen after the selected time.
Status – shows the Lead’s last status. The statuses are as follows:
- DIALING
- CONNECTING
- CONNECTED
- NOANSWER
- MACHINE – Answering Machine Detected
- ABANDONED
- BUSY
- NO_DIAL
- NO_ROUTE
Retries – shows the number of retries.
Disposition – represents the Disposition set on this call. From here, it can be changed to a different Disposition.
- Number Field
The number of the specified field entered upon CSV upload.
(E.g., 1)
(Display)
- Errors
The number of errors shown.
(E.g., 0)
(Display)
- Counts
The number of counts in the CSV file.
(E.g., 81)
(Display)
- Priority
If there are numerous CSV files uploaded, set the priority of each.
(E.g., 1)
(Display)
- Upl. Date & Time
Shows the exact date and time of when the CSV file was uploaded.
(E.g., 07 May 2020 10:08)
(Display)
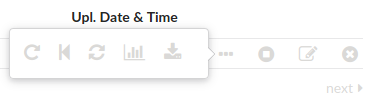
If users hover their mouse over three dots in the menu, the following items will appear:
- Reset
Reset all numbers on the list.
- Reset Unanswered only
Reset all unanswered numbers on the list.
- Reset by Disposition
Reset all numbers on the list with a specified Disposition.
- Show CSV Stats
Display data statistics for the current list.
- CSV download
Download the current CSV file.
CSV will have fields like ‘number’, ‘name’, ‘city’, ‘details’, ‘dialed_number’, ‘disposition’, ‘ivrdtmf’ represeting (Voice Messaging). Apart from these fields, any data submitted by the feedback form should be present if the scripting is set up.
Other buttons represent the following items:
- Activate
Each list must be activated in order to be used by a Campaign.
(E.g., Click to activate the list.)
(Button)
- List Edit
Users can edit the priority and the feedback form of a list. There is a preview of all numbers on a list where users can manually change the Disposition of each number.
(E.g., Click in order to edit.)
(Button)
- Delete
Deletes the CSV file from the system.
(E.g., Click to delete the CSV file.)
(Button)
NOTE: Uploading many lists for a single Campaign is not a good practice. Instead, try splitting the lists across multiple Campaigns.
DNC Numbers
DNC (Do Not Call) Numbers contain a list of numbers not to be dialed by Agents. Users can upload the list by CSV. These numbers can be deleted from the list or added manually. Any DNC number marked by an Agent through the Disposition will be visible here.
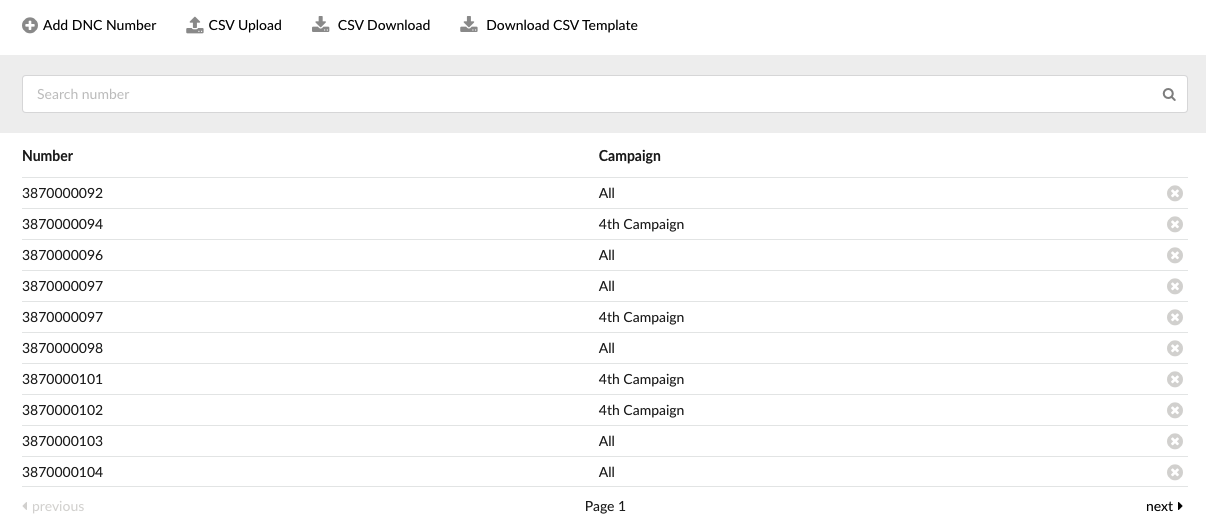
- Add DNC Number
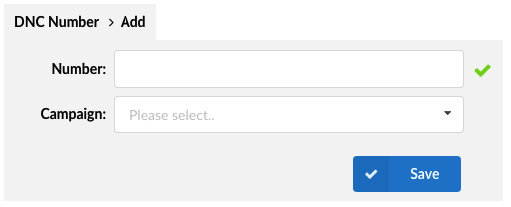
Add DNC Numbers
Upon clicking the ‘Add DNC Number’ button, users will be prompted to a different window in which they can edit their DNC numbers.
(E.g., Click the button to add DNC numbers.)
(Button)
- Number
Number to be added.
([0-9])
- Campaign
A drop-down menu showing the list of Campaigns on the system. After selecting one, the DNC number will be applied to that specific Campaign.
(E.g., Test)
(Select box)
Other options are as follows:
- CSV Upload
Upload a list of DNC Numbers through a CSV file.
(E.g., Click to upload a CSV file.)
(Button)
- CSV Download
The CSV download button plays a part in downloading the existing list as a CSV file.
(E.g., Click to download the existing list as a CSV file.)
(Button)
- Download CSV Template
Download the CSV template.
(E.g., Click to download the CSV template.)
(Button)