Customer Relationship Management (CRM) is a business strategy that provides companies with an opportunity to manage their own previous, present, and planned interactions. PBXware allows users to integrate, test, select some of the log options for their CRMs. It is integrated with several CRM solutions. The supported CRMs are as follows: Bullhorn, Hubspot, Microsoft Dynamics 2015, Pipedrive, Proprietary CRM, Proprietary CRM I, Salesforce, SugarCRM, SuiteCRM, Vtiger CRM, Zendesk, and Zoho CRM.
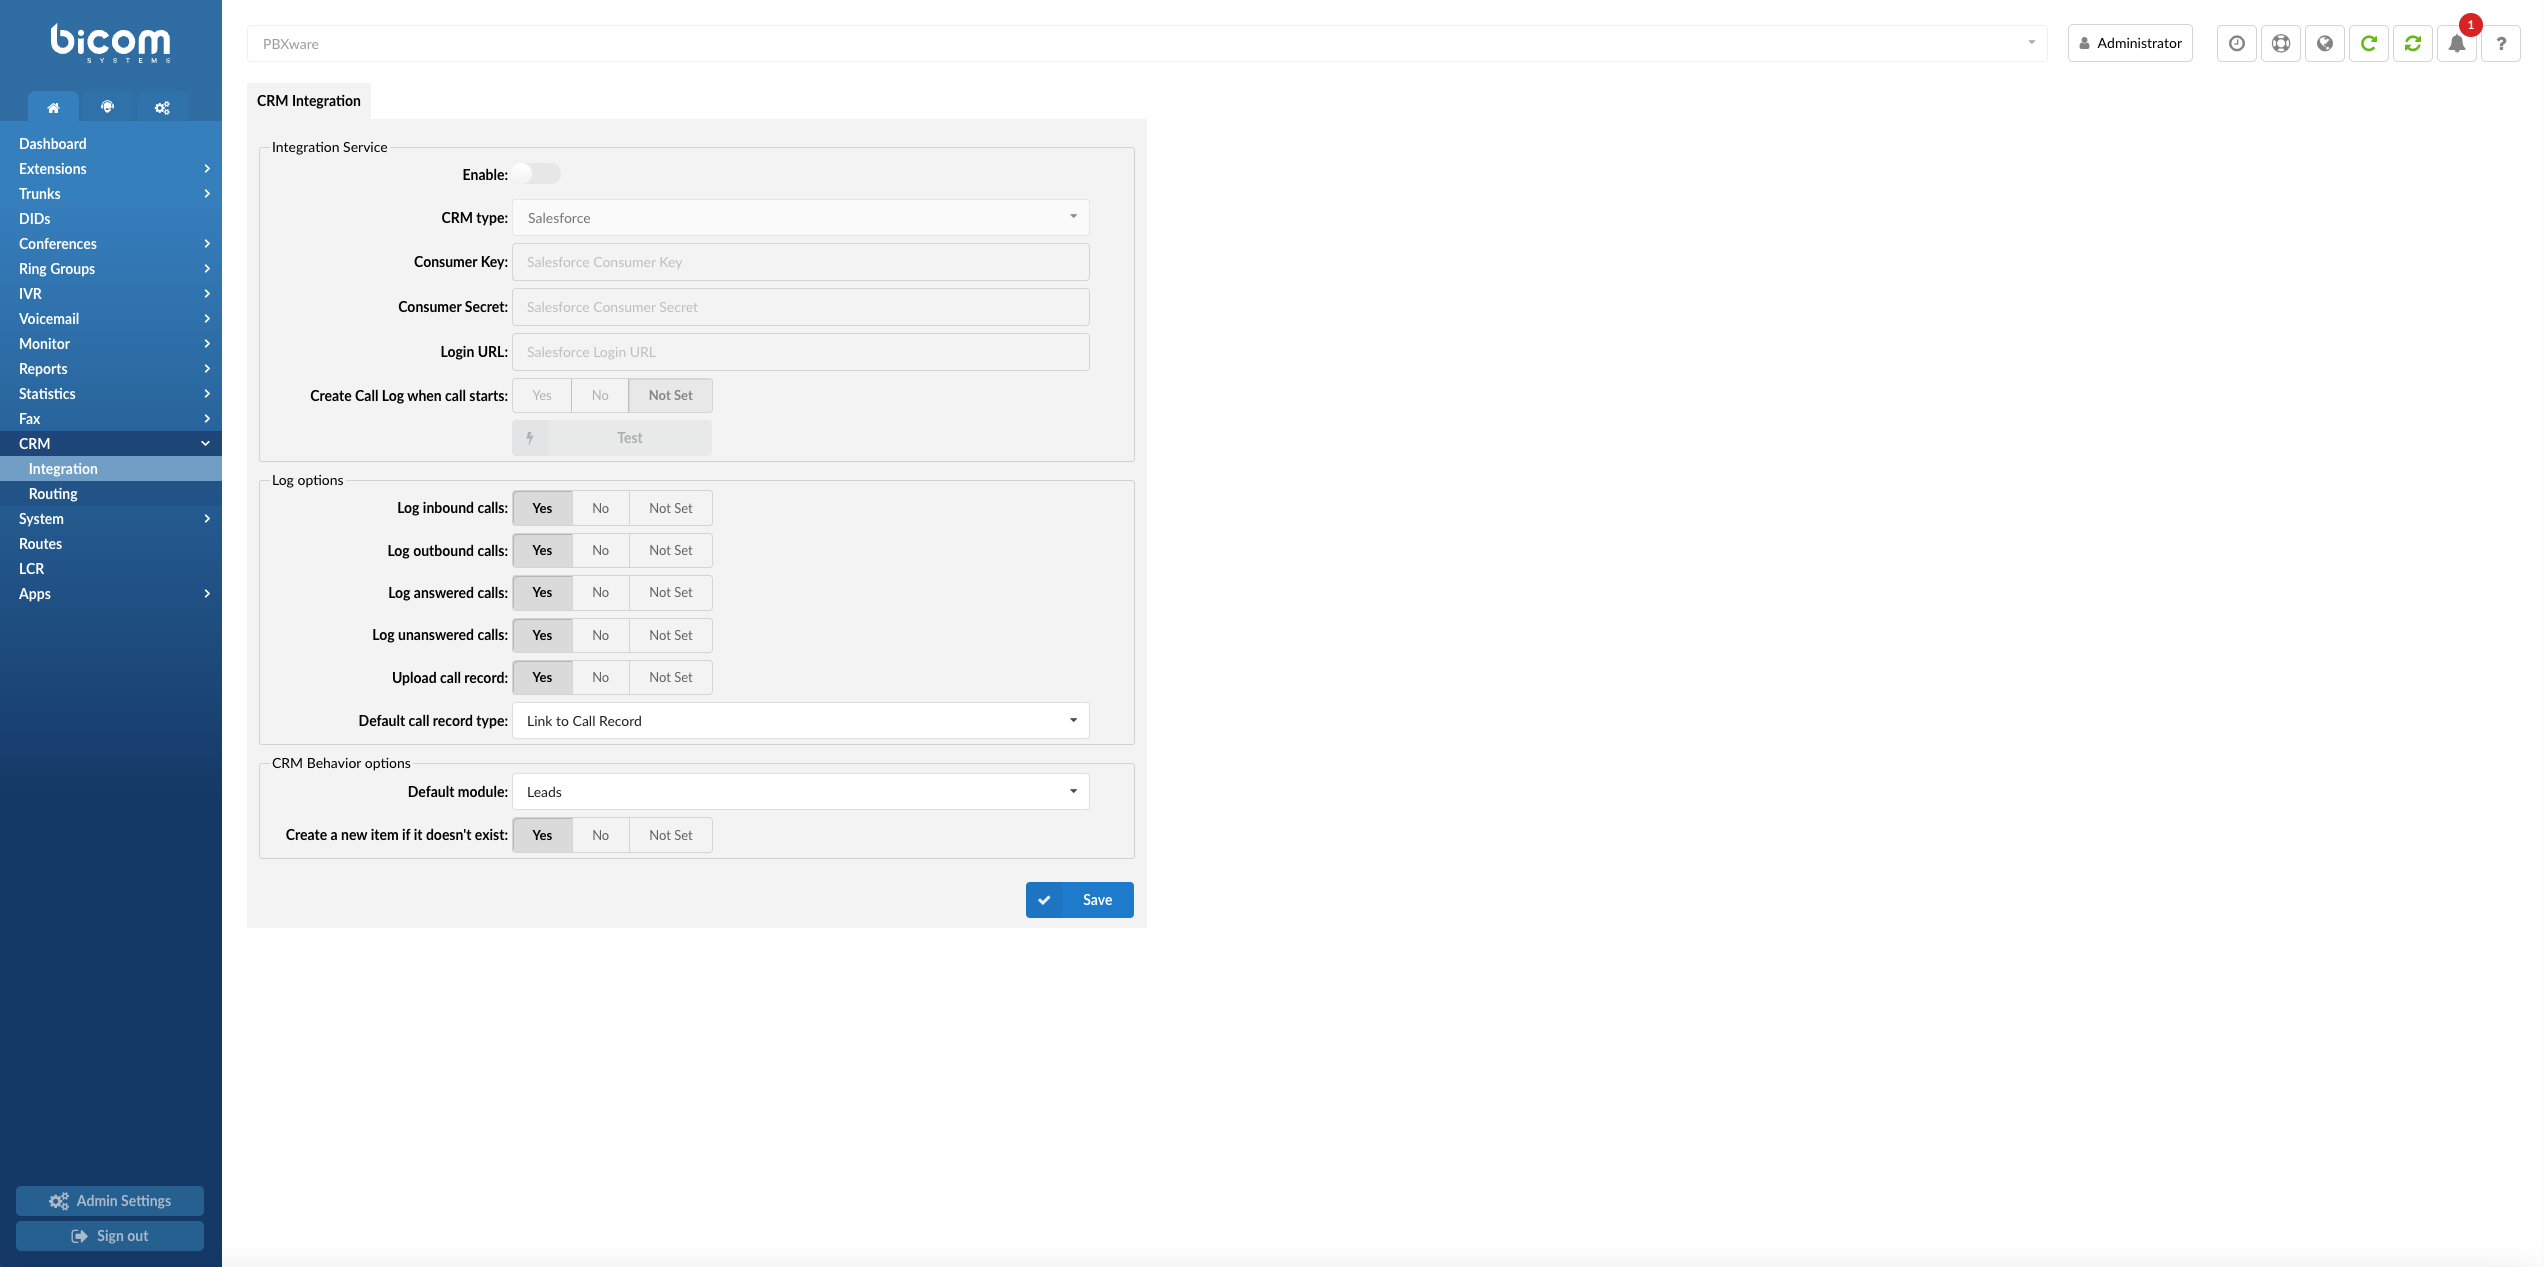
To see more information on CRMs supported by PBXware, please click the images below.
NOTE: Upon clicking the image, users will be prompted to our Wiki page. From there, they can refer to documentation on how to set up specific CRM configuration.
.
Supported CRMs
.
Routing
CRM Routing
CRM Routing allows routing to a specific Queue or IVR, and it also allows playing sound files based on the information fetched from CRM. When the call comes in AGI, PBXware will first contact CRM and make a specific action based on the returned value.

To set up the configuration in PBXware, navigate to the CRM section with the ‘Integration’ and ‘Routing’ sub-menus. When on the ‘Routing’ section, a user can set up rules based on which calls will be routed. On DID and IVR, new destinations can be assigned the rule which will be evaluated for a particular DID/IVR.
NOTE: CRM Routing must be enabled in a license.
- Search
Search the specific data by typing details in the search bar
[(a-z)(0-9)]
- Rule Name
Displays the name of a Routing Rule
(E.g. Example Name)
(Display)
- CRM Field Name
Displays the API Name of a CRM field
(E.g. Account_Name)
(Display)
- Location
Displays the location it points to
(E.g. IVR)
(Display)
 Click this button to edit the Routing Rule.
(Button)
 Click this button to delete the Routing Rule.
(Button)
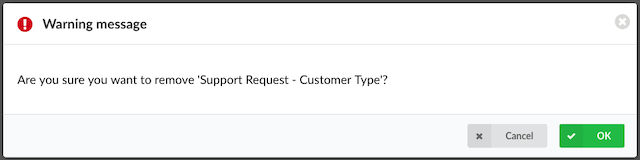
NOTE: Upon deleting the Routing rule, the warning message will appear saying “Are you sure you want to remove ‘XYZ’?” If ‘OK’ is pressed, the action will be confirmed and the Routing rule will be deleted.
Add/Edit Rule
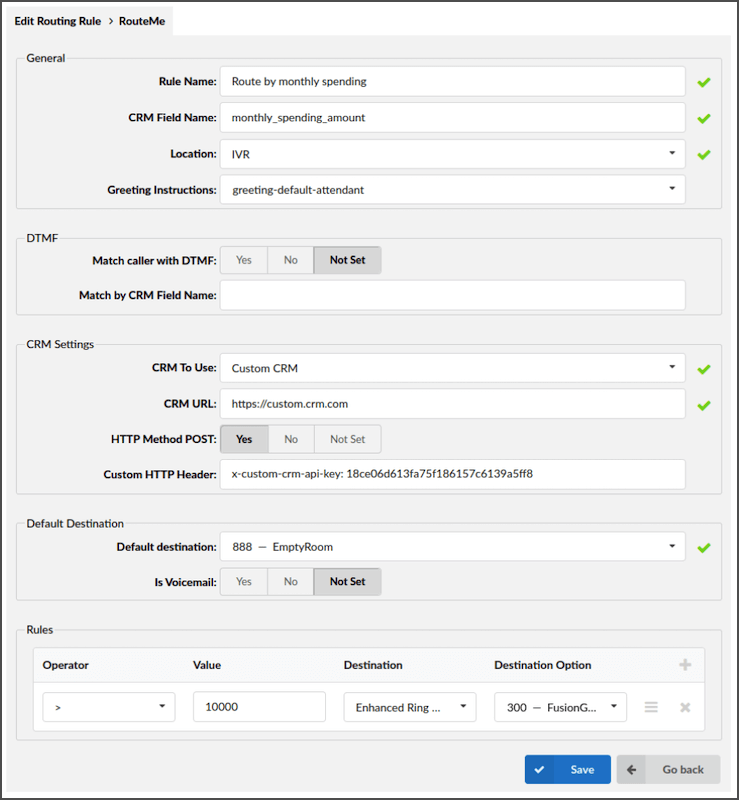
To add or edit a CRM rule, specify the Rule Name, select the relevant CRM Field Name, and provide Location and Greeting Instructions. Choose the CRM to Use and specify the CRM Modules involved. Enter the CRM Username and Password for authentication and set the Default Destination for routing or actions.
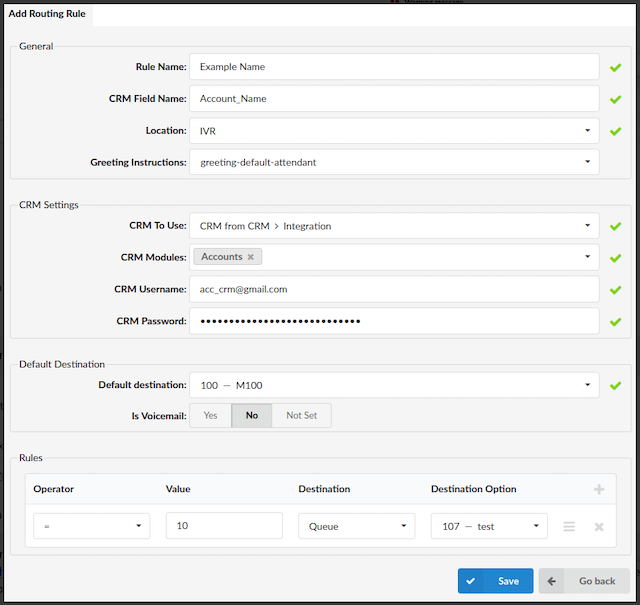
General
- Rule Name:
Name for a new rule
(E.g. Example Name)
[(a-z)(0-9)]
- CRM Field Name:
CRM field defining which value should be fetched
(E.g. Account_Name)
[(a-z)(0-9)]
NOTE: Please note that this field needs to be populated with a suitable API Name.
For more on how to find the API Name, please refer to the example of Zoho CRM below. This is applied to every supported CRM respectively.
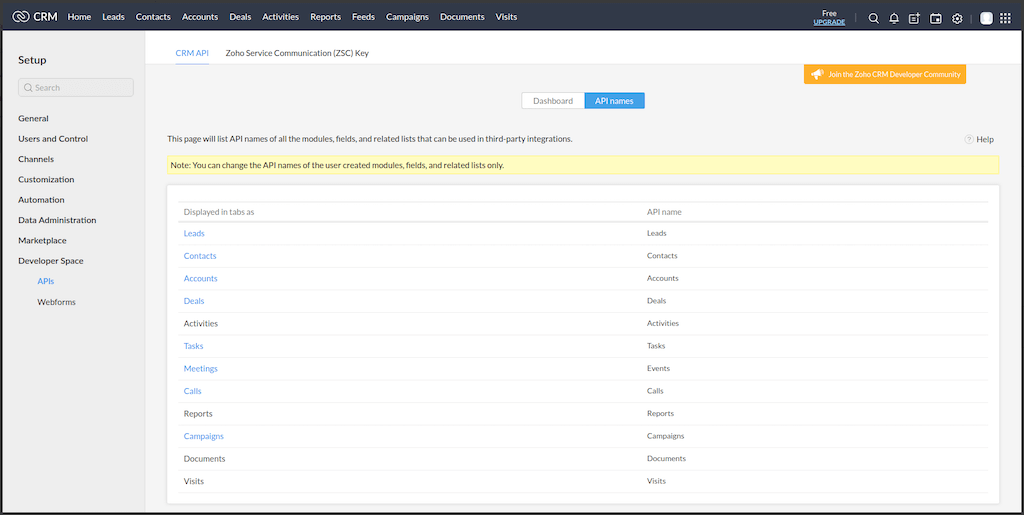
For instance, this is a link of the Zoho CRM account:
Once users are logged in to their CRM account, they can navigate to ‘Settings’ -> ‘API’ and find the applicable API Name. Please refer to the screenshots.
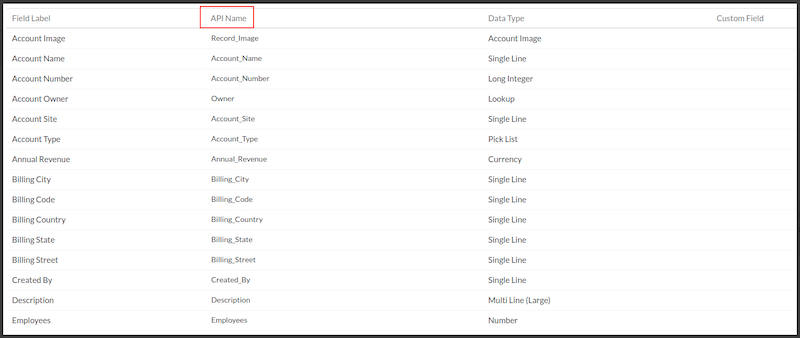
NOTE: Please note that the link provided above refers to Zoho CRM so the page URL can have one of three possible formats: https://crm.zoho.com/crm/, https://crm.zoho.eu/crm/, or https://crm.zoho.in/crm/ depending on the Data Center to which a certain Zoho instance belongs to. Therefore, the format has to be changed accordingly. Also, the ‘orgXXXXXXXX’ stands for the organization number to which users can have access once they are logged in to their CRM account.
- Location:
Define where to use this rule
(E.g. DID/IVR)
(Select box)
- Greeting Instructions:
If ‘IVR’ is chosen as a ‘Location’, a new option pops up.
The greeting should be set if a user wants to get DTMF from a caller and send that DTMF to CRM.
(E.g. greeting-default-attendant)
(Select box)
CRM Settings
- CRM To Use:
Select one of two options to use:
1. CRM from CRM > Integration: PBXware will contact CRM and fetch the value.
2. Custom CRM: A customer should implement communication with CRM on his own.
If ‘CRM To Use’ is set to CRM from CRM > Integration, the following options are available:
- CRM Modules:
Define from which CRM module PBXware should fetch information
(E.g. Accounts/Contacts/Leads)
(Select box)
- CRM Username:
Enter a valid CRM username
(E.g. Example CRM Username)
([a-z][0-9)]
- CRM Password:
Enter the CRM password in the same way as for gloCOM. Please follow the instructions for a specific CRM.
(E.g. ********)
([a-z][0-9])
NOTE: Please follow the instructions for a specific CRM.
If ‘CRM To Use’ is set to Custom CRM, the following option is available:
- CRM URL:
Provide a URL which PBXware will contact.
NOTE: It must start with “https://”.
Default Destination
- Default destination
Select the destination to which the call will be redirected in case the return value does not match any rules
(E.g. 100 – Test)
(Select box)
- Is Voicemail
Select whether the call will be redirected to the voicemail of the default destination
(E.g. Yes/No/Not Set)
(Options button)
Rules
- Operator:
Select the arithmetic operator
(E.g. <,>,=, <=, >=)
(Select box)
- Value:
Enter a value to compare with
(E.g. 50)
([a-z][0-9])
- Destination:
Select a Destination
(E.g. Queue/IVR/Play recording)
(Select box)
- Destination Option:
Enter the Queue/IVR number or recording name.
(E.g. 103)
([a-z][0-9])
NOTE: All fields except ‘Greeting Instructions’ are required.
How Does Routing Work?
After fetching the value from CRM, PBXware goes through the rules row by row and evaluates the comparison between the returned value and a value from the rule’s row by using the arithmetic operator defined in the row. A destination for a caller is the destination from the first row which matches the criteria.
For example, a user needs to filter inbound calls on DID and send calls to destinations based on some fields in his/her CRM. Following this, in CRM, there is a “status” field name with the customer’s status and the value of the field that can be ‘GOLD’, ‘SILVER’, ‘BRONZE’, and so on. A user can set his/her CRM routing rule to check if the customer is marked as ‘GOLD’. If this is true, a user can send the call to the appropriate location such as IVR, Queue, and so on.
Custom CRM
In case of a custom CRM (CRM implemented by a customer), a URL which PBXware will try to reach is as follows:
CRM URL
{URL}?field_name={CRM_FIELD_NAME}&dtmf={DTMF}
- URL = CRM URL set on the Routing Rule,
- CRM_FIELD_NAME = CRM Field Name set on the Routing Rule,
- DTMF = DTMF entered by a caller (available only for IVRs when the ‘Greeting instructions’ option is selected).
Based on the configuration from the example a URL will be:
HTTP Method POST
PBXware will only send a POST request if the user specifically sets the option to “Yes.” When a POST request is sent, PBXware includes the data in the request body as JSON, with the Content-Type header set to application/json.
Custom HTTP Header
Users can specify any valid HTTP header value to include in the HTTP request sent by PBXware.
NOTE: A user who implements the Custom CRM integration is the one who is in charge of handling this request on his/her side.