gloCOM brings a unified chat between Desktop, Web and Mobile applications. Chat history is stored on the server and is always synced between all your devices. This means that if you need to leave the office but you were having an important chat discussion with your colleagues you can seamlessly continue chatting using your mobile application. Also, in case you change your PC or laptop your full chat history will be synced the first time you log in on the new computer.
Full history sync
After every log in the application makes sure that your chat history is always synced and that you have all messages available on your device.
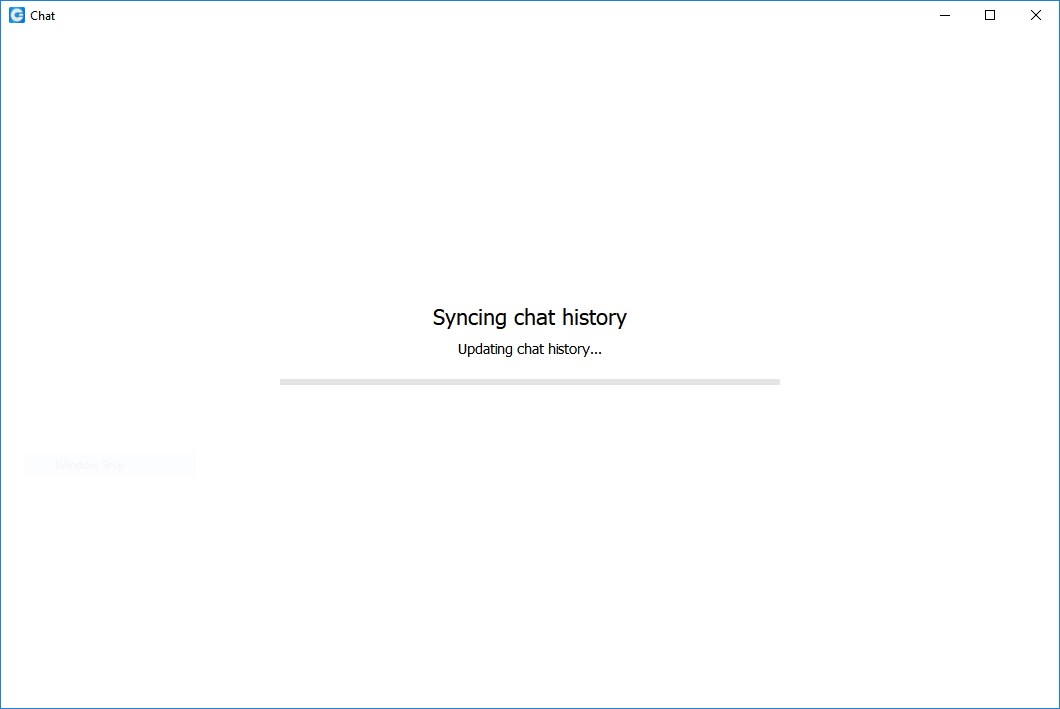
![]() During the sync there is an indication on the chat module icon in the main window to inform the user that the sync is currently in progress.
During the sync there is an indication on the chat module icon in the main window to inform the user that the sync is currently in progress.
If you open the chat window during sync you will see an informative message, with a progress bar indicating the sync progress.
If chat sync has failed there is a warning in the chat window with the option to retry the sync by pressing the Retry button.

In case that chat sync has failed because chat server was down at the time you logged in, the application will automatically start the sync process again, once it detects that the server is back up.
Chat server unavailable
If chat server is down you cannot send nor receive messages until it gets back up.
![]() While the chat server is down there is an indication on the Chat module icon in the main window to alert the user.
While the chat server is down there is an indication on the Chat module icon in the main window to alert the user.
If you open the chat window while the server is down, there is also an informative message that the chat server is not connected.

As soon as the application detects that the chat server is back up the warning is dismissed and you can continue chatting where you left off.
Starting conversations
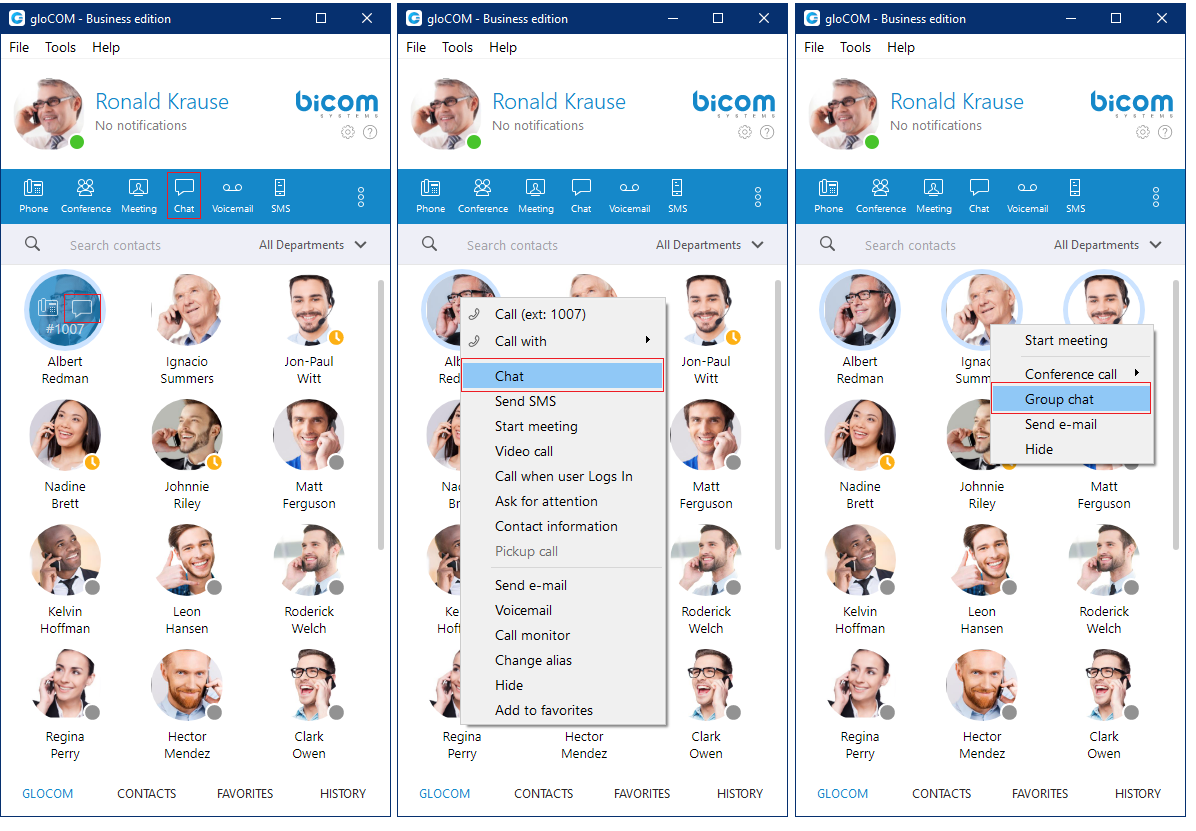
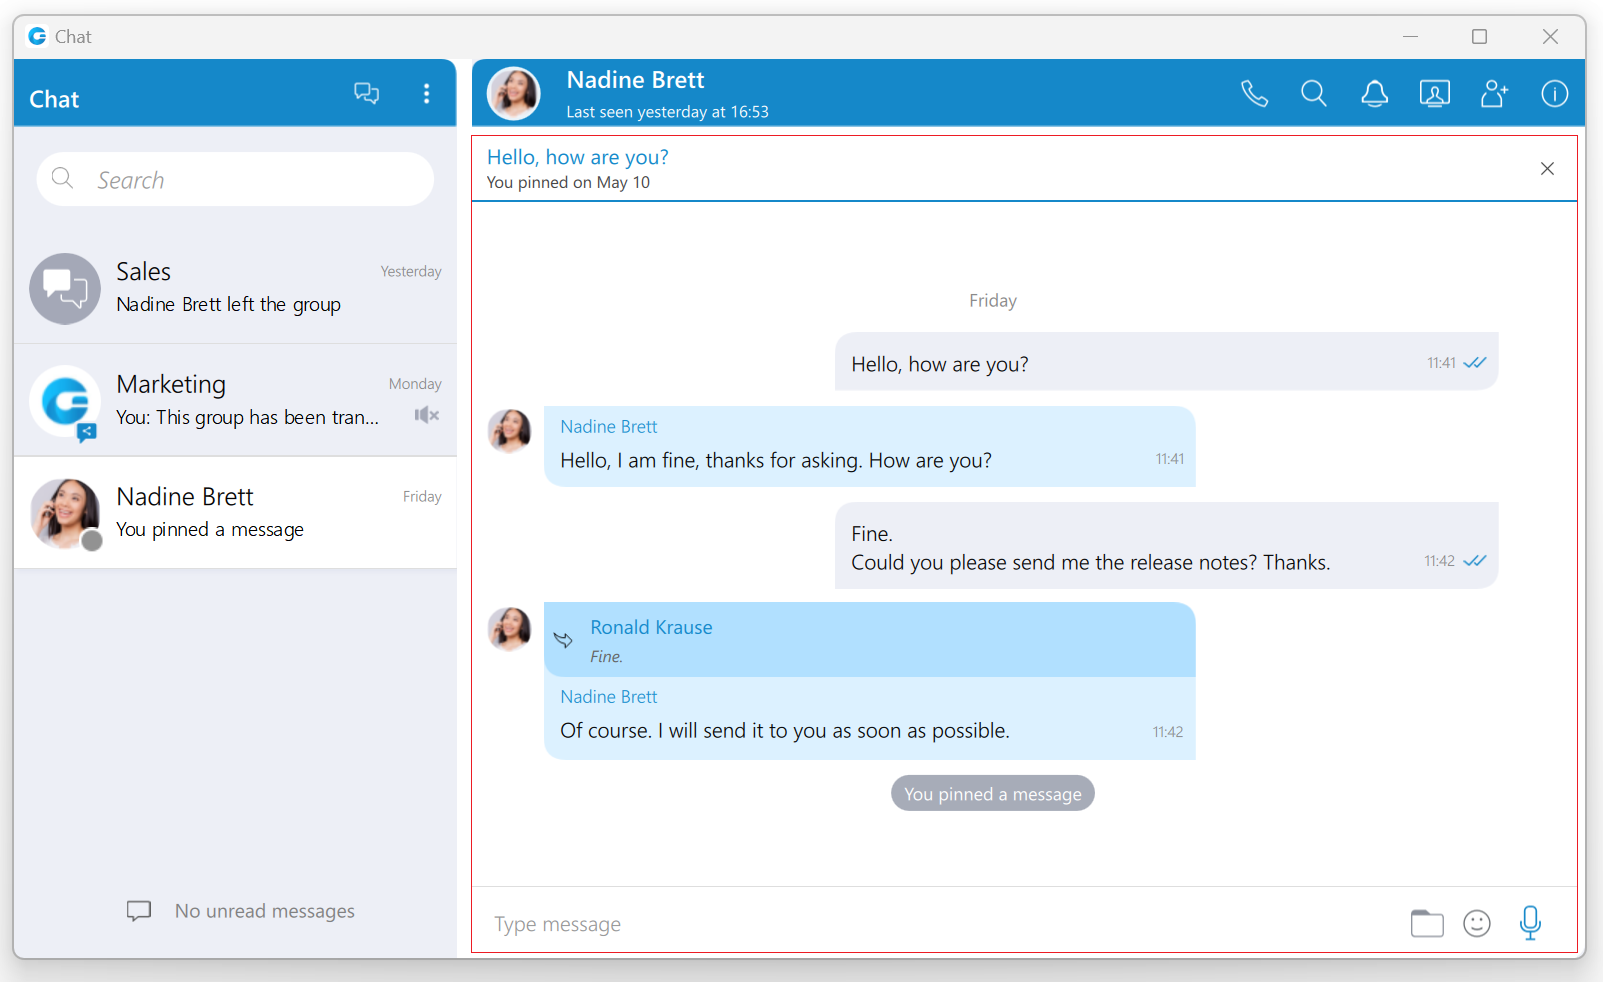
Click the Chat module icon in the main gloCOM window to open the chat window. The conversation list on the left side of the window displays all users’ conversations, while the right shows the currently selected conversation.

There are a few ways to start a conversation, or to open the existing conversation with another user:
- Click on the chat icon when hovering over a user in the main window (only for Grid View).
- Right-click on a user in the main window, and choose the option Chat from the menu.
- Double click on a user in the main window (if your default double click action is set to Chat inside the Preferences).
- Select multiple users in the main window, right-click, and choose the option Group chat from the menu to create instant groups from the main window.
- Search for a user inside the chat window and click on the desired user.
Top blue bar
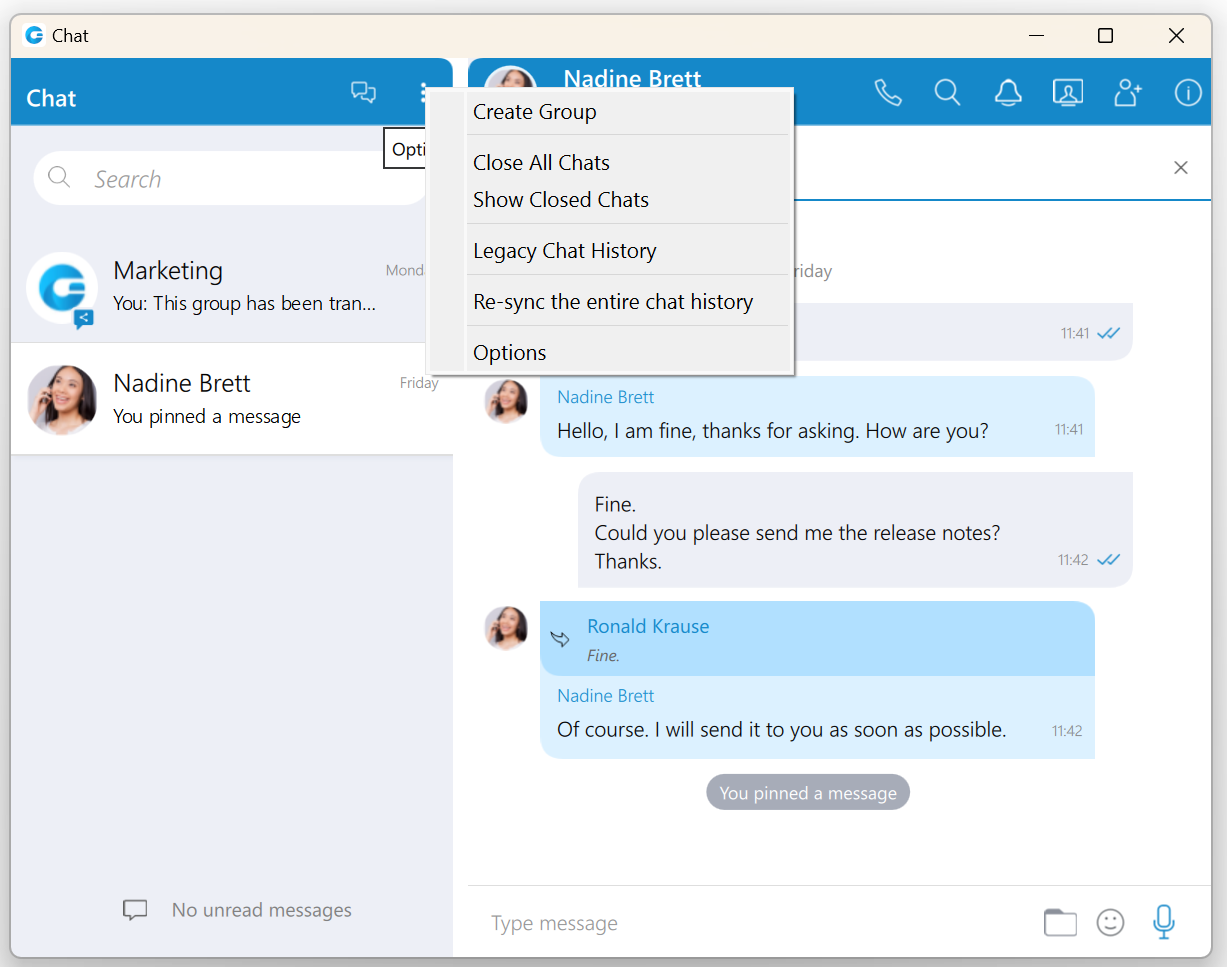
The top blue bar at the top of the window consists of two parts. The Create Group and Options buttons are positioned on the left side.
The Create Group button is used for creating groups, while the Options button contains the following options:
- Create Group
- Close All Chats
- Show Closed Chats
- Legacy Chat History
- Re-sync the entire chat history
- Options
Create Group Chat option is used for creating group conversations (as the group creator, you are automatically the group administrator). Two types of groups are available. The first type of groups are ordinary groups, meaning that the chat history will not be available to newly added participants. The second type of groups are groups with visible chat history, meaning that the full chat history will be available to newly added participants.
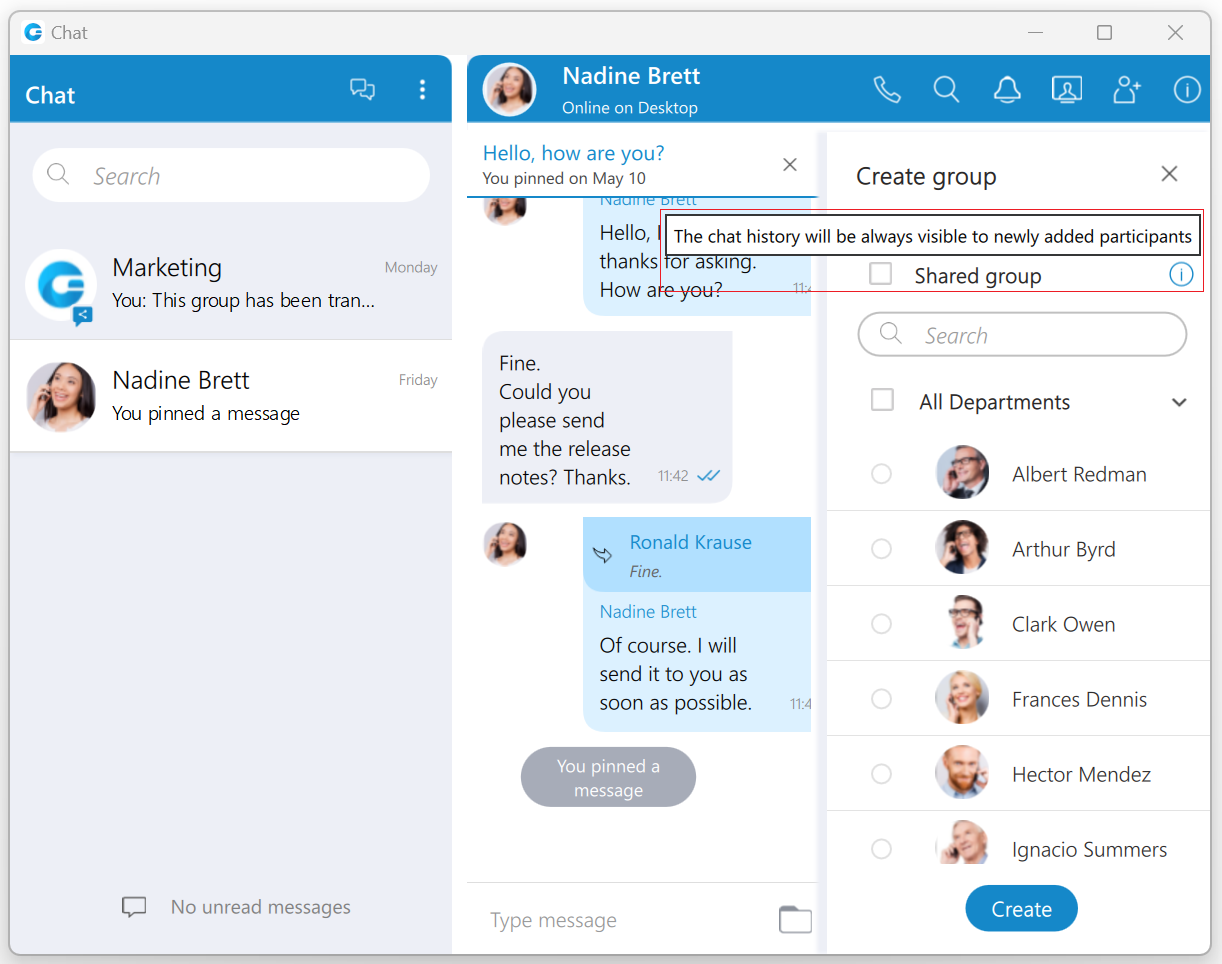
To create a group with visible chat history, check the option Allow full history visibility.
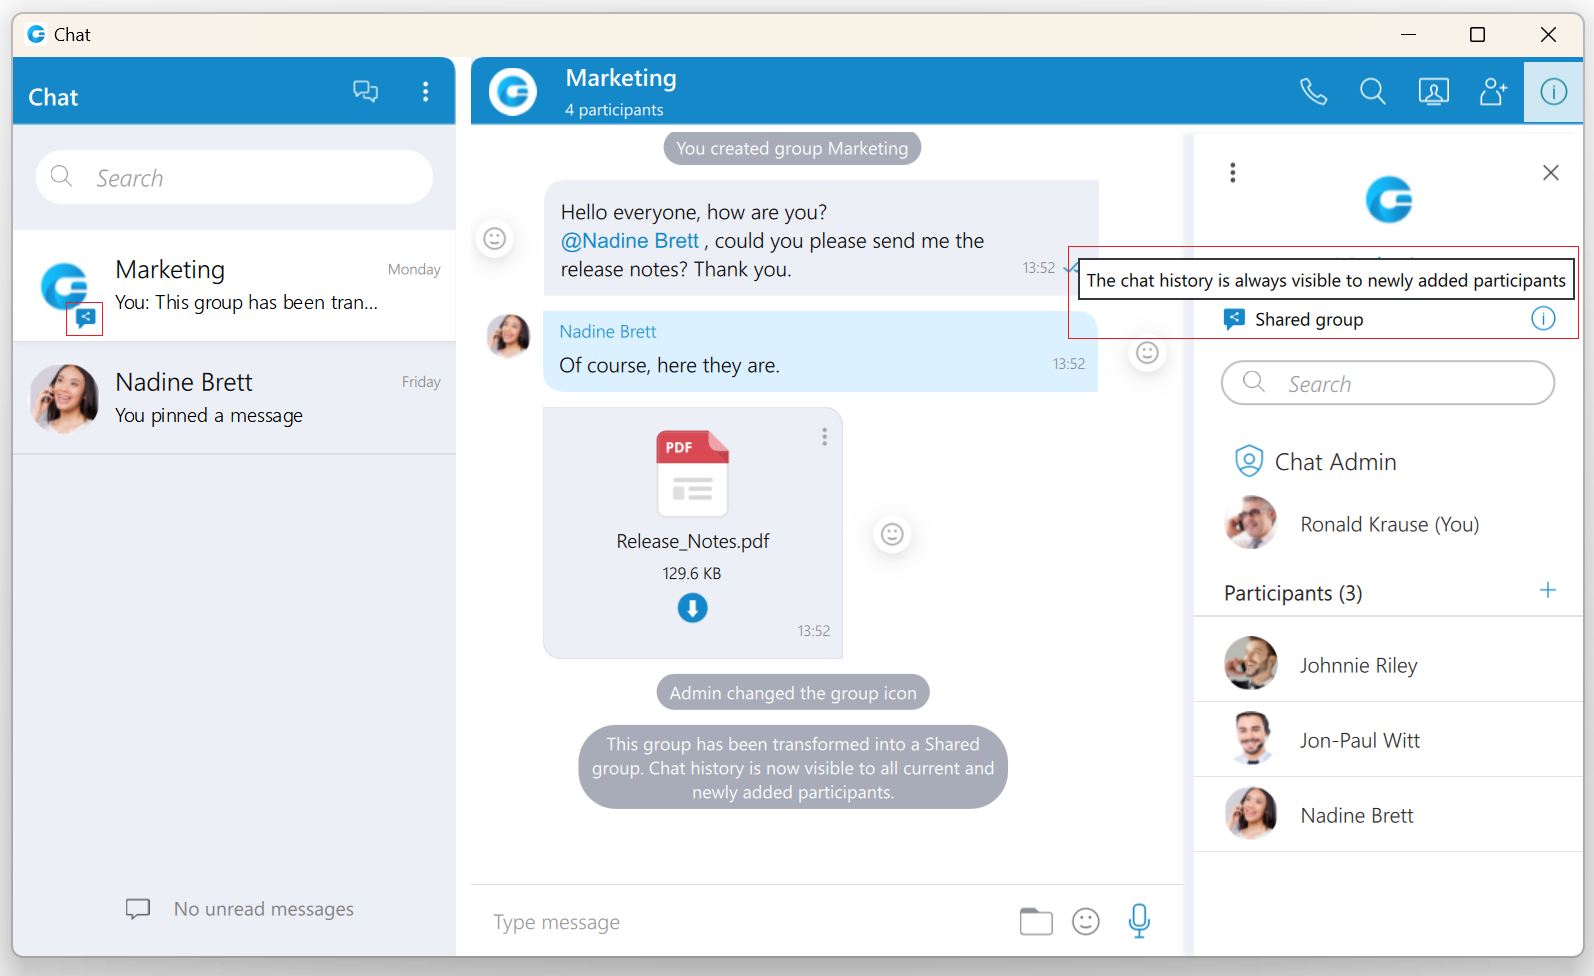
 – Indicates that the chat history is visible to newly added participants.
The group name may or may not be provided during the group creation. If the user does not provide a group name, the group name will be just Group. However, the user can change the group name at any time after creating the group by clicking on the group name.
Filtering and selecting contacts are the same as described in the conference section. The user can filter contacts by name, extension number, and department. Created groups are permanent, meaning the user will remain a group member after closing the application.
It is possible to have multiple groups with the same participants and the same or different names. For example, you could create Sales Reports and New Release groups. Both groups can have the same participants, and the user can use them for various topics, so unrelated matters are not mixed up in a single conversation.
Group chat can be created from one-on-one conversations and conference calls.
Close All Chats option is used to close all your conversations easily without having to close each one manually.
Show Closed Chats option is used to see all of your closed conversations so you can find them and move them back to active.
Legacy Chat History option is used to show chat history from previous versions so you would not lose all of the messages you had in your chat history prior to the update to gloCOM version 6.0. This chat history is kept only for those purposes since old chat messages cannot be migrated to the new chat.
Re-sync the entire chat history option is used to manually re-sync the entire chat history. This option should be used only in case of chat history corruption.
Options option is used to quickly navigate to Chat section in the Preferences window.
The right side of the bar provides information about the currently selected conversation, such as its avatar, the user’s name (or a group name in case of a group conversation), and various action buttons available for that conversation. Click on the name to open the Contact Information (in case of the group conversation, the info section will be opened after clicking the name or the label below)
Below the name is information about the user’s presence and status, e.g., is the user currently online, what is the user’s status message (if any), is he currently away from the Desktop, etc. For group conversations, a label indicates the number of participants in the conversation.
The list of the action buttons is as follow:
 Call the currently selected user (create a voice conference in case of a group conversation).
 Search for messages from the current conversation.
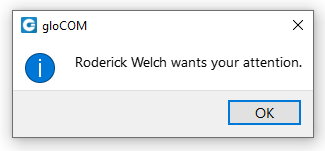
 Ask for attention – the user in the current conversation will be notified that you need their immediate attention. Not available for group conversations.
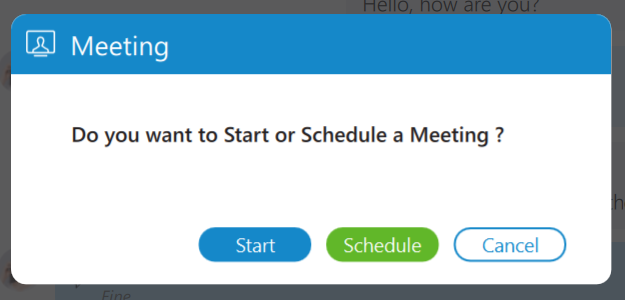
 Start or Schedule a meeting with all chat participants.
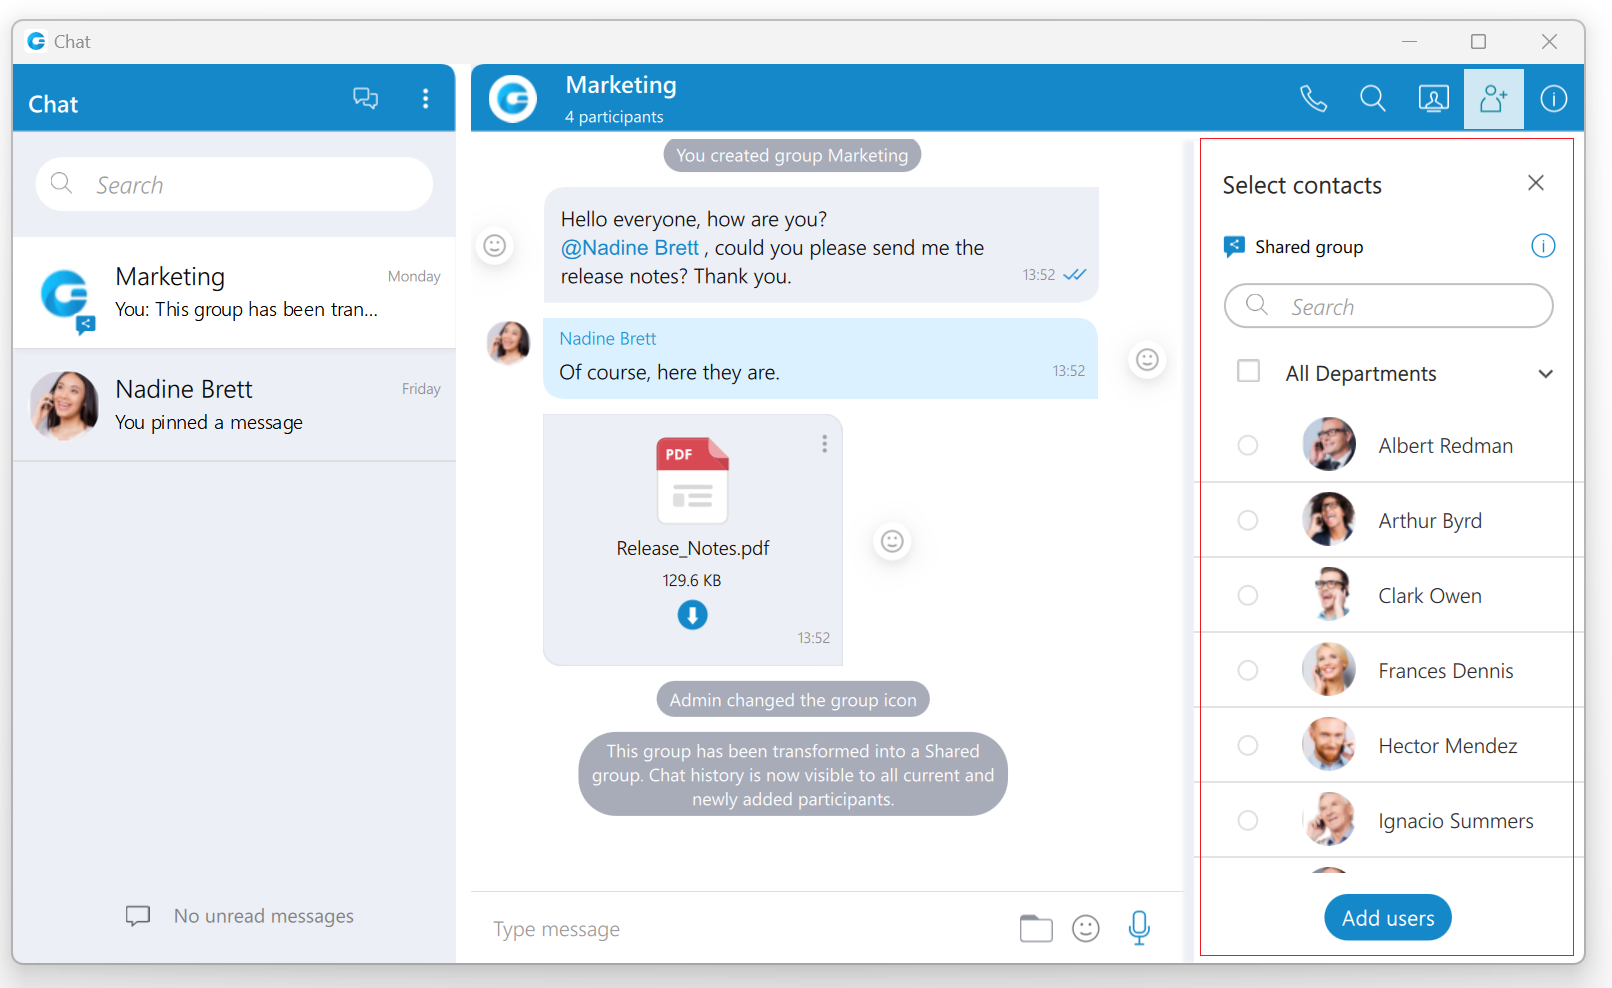
 Add more users into currently selected conversation.
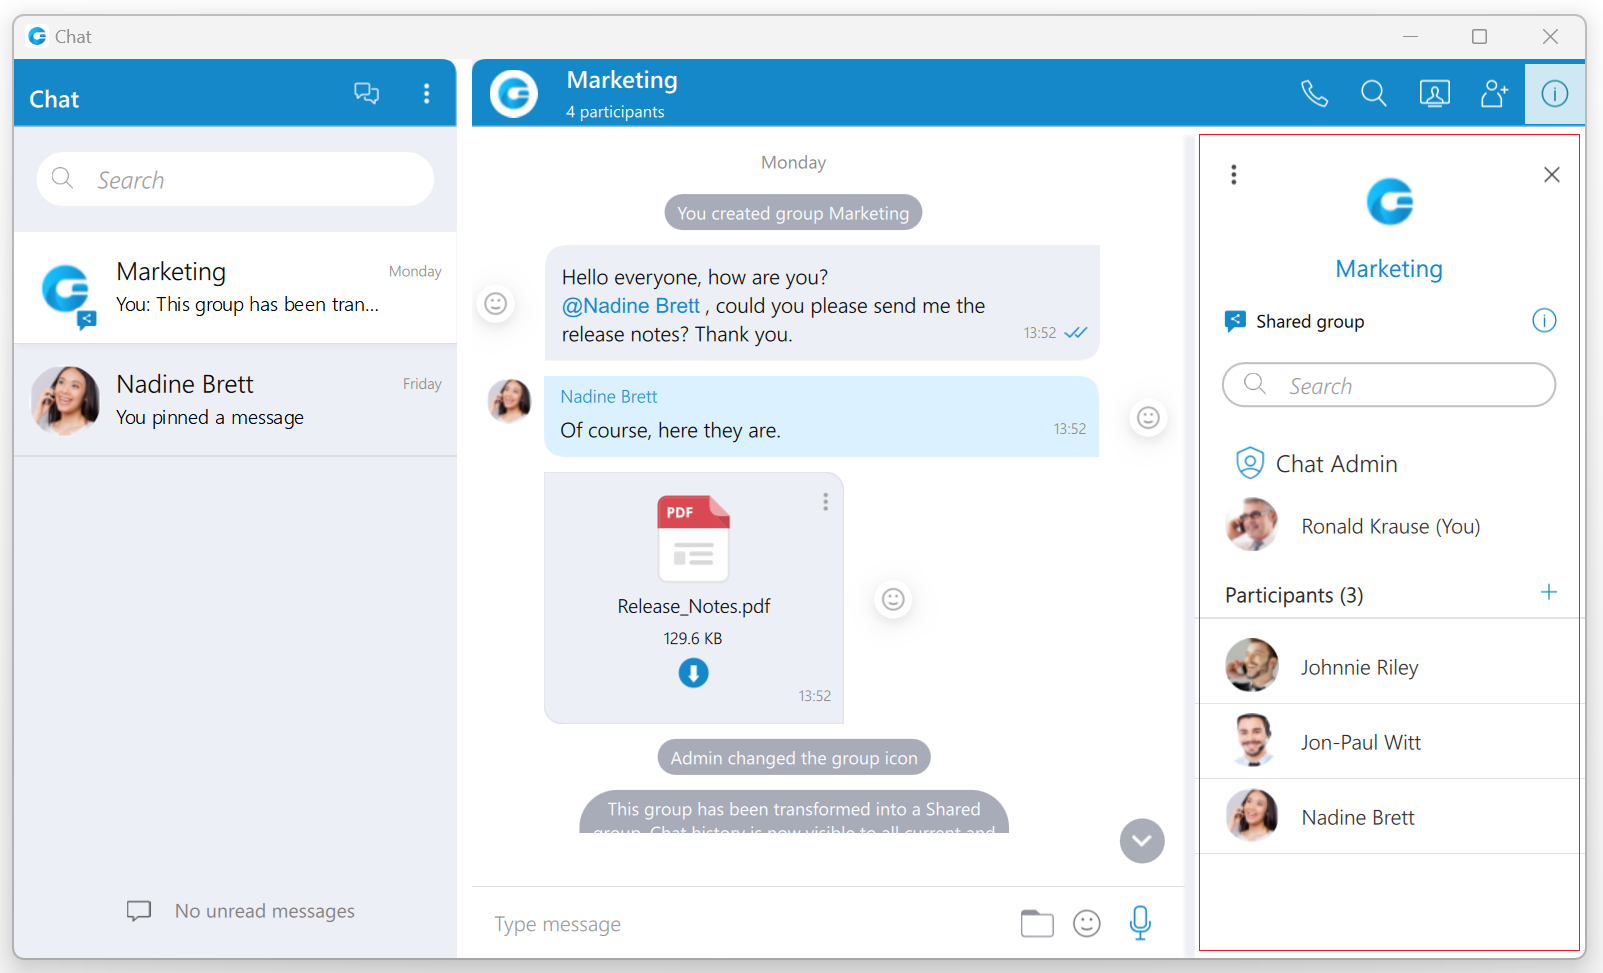
 Open the chat info.
When adding users into the currently selected conversation you can filter users list by searching for a user’s name or extension. You can also filter by department, or even add a whole department into the conversation. Added participants cannot read previous messages in the conversation.
To collapse the users list and show a list of departments click on the name of the currently expanded department. To select all users from the currently expanded department, click on the checkbox next to the department name.
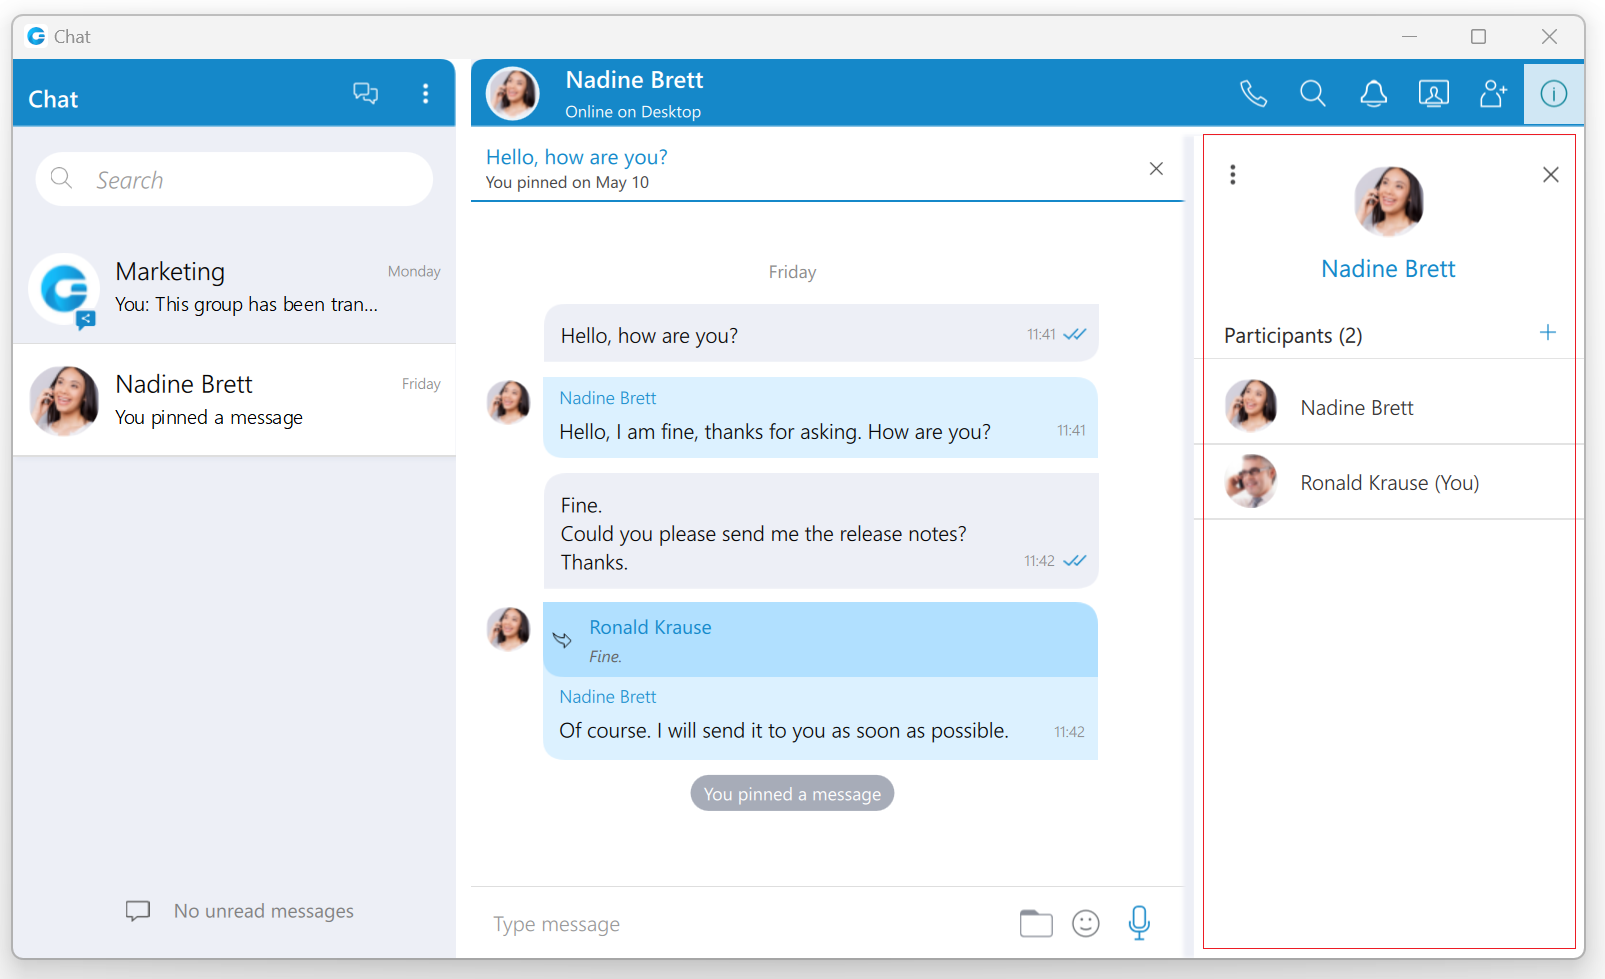
Chat Info
Single chat conversations
Info drawer shows all participants within the selected conversation. Furthermore, it allows users to add more participants to the selected conversation by clicking on the + sign located on the right of the Participants label. This way, the user can easily create a group chat conversation from a single chat conversation. Additionally, by hovering over each participant, the user can see information about their presence and available actions.
![]() The Options button contains:
The Options button contains:
- The Show Files option shows all shared files within the selected conversation.
- The Delete conversation option deletes the selected conversation.
While hovering over a participant, the following action is available:
 Call the hovered participant.
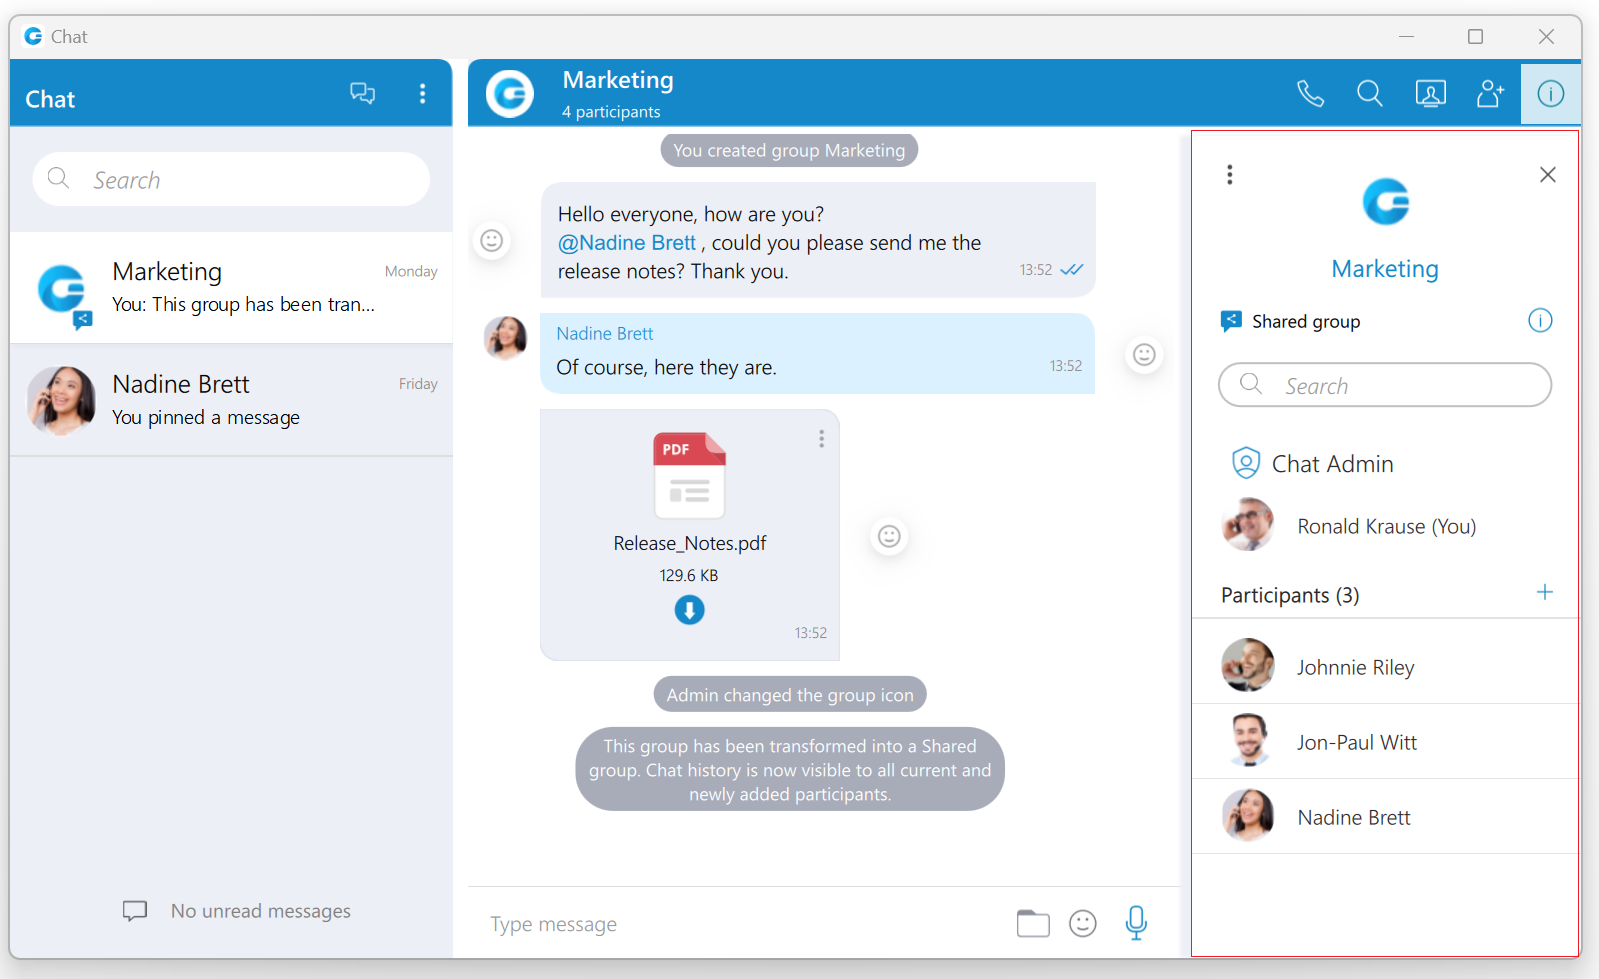
Group chat conversations
The Info drawer shows the group chat icon, the group name, the type of group, the group administrator, and all participants of the selected group conversation. A group administrator can change the group chat icon and group name, remove participants from the group, and select a new group administrator.
The Set group chat icon option allows the group administrator to set/change the group chat icon at any time. Clicking on the group chat icon opens the file explorer window, where an image from the computer can be selected as a new group chat icon. In case the group chat icon has already been set, clicking on it will open a drop-down menu with the following options:
- Change icon: This option allows the administrator to change (update) the group’s chat icon.
- Reset to default: This option resets the group’s chat icon to the default value.
To change a group name, the administrator needs to click on the group’s current name, type in a new name, and press the Enter key on their keyboard.
Furthermore, the administrator can add new participants to the selected conversation or filter participants of the conversation. Additionally, by hovering over each participant, the user can see information about their presence and available action buttons.
While hovering over a participant, the following action buttons are available:
 Call the hovered participant.
 Open the single chat conversation with the hovered participant.
 Remove the hovered participant.
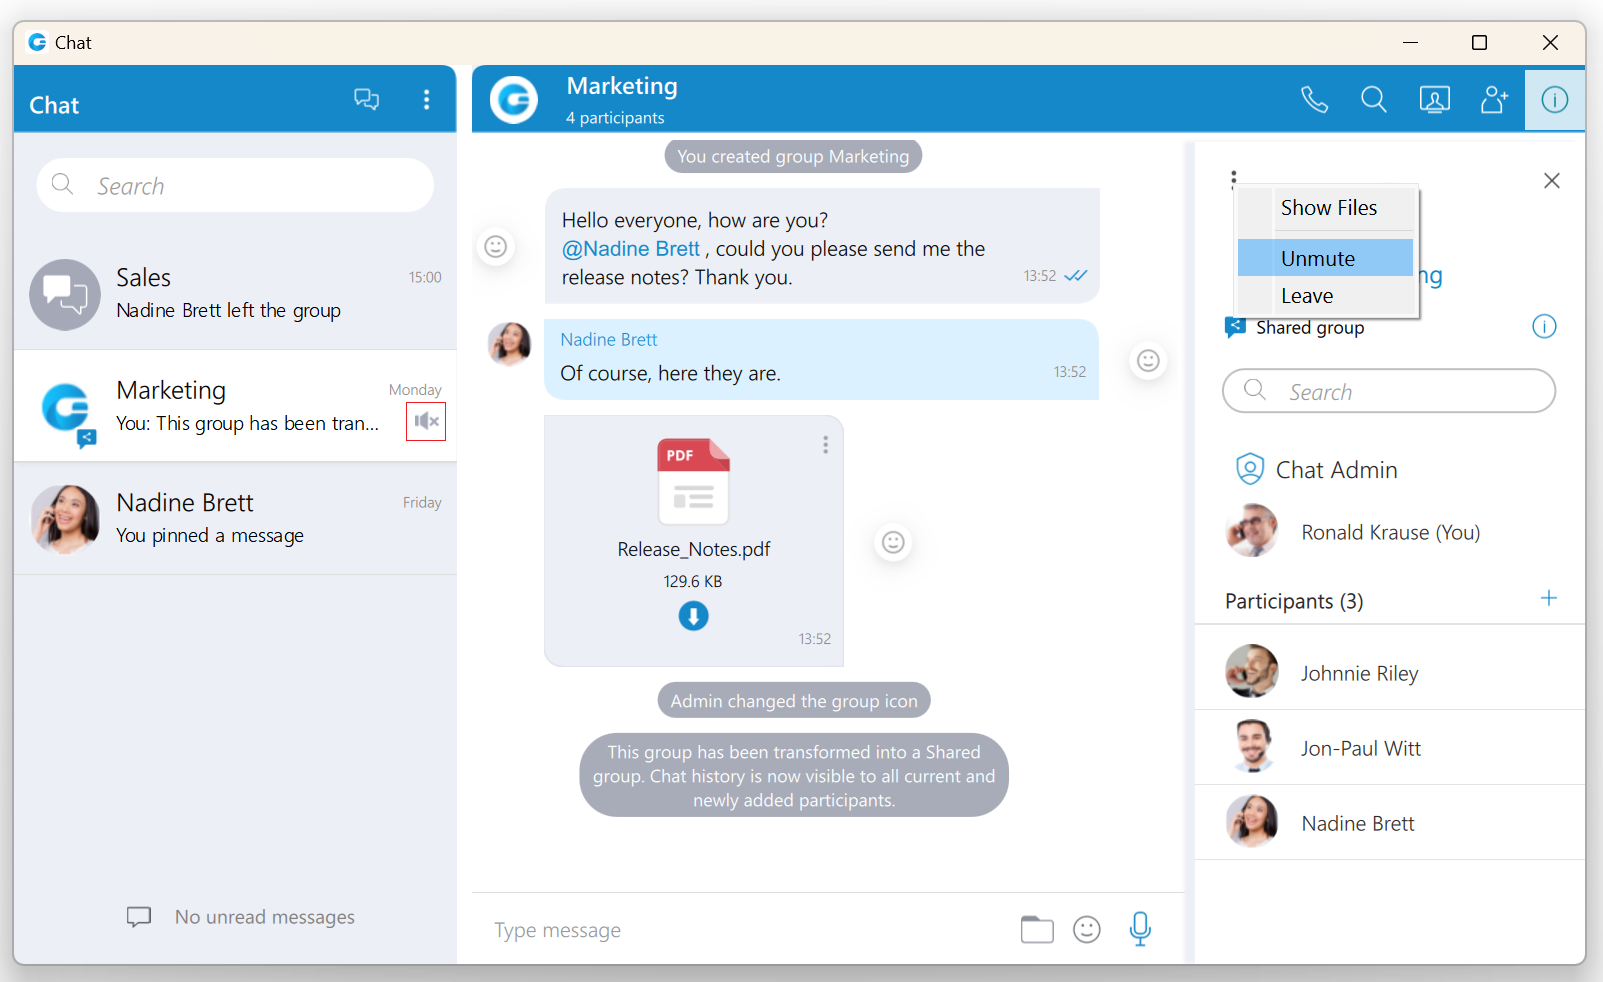
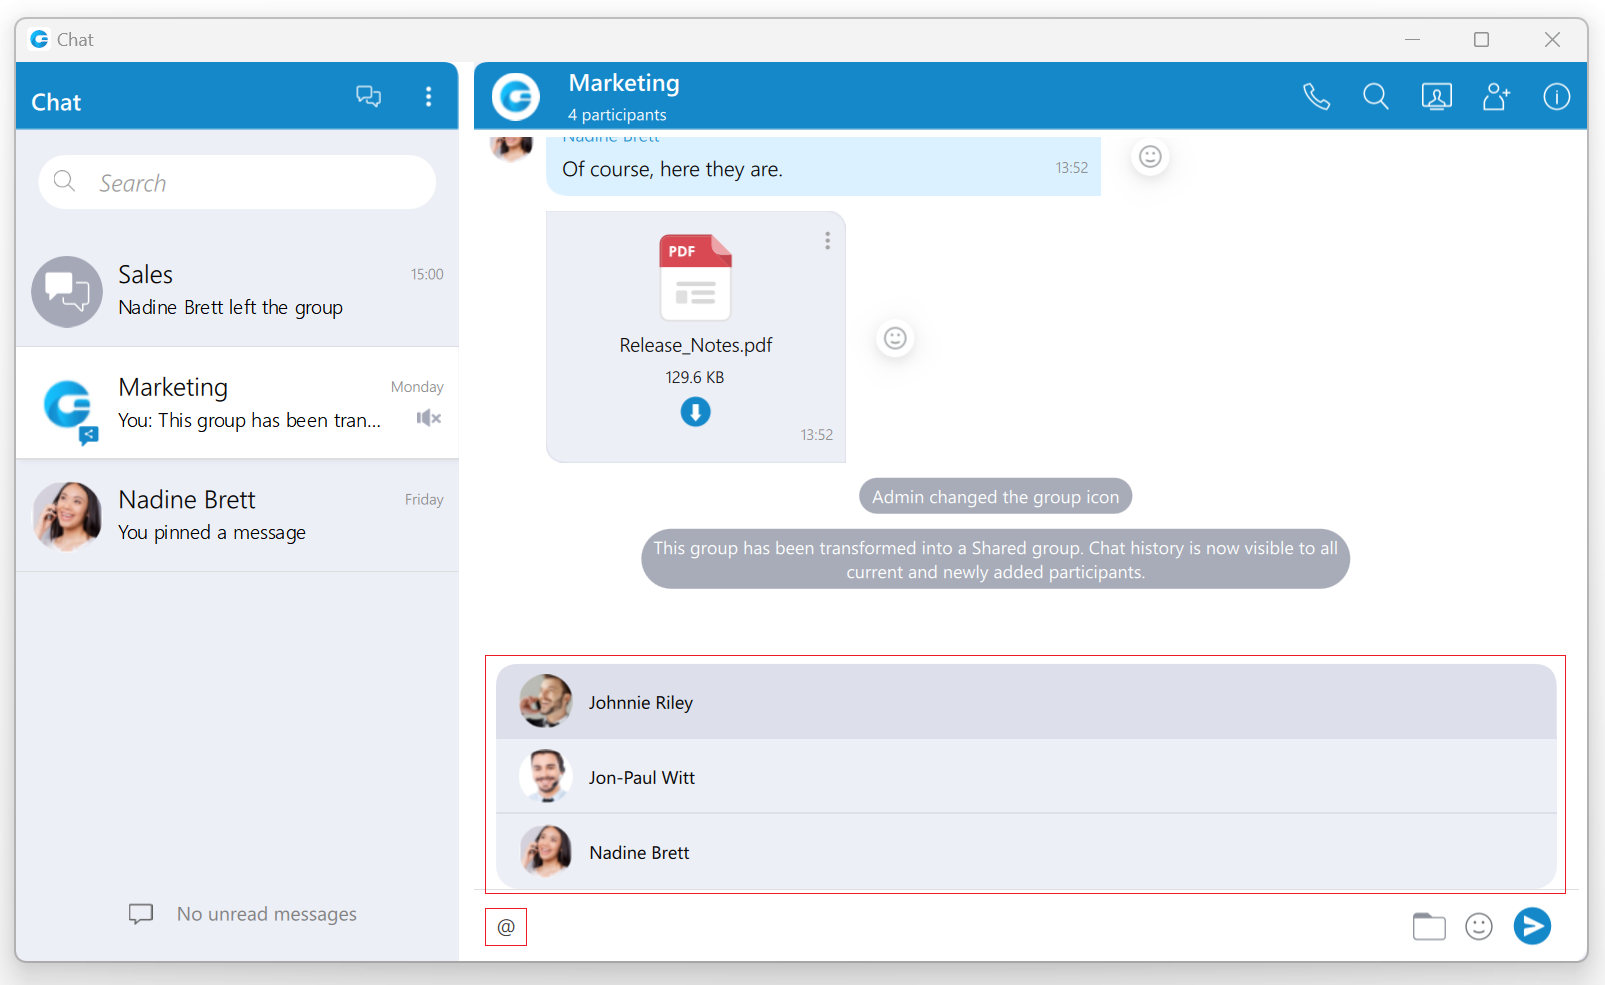
![]() The Options button contains Show Files,Transform into Shared group, Mute, and Leave options.
The Options button contains Show Files,Transform into Shared group, Mute, and Leave options.
- Show Files: This option shows all shared files within the selected conversation.
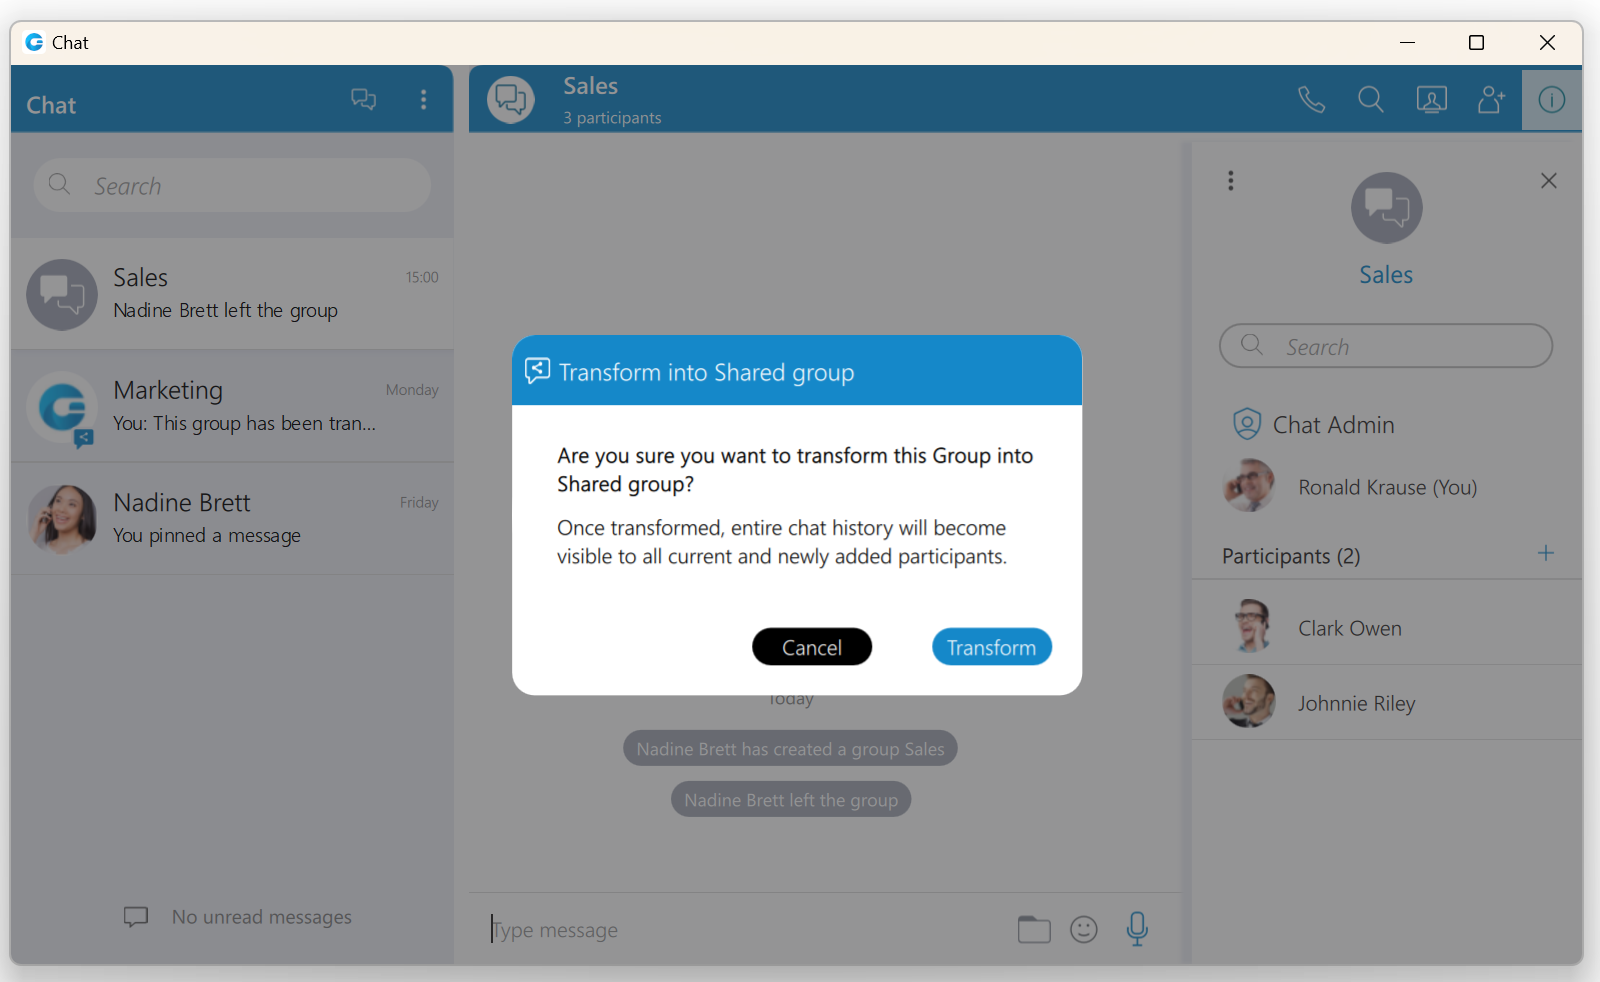
- Transform into Shared group: This option allows the admin to change the existing standard group into a shared group with full history visibility to all existing and newly added participants. Once transformed, it cannot be undone. Caution should be exercised when using this option.(It will be displayed within the drop-down menu only for the standard group chat conversations.)
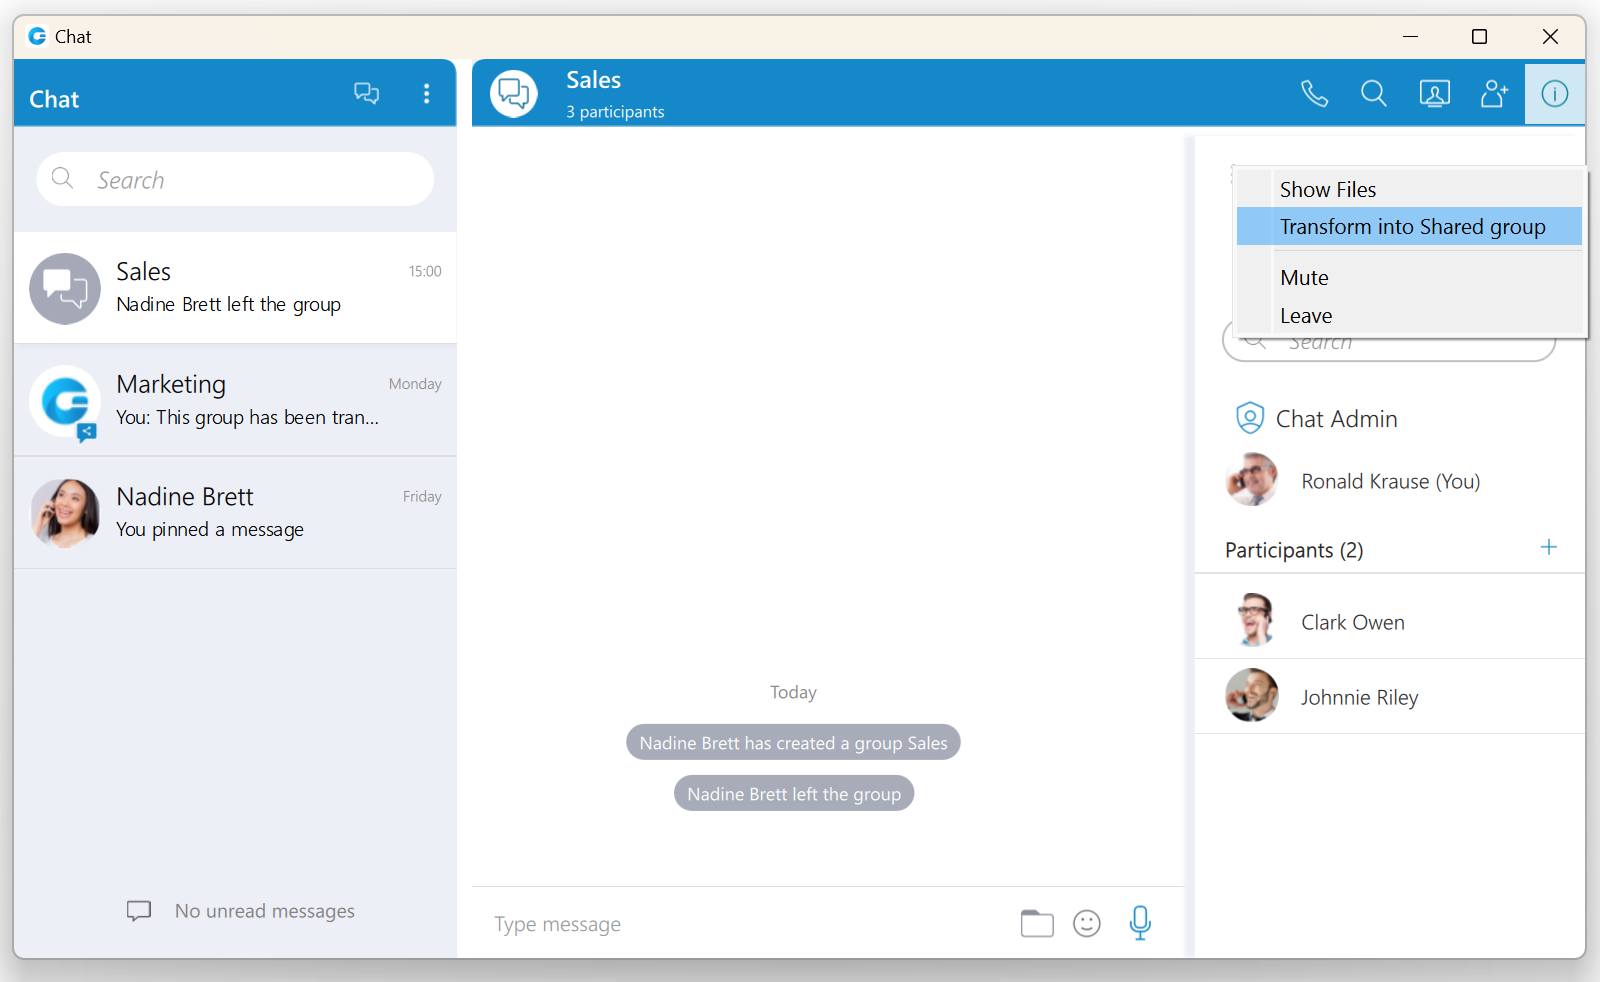
- Mute/Unmute: This option mutes/unmutes the selected conversation.
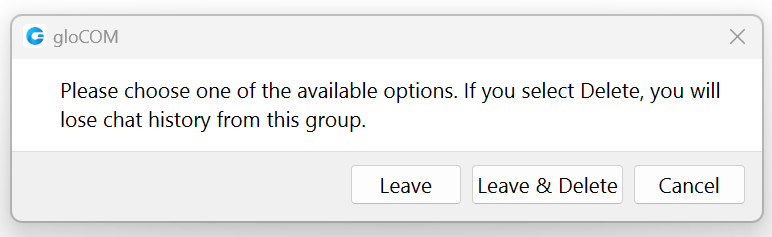
- Leave: option allows the user to leave the selected group conversation and choose what they want to do:
- Leave: It will leave the group and keep the chat history.
- Leave & Delete: It will leave the group and delete all chat history.
- Cancel: It will cancel the leaving process.
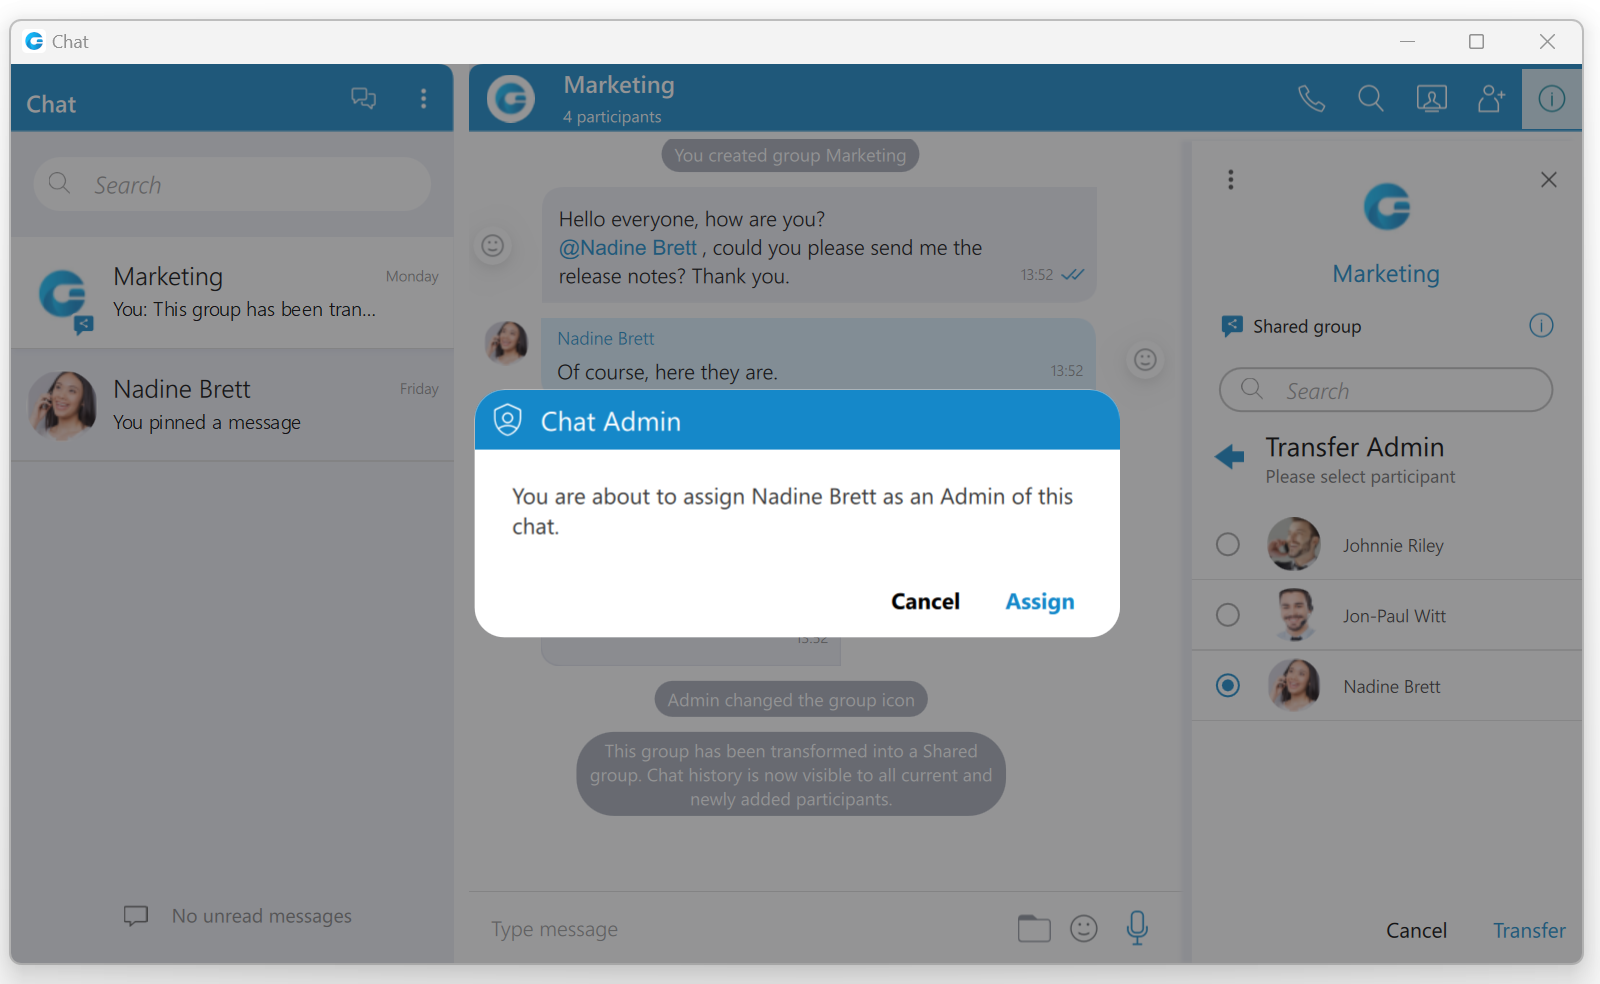
Finally, the group administrator can select a new group administrator by clicking the Transfer button next to their name and selecting a new one. To confirm the transfer process, click on the Transfer button at the bottom of the Info drawer. As a result, a confirmation dialog pops up asking for the confirmation.
Click the Cancel button at the bottom of the Info drawer to cancel the transfer process.
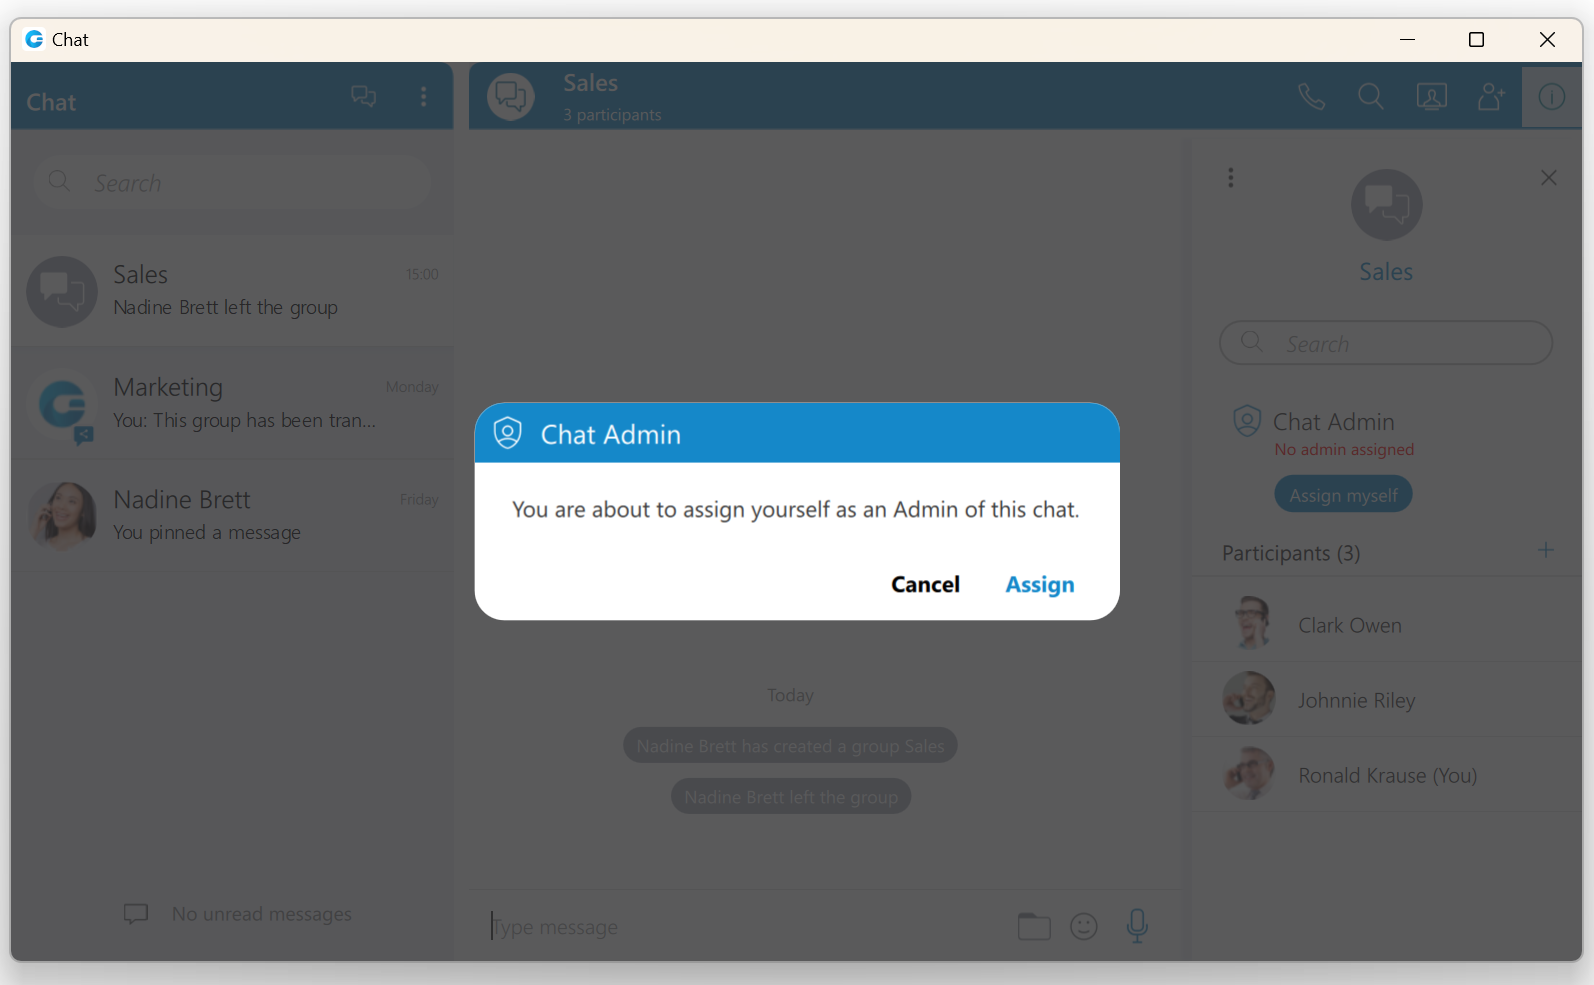
If the group chat does not have an administrator, anyone can become an administrator by clicking the Assign myself button below the “No admin assigned” label. As a result, a confirmation dialog pops up asking for the confirmation.
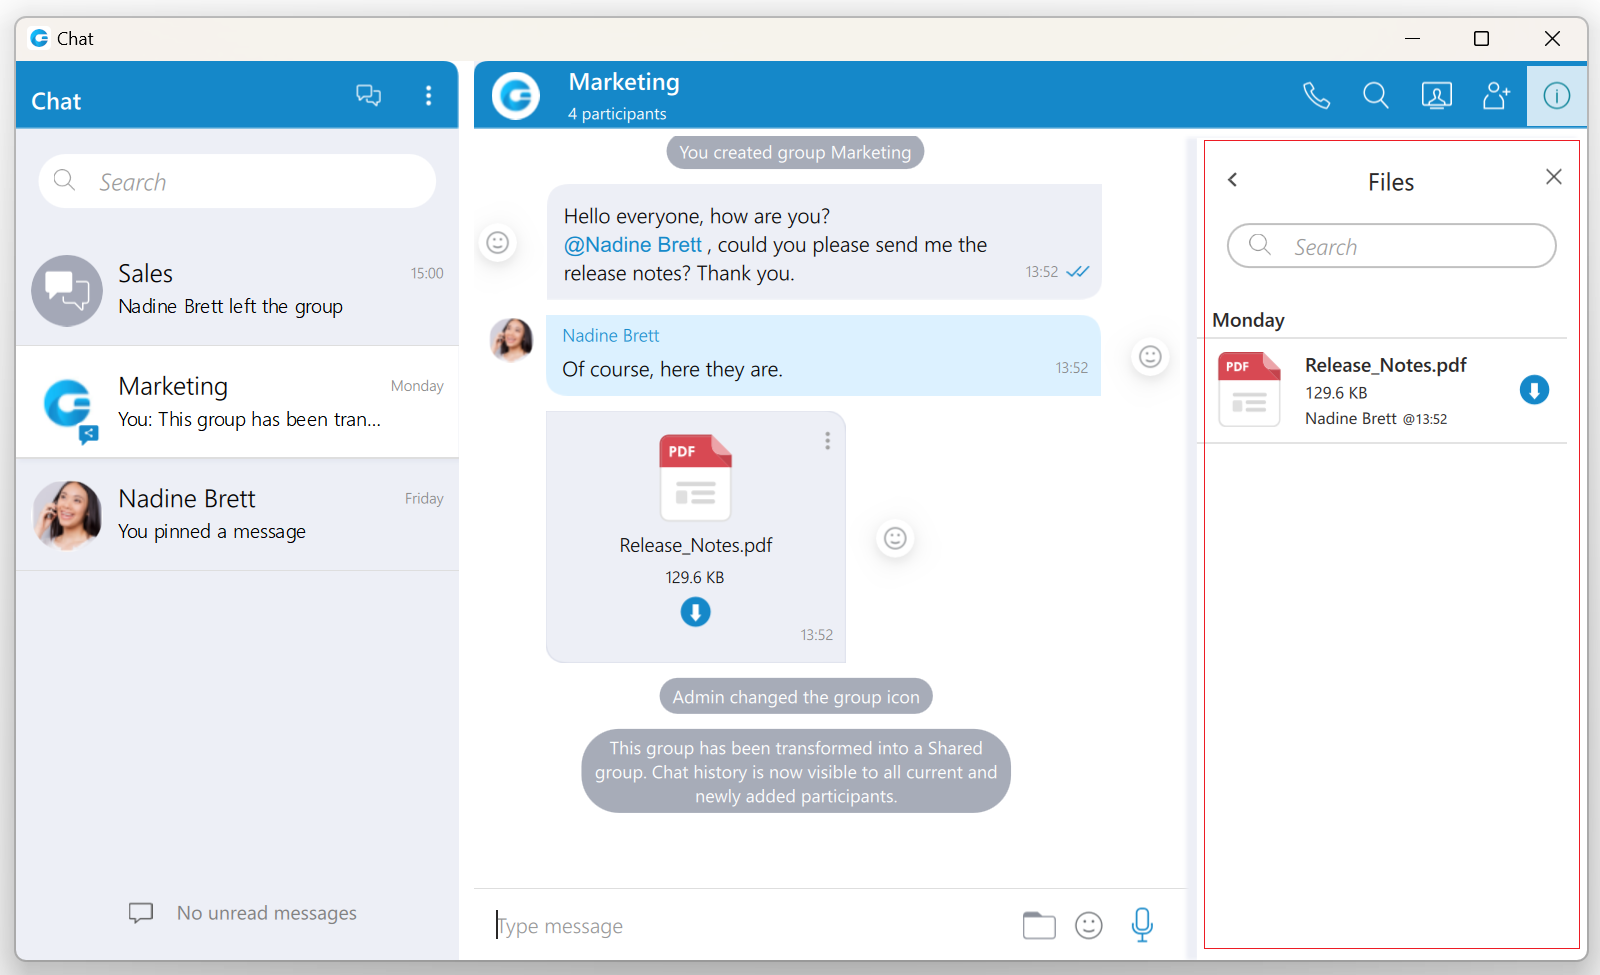
Files overview
Selecting the Show Files option from the drop-down menu displays all sent and received files inside the conversation.
You can search for a particular file by its name. Click the file thumbnail or the file name to open the file if it is available, or offers to download it if the file has not been downloaded yet.
File name, file size, sender, and time are shown for each file. Depending on the file direction (incoming/outgoing) and file status (uploading/uploaded/ready to download/downloading/downloaded) the button on the right of the file name provides certain actions:
 Click to download the file.
 File is already downloaded, click to show the menu and choose from Open, Show in Windows Explorer for Microsoft Windows (Show in Finder for macOS) and Save As options.
- Open option opens the file in the default application
- Show in Windows Explorer/Show in Finder option opens the folder containing the file and selects the file which is useful for locating the file on the file system.
- Save As option creates a copy of the file in the desired location with the pre-filled file name. The file name, by default, will be the same as the file’s name within the gloCOM Desktop application.
 Show progress of currently uploaded/downloaded file.
 Click to cancel current uploading/downloading. Visible when you hover the progress circle.
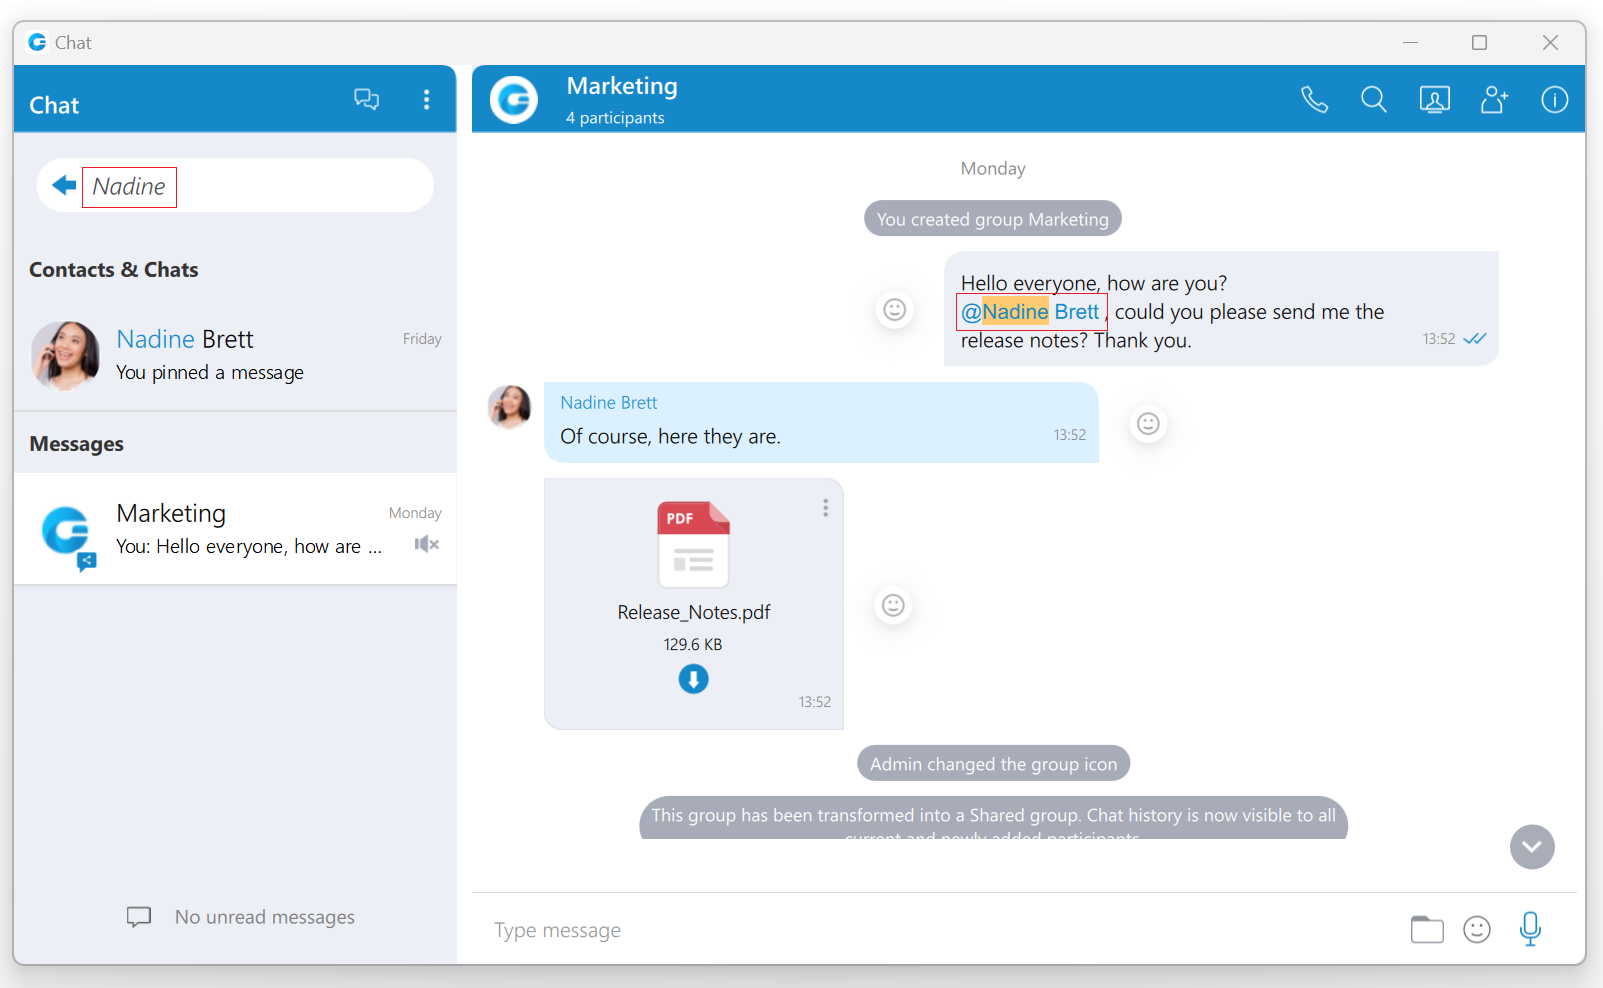
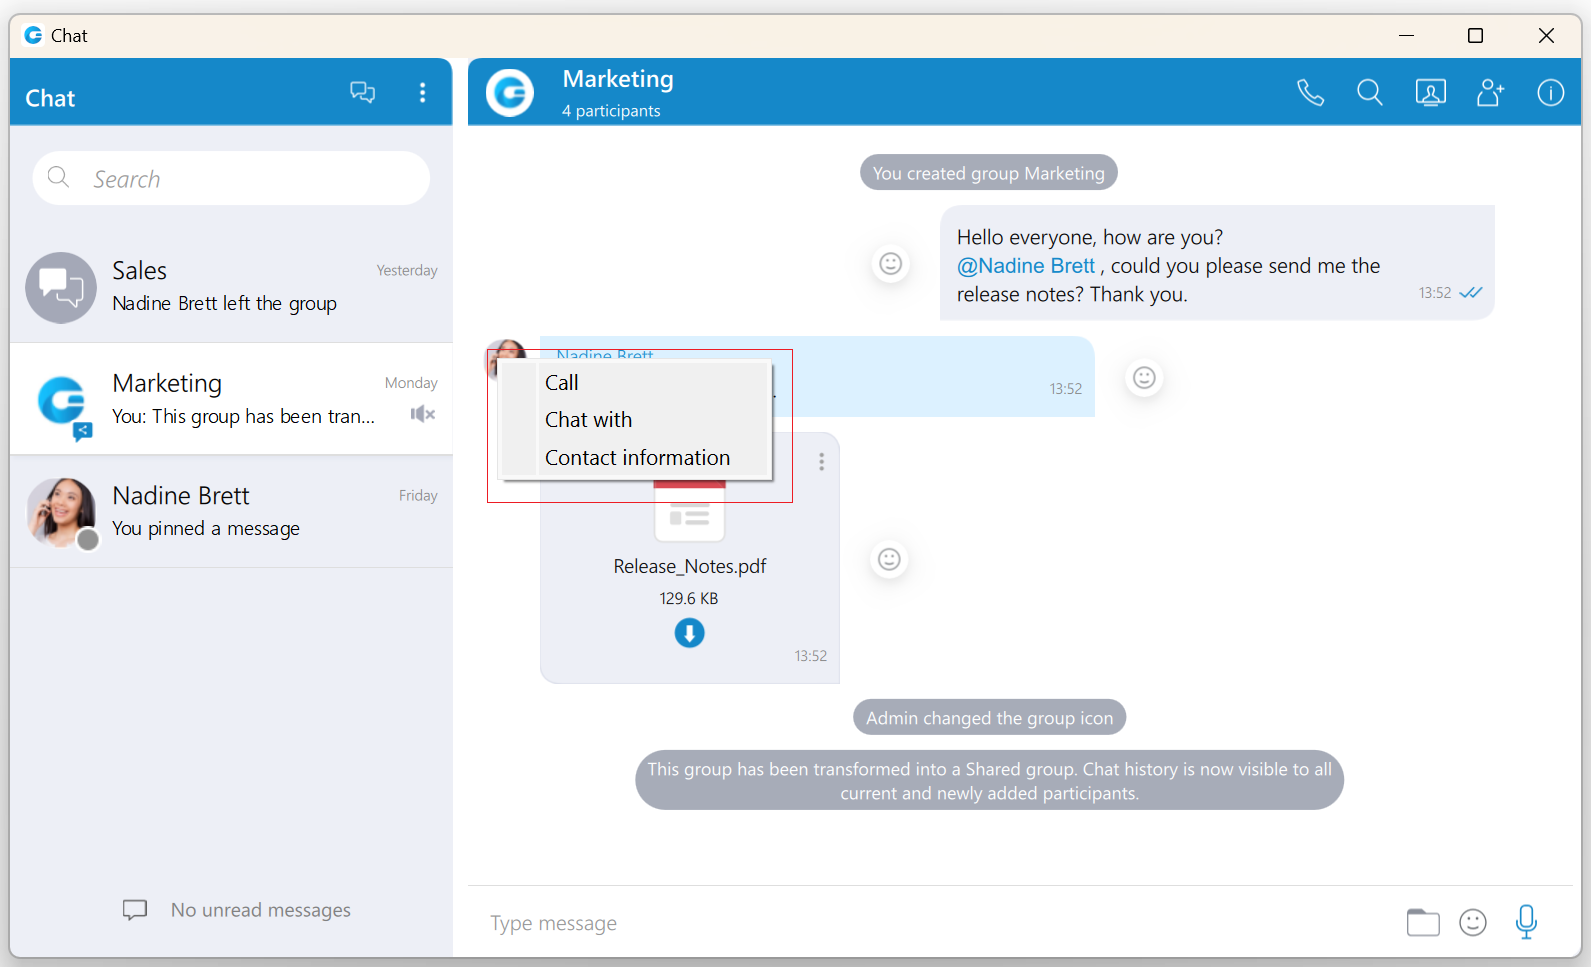
Mention participants in group chat conversations
The mention as a feature represents a good way to get someone’s attention within the group conversation. It allows the user to mention one or more participants and provide the context of their mentioning within the message. The mentioned participants will receive a notification even in the group conversations they have currently muted.

To mention a participant, the user needs to enter the @ sign followed by the name of the desired participant. Immediately after entering the @ sign, the list of the participants who can be mentioned will be displayed above the input field.
Only participants from the group chat conversation can be mentioned.
The user has a few possibilities for selecting participants:
- The first includes scrolling through the list using the up and down arrow keys and selecting the participant by pressing the Enter (Return) key on their keyboard or using the mouse wheel and clicking on the participant.
- The second is to continue entering the participant’s name after the @ sign. In that case, the list above the input field will only display participants whose names match the entry.
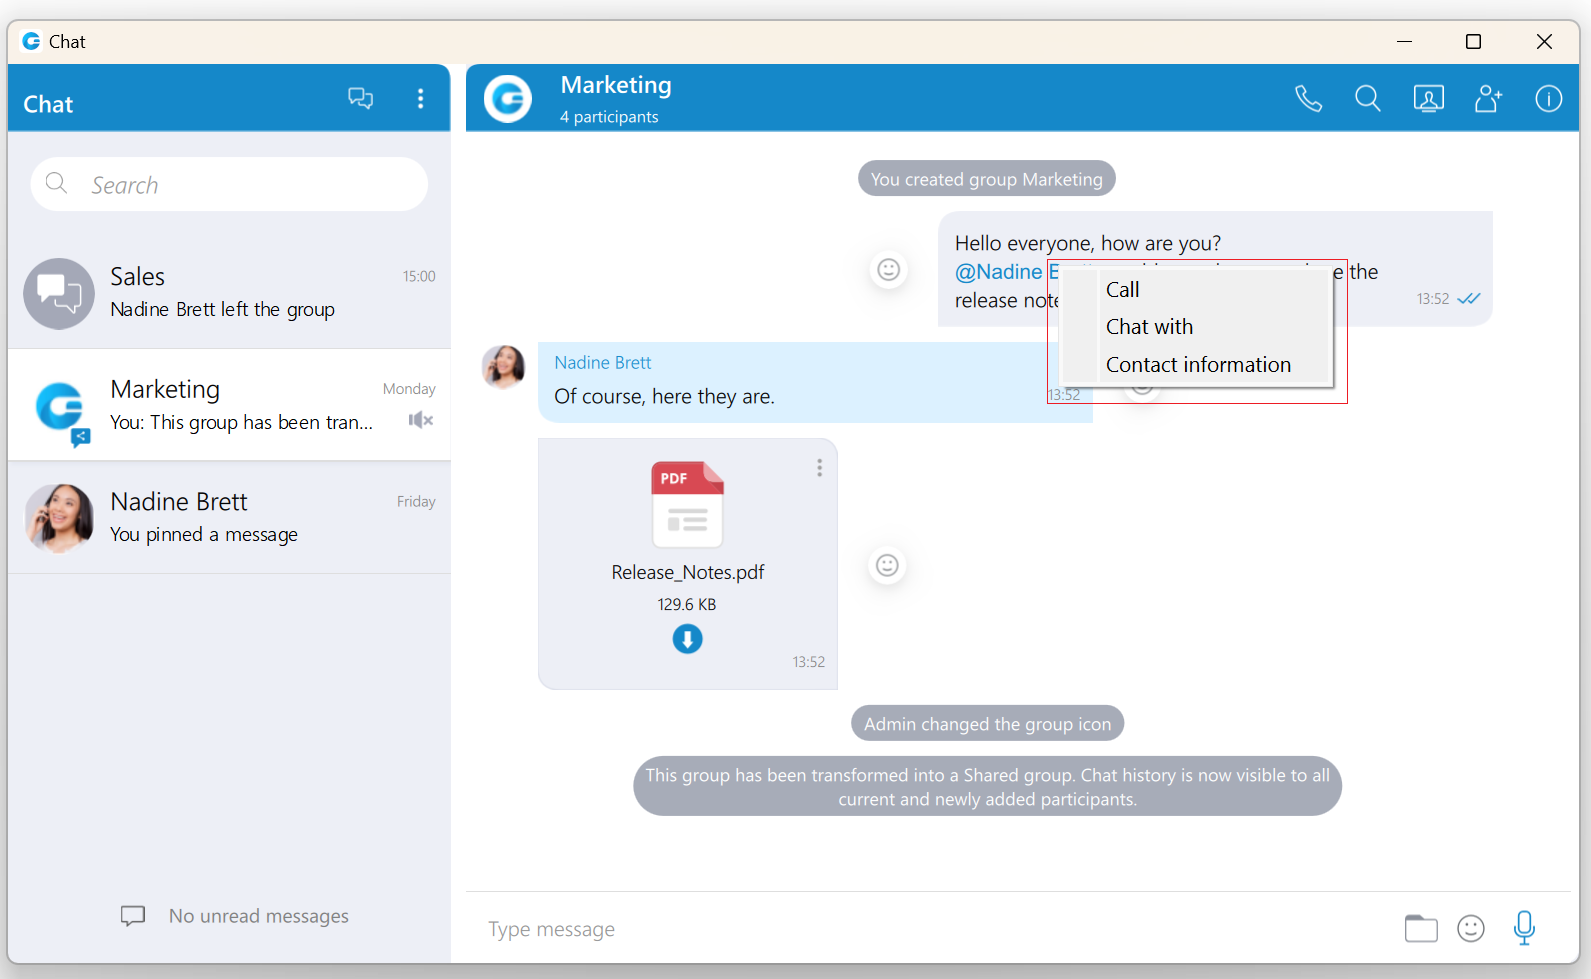
The mentioned participant will be colored in blue within the conversation.

Clicking on the mentioned participant within the conversation brings a pop-up menu with the following options:
- Call
- Chat with
- Contact information
Search and Chat History
The Search field below the Create Group and Options buttons, has multiple purposes:
- Start a new conversation or open an existing conversation by searching for a user’s name, a user’s extension or a group name, and click on the desired item in the list
- Chat history
Unlike the versions prior to gloCOM 6.0 chat history is now integrated into the chat window so you don’t have to open another window to search for a message. When you type in a term in the search field, the application is going to find all users or existing conversations that match the term, and also find all messages that match the term. Users and existing conversations are positioned on the top, followed by all messages that match the term, sorted from the most recent one to the oldest one.
If you click on any item in the Contacts & Chats section, the application is going to open the selected conversation and clear the search field.
On the other hand, if you click on an item in the Messages section, the application is going to open the conversation, focus the desired message and load a few messages around it to give you the context of the conversation at that point. From there, you can scroll up/down to load older/newer messages, where every occurrence of the searched term is going to be highlighted.
Once you have found what you were looking for, you can delete the term in the search field to exit the search mode or click on the  button on the left side of the search field. This enables you to search your entire chat history without ever leaving the chat window.
If you type in more than one word in the search field, the application is going to find all messages that contain both of those words in any order.
For example, searching for “Hello Bob” matches all of these:
- Hello, how are you Bob?
- Bob? Hello? Are you there?
- Hello Bob, do you have a few minutes?
- hello Bob, how are you?
But maybe you just wanted to find the last two messages, where words Hello and Bob are right next to each other and in the right order (where the word Hello comes before Bob). In that case you have to put quotation marks around the term.
For example, search for “Hello Bob” matches just these:
- Hello Bob, do you have a few minutes?
- hello Bob, how are you?
As you can see in the examples above search in the chat window is case insensitive.
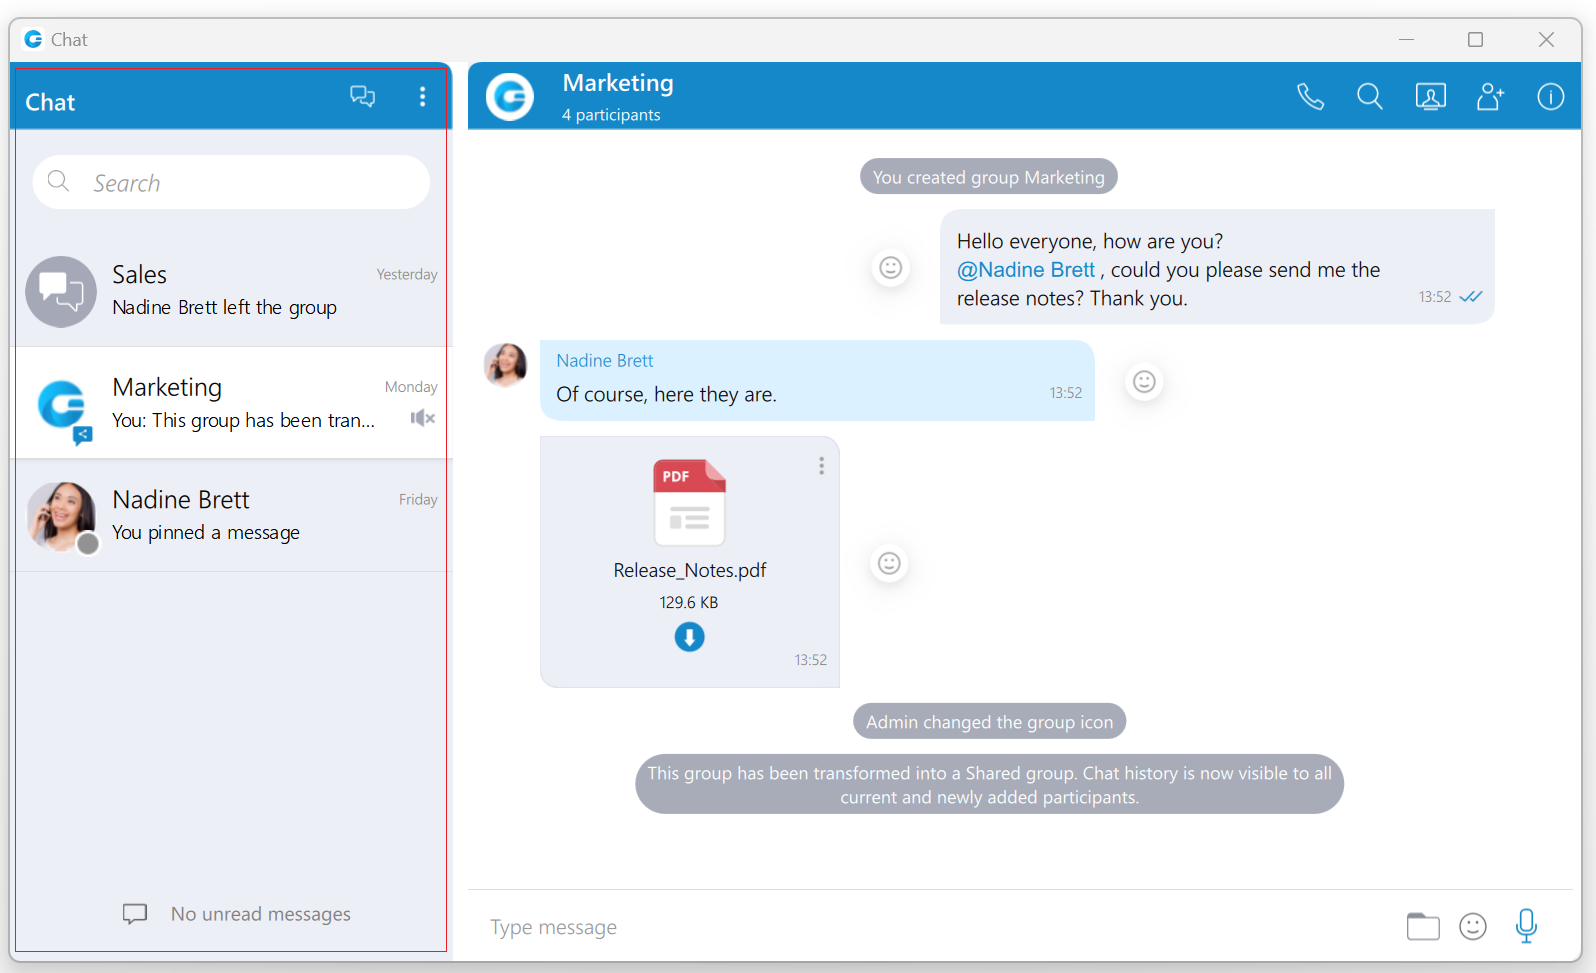
Conversations list
Below the search field is a list of all chat conversations sorted by their most recent activity. These conversations are persistent, meaning they will appear in the chat window even after restarting the application. To remove the conversation permanently, users have to delete the conversation, which can be done from the info drawer. However, to close the conversation, hover over the conversation and press the x button that appears in the top right corner of the conversation. This way, users can keep only those conversations they are currently interested in visible. Closing all conversations can be done by selecting the Close All Chats option from the Options drop-down menu above the search field. Any activity within closed conversations will move them back to the active conversation list (new messages, new participants added, etc.). Hence, users will always catch the latest messages and events. Users can find closed conversations using the search field above the conversation list or by selecting the Show Closed Chats option from the Options drop-down menu above the search field. From there, any closed conversation can be moved back to the active conversation list by clicking on it or the  icon at the top right corner while hovering over it. Click the Back to active chats label to return to the active conversations list.
Conversation with a user which has been deleted from PBXware will be marked with a prefix (Deleted). You can no longer send messages to this conversation, but it is still useful because of the chat history and all existing messages with that user before deletion.
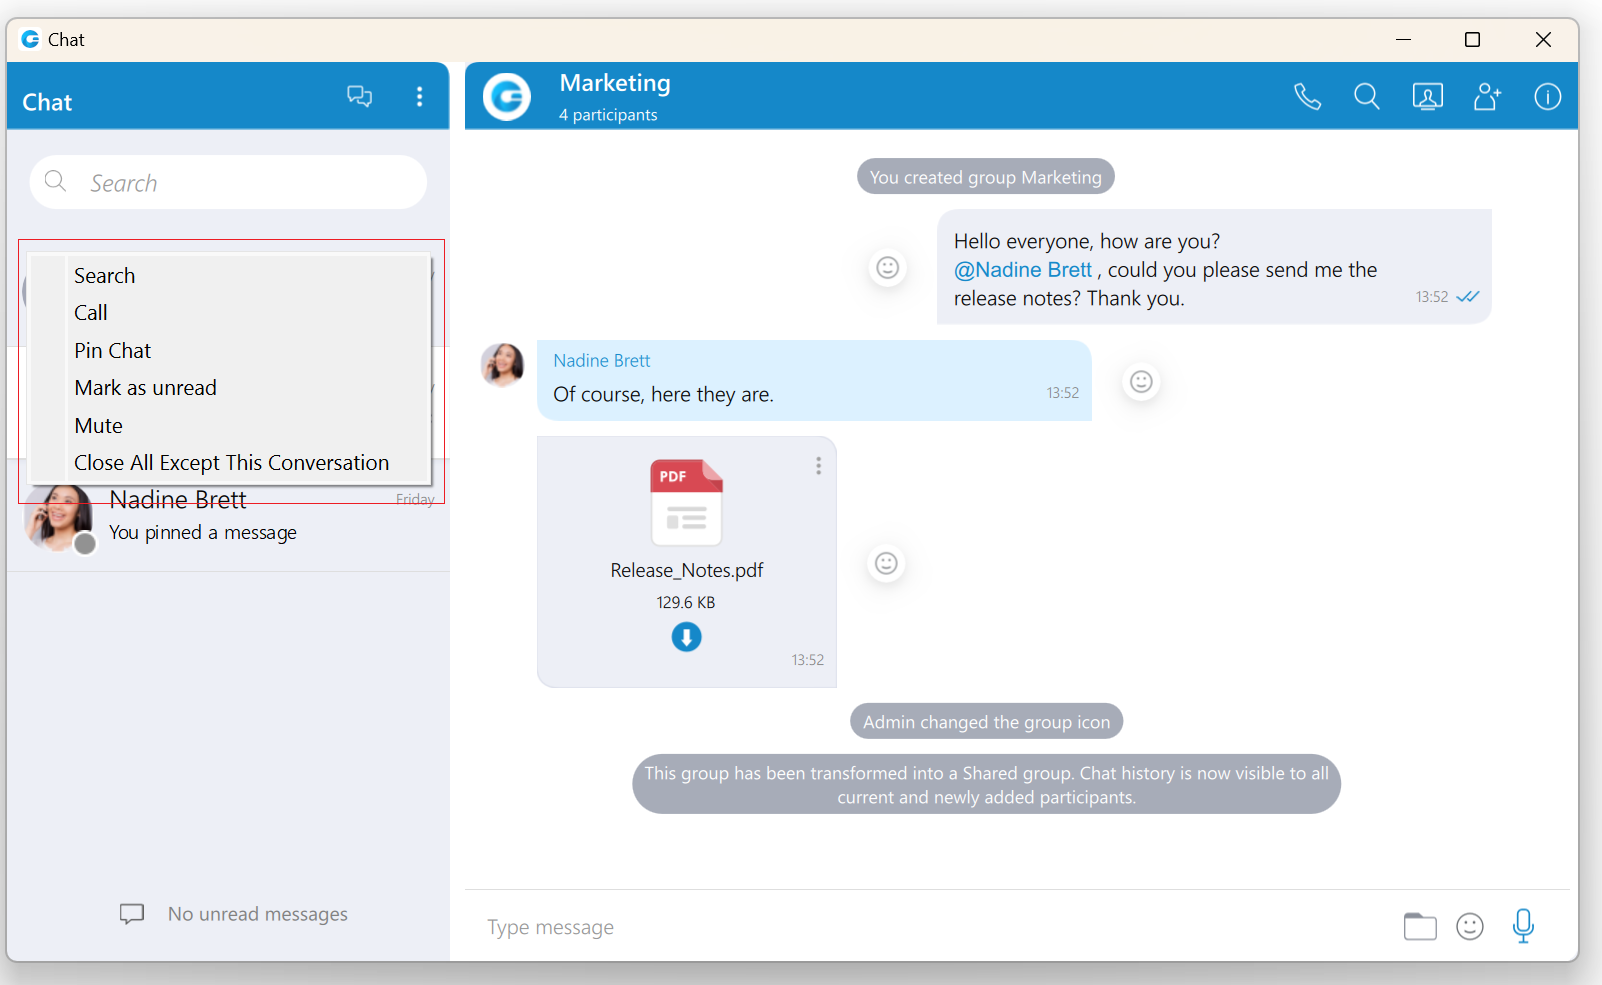
When you hover a session, besides the x icon there is a dots icon in the top left corner of the conversation.
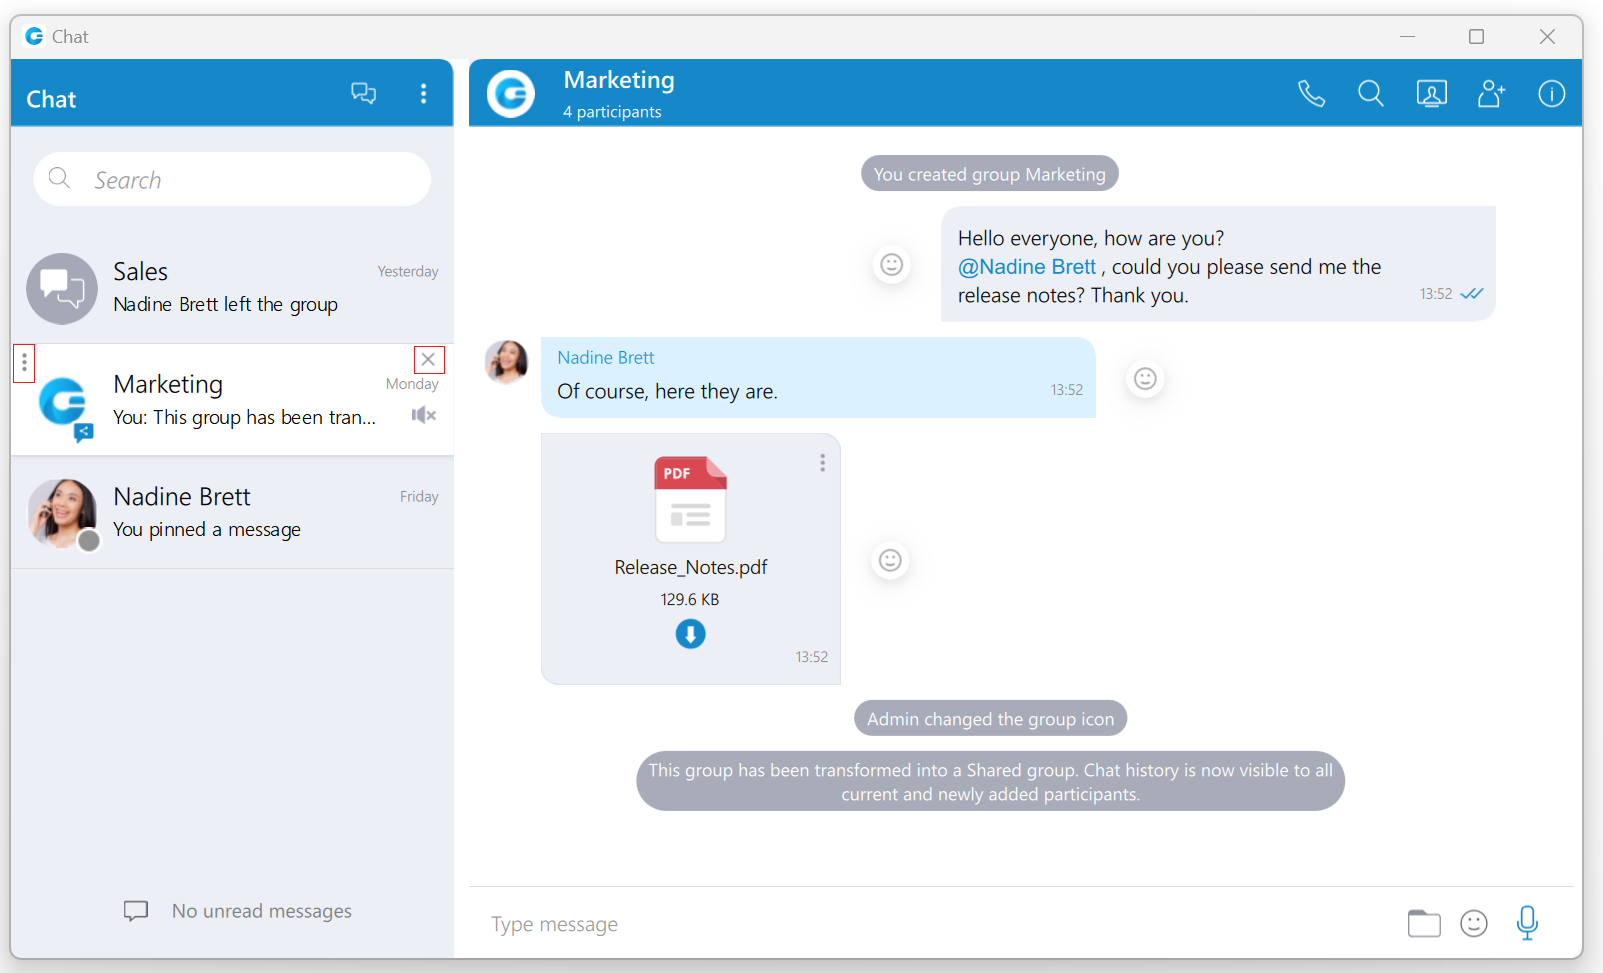
Click on it will open a drop-down menu with the following options:
- Search
- Call
- Pin Chat
- Mark as Read/Unread
- Mute (only for group conversations)
- Close All Except This Conversation
Also, right-clicking on the chat conversation in the conversations list will open the same drop-down menu.
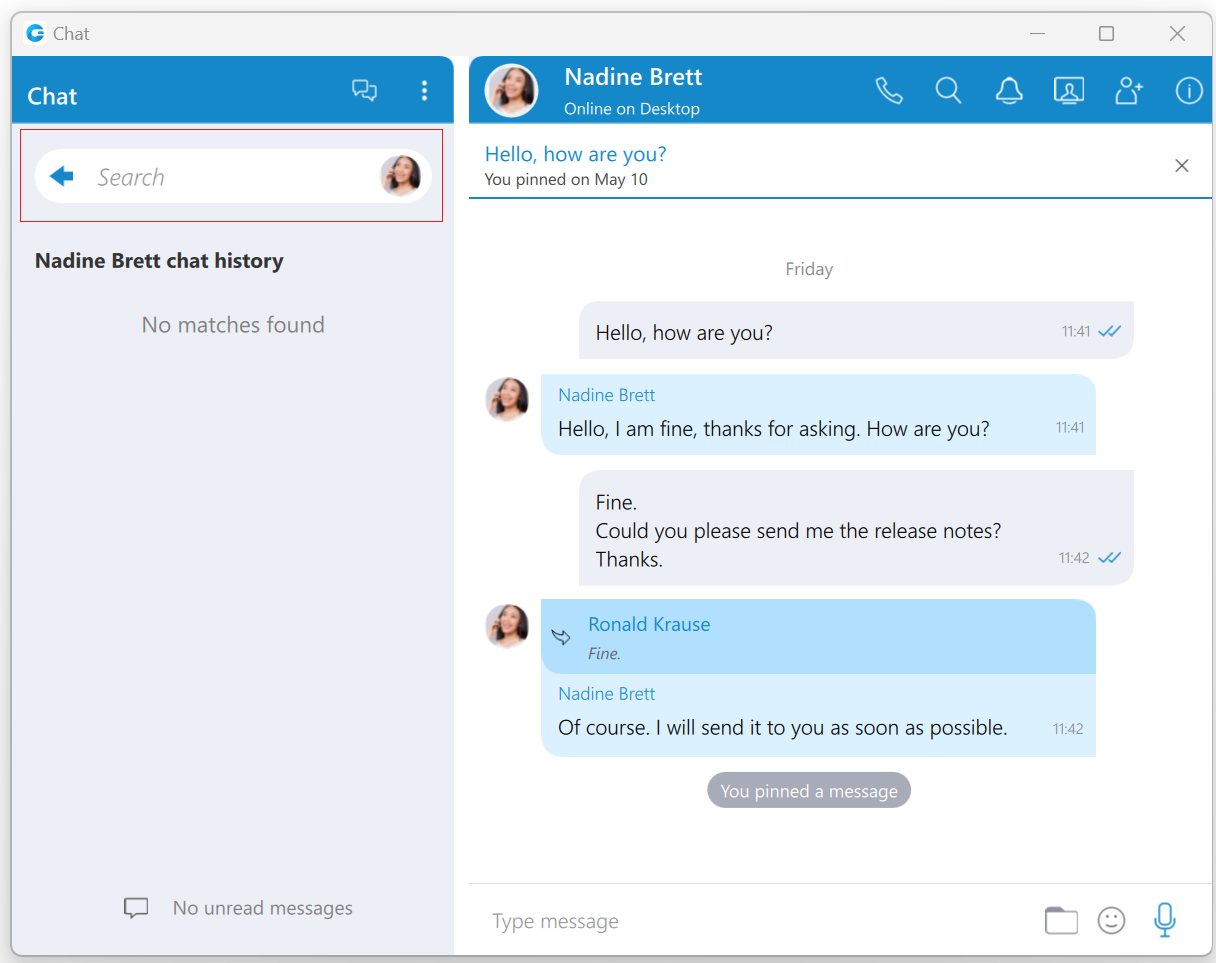
Search option allows you to search for messages from that conversation. This is useful to search only for messages from a specific user unlike global search which searches for messages from all conversations. There are two ways to get out of this mode: by clicking on the back icon ![]() located on the left side of the search field, or by pressing the ESC key.
located on the left side of the search field, or by pressing the ESC key.
Call option allows you to call the user or to create a conference call in case of a group chat.
Pin Chat allows you to pin the most used conversations on the top of the conversation list. The last pinned conversation is always on the top of the conversation list. You can unpin the conversation in the same way as pin, and also by clicking on the pin icon ![]() that appears if a conversation is pinned. The user can rearrange pinned conversations according to their needs by using the drag and drop options. This allows them to define priority for pinned conversations.
that appears if a conversation is pinned. The user can rearrange pinned conversations according to their needs by using the drag and drop options. This allows them to define priority for pinned conversations.
Mark as Read/Unread allows the user to explicitly mark the conversation as Read/Unread. If they mark the conversation as Unread, the Unread indicator will show up for that conversation. It informs the user to look at this conversation again and take some actions if needed. Any action inside the chat conversation with the unread status will remove the Unread indicator. Also, opening the conversation or explicitly marking it as read will remove the indicator.
Mute option is used if you want to stop receiving notifications for a group chat maybe because there are too many messages exchanged and it distracts you. You can unmute a group chat in the same way as mute, and also by clicking on the speaker icon ![]() that appears if a conversation is muted. You can also Mute/Unmute a conversation from the Chat Info screen.
that appears if a conversation is muted. You can also Mute/Unmute a conversation from the Chat Info screen.
Close All Except This Conversation option allows you to close all conversation except this one. This is useful if you have only one conversation you are currently engaged in, so you want to hide all others so they don’t distract you.
For each 1 on 1 conversation in the list you can see:
- User’s avatar with his status icon
- User’s name
- Last message in the conversation
- Time of the last message in the conversation
- Number of unread messages (if any)
For each group conversation in the list you can see:
- Group chat icon
- Group name
- Last message in the conversation
- Time of the last message in the conversation
- Number of unread messages (if any)
While in search mode conversations list will change its items according to the searched term which is explained in the Search and Chat History section.
Unread messages indicator
An indicator for unread messages is at the bottom of the conversation list. This is helpful if users have scrolled down and do not see their most recent conversations or when they are in search mode.
If there are any unread messages the label and the icon are emphasized in blue color to draw the user’s attention.

Click on a label to open up a menu showing a list of all conversations with unread messages indicating the number of unread messages in the parenthesis. Also, there is an option to mark all messages as read.
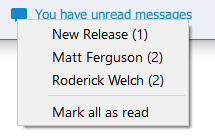
Marking all messages as read will effectively send seen to all those conversations even though you haven’t read those messages yet. Clicking on any other option besides Mark all as read opens the selected conversation. This can be used as a quicker way to find conversations with unread messages instead of looking for them in the conversations list.
If there are no unread messages, the label is not emphasized and serves only as an indicator, without any functionality.

Messages view
On the right side of the chat window you can see the messages of the currently selected conversation.
In case there are no unread messages in the conversation, the application will load last 20 messages and place the scrollbar on the bottom. If you want to load older messages, you just scroll up until you reach the top. This way you can scroll all the way to the beginning of the conversation.
In case there are unread messages in the conversation, the application will load all unread messages plus 20 additional older messages. The scrollbar will be positioned on the first unread message with the  indicator so you know where should you continue reading the messages.
The keyboard’s up and down arrow keys can be used for scrolling messages through chat/SMS conversations.
The typing indicator is presented above the input field of the message window and within the conversation list so you can see when somebody is typing to you. In the case of a group conversation, if more than one participant is typing at the same time, the typing message will take the form N participants are typing where N is the number of typing participants.
While you are inside of the group conversation, left-click on the participant’s name or avatar inside the messages window will show a popup menu with three options:
- Call: Call the participant directly.
- Chat with: Start a one to one conversation with the participant.
- Contact information: Show the contact information.
While scrolling up in the currently selected conversation, a scroll indicator ![]() appears in the bottom right corner of the messages view so you can easily move to the end of the conversation. If you receive a new message while searching/viewing the older messages, the scroll indicator will show the number of messages received. Clicking on the scroll indicator
appears in the bottom right corner of the messages view so you can easily move to the end of the conversation. If you receive a new message while searching/viewing the older messages, the scroll indicator will show the number of messages received. Clicking on the scroll indicator ![]() will take you to the first received message.
will take you to the first received message.
Message Reactions
As the picture shows, every outgoing/incoming message has a reaction button on the left/right side of the message that allows users to react to a message.
Hovering over it brings up a pop-up window containing a list of reactions that can be used to react to a message. After selecting one of the reactions, the same will be displayed next to the message instead of the reaction button, along with the last reaction (if any) and the total reaction count.
The selected reaction will be highlighted within the reactions pop-up.
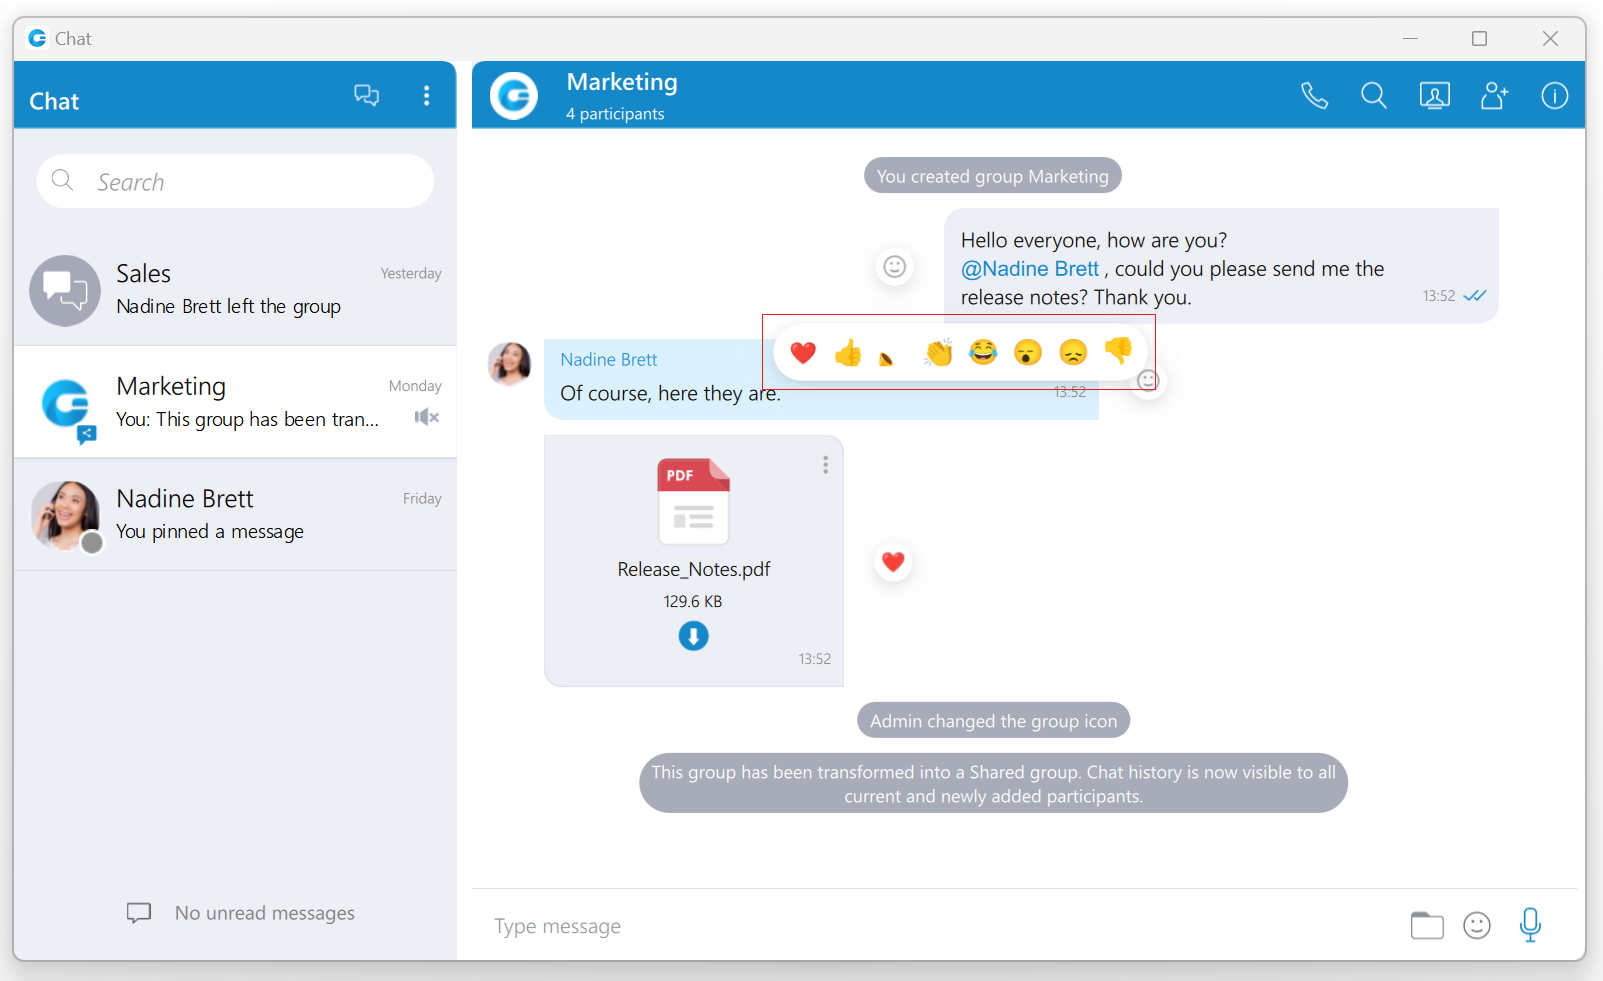
The user will receive a notification for every outgoing message when somebody reacts to it.

If a user has already reacted to a message, re-opening the reactions pop-up will present their reaction as selected. Clicking on the same reaction will remove it, and clicking on a different one will change it.
Reacting to outgoing messages within one-to-one chat conversations is not possible.
Besides the information about the delivery and seen status, the message Info contains information about reactions (if any).
Threads
Threads, as a feature, allows users to start multiple conversations within group chat conversations, enabling parallel discussions within groups.
Please note that the Threads feature needs to be enabled in a license and configured on the PBXware before it can be used.
A thread can only be created from text messages.
To create a thread, right-click on the text message within the group chat conversation, select the Create Thread option from the drop-down menu, and send the message in order to create a thread.
Threads support all message types that are supported in chat conversations.
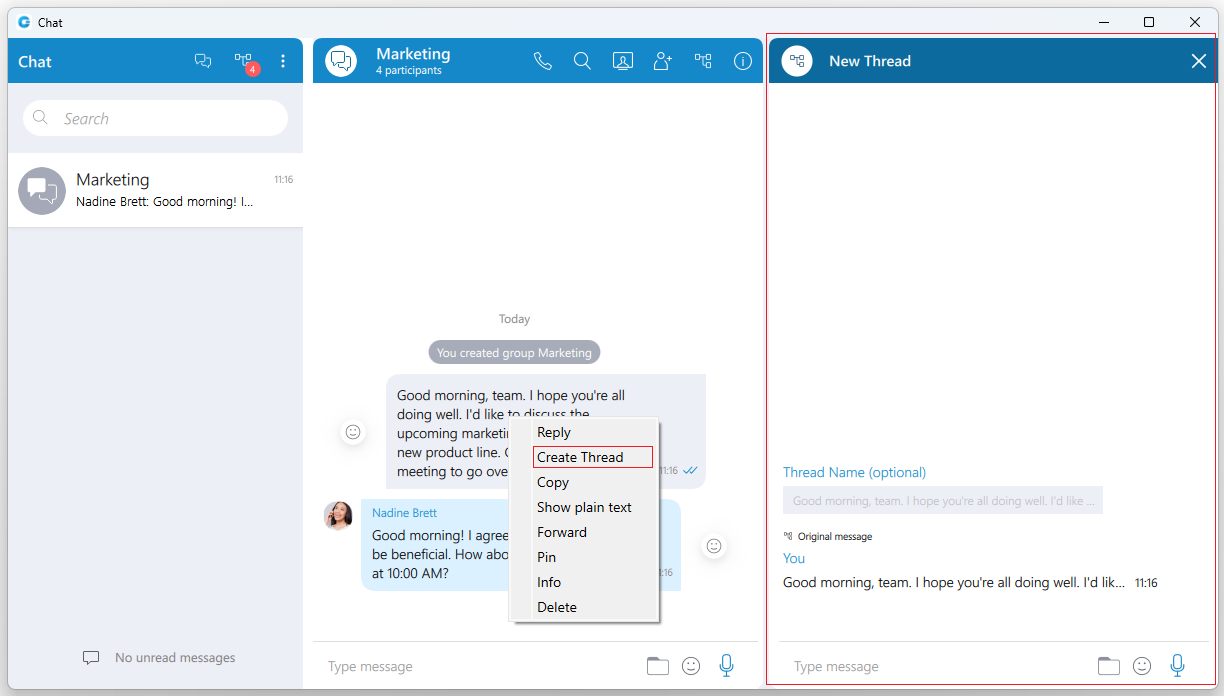
The thread creator can also specify a Thread Name while creating a thread by entering it in the designated field. If the name is not specified, the thread’s name will be the message from which the thread was created.
The thread name cannot be longer than 100 characters.
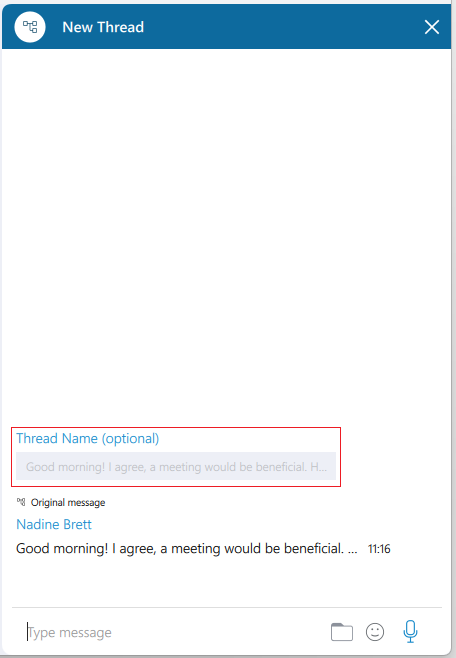
By default, the thread name is the message from which the thread was created.
However, the group administrator and the thread creator can rename a thread anytime by clicking on its name at the top of the thread panel and providing a new one. After the name is provided, press the Enter key on the keyboard for confirmation or the ESC key for cancellation.
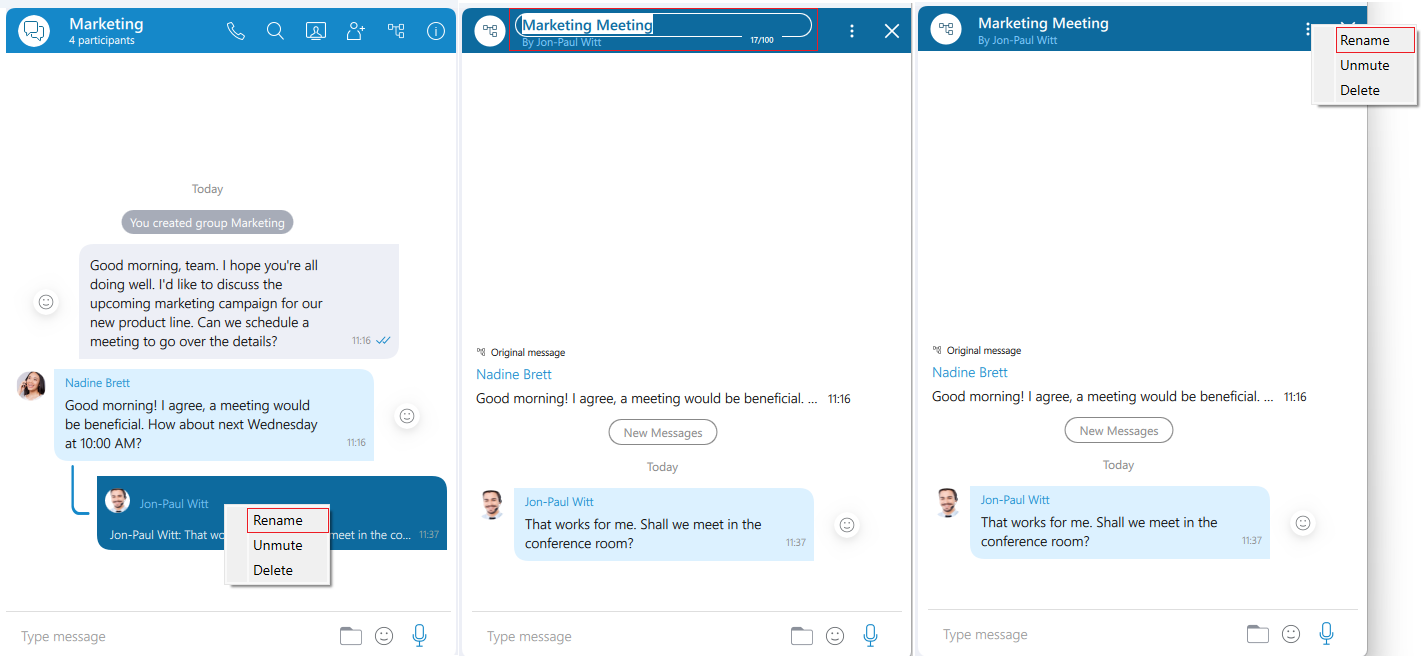
Also, renaming can be done by selecting the Rename option from the drop-down menu displayed within the chat after right-clicking on the thread or by clicking on the Three dots button within the thread panel context bar and selecting the same option from the drop-down menu.
Only the group administrator and the thread creator can rename a thread.
Deleting threads can be done by right-clicking on a thread inside the group chat conversation and selecting the Delete option from the drop-down menu. However, in case the user wants to delete the thread that has already been opened, they can click on the Three dots button within the thread panel context bar and select the Delete option from the drop-down menu.
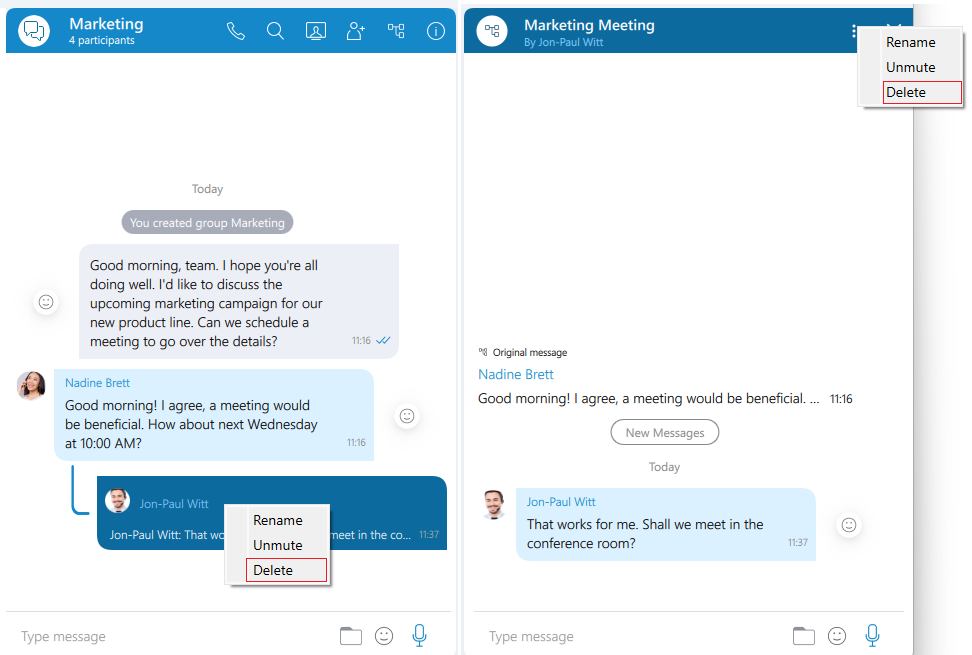
Only the group admin can delete the thread.
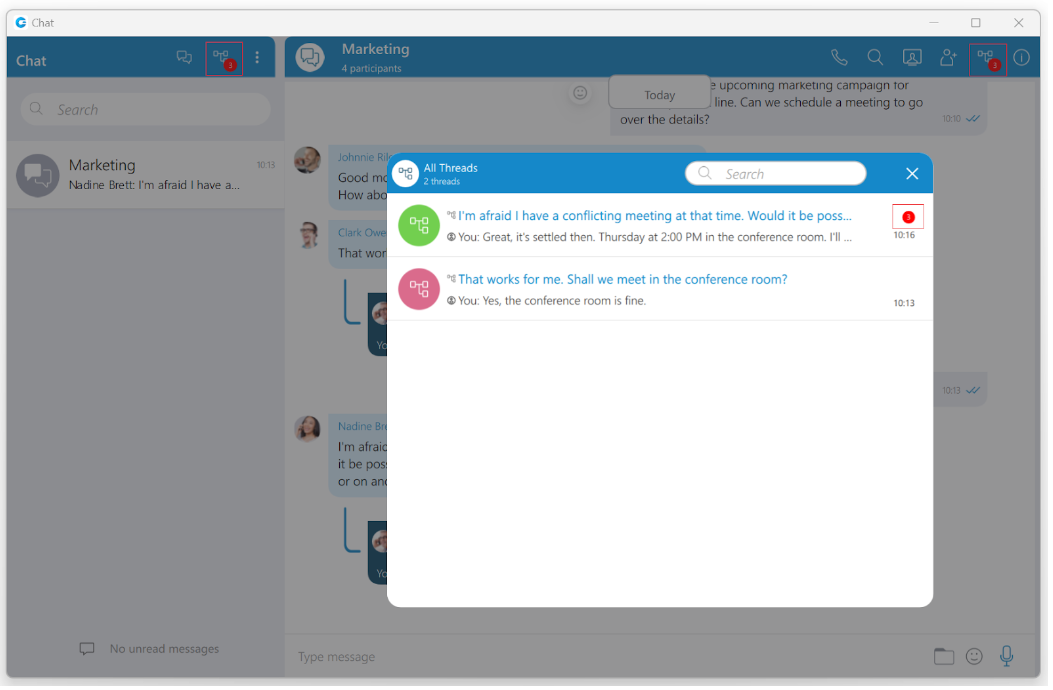
Notifications for all unread thread messages will be displayed as a red badge with the number that represents the total number of unread messages. Furthermore, notifications for unread thread messages for a single thread will be displayed within the thread list, which can be opened by clicking the Open threads button.
 Thread List icon: Click on it to open the list of threads.
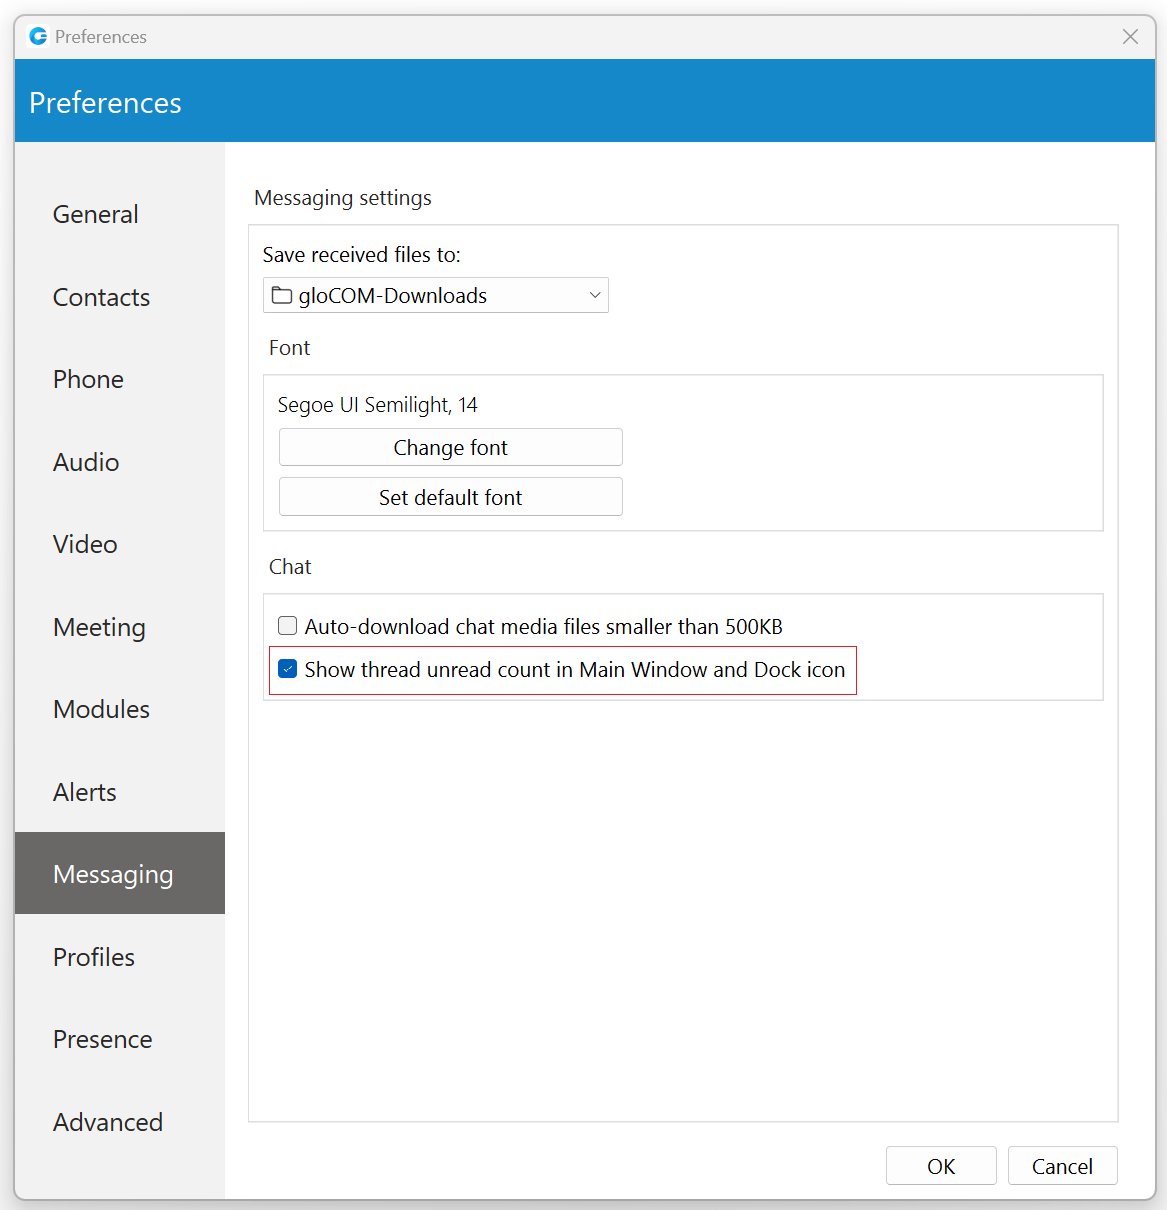
Additionally, suppose the user wants notifications for the thread message included within the gloCOM Main Window and the Dock icon.
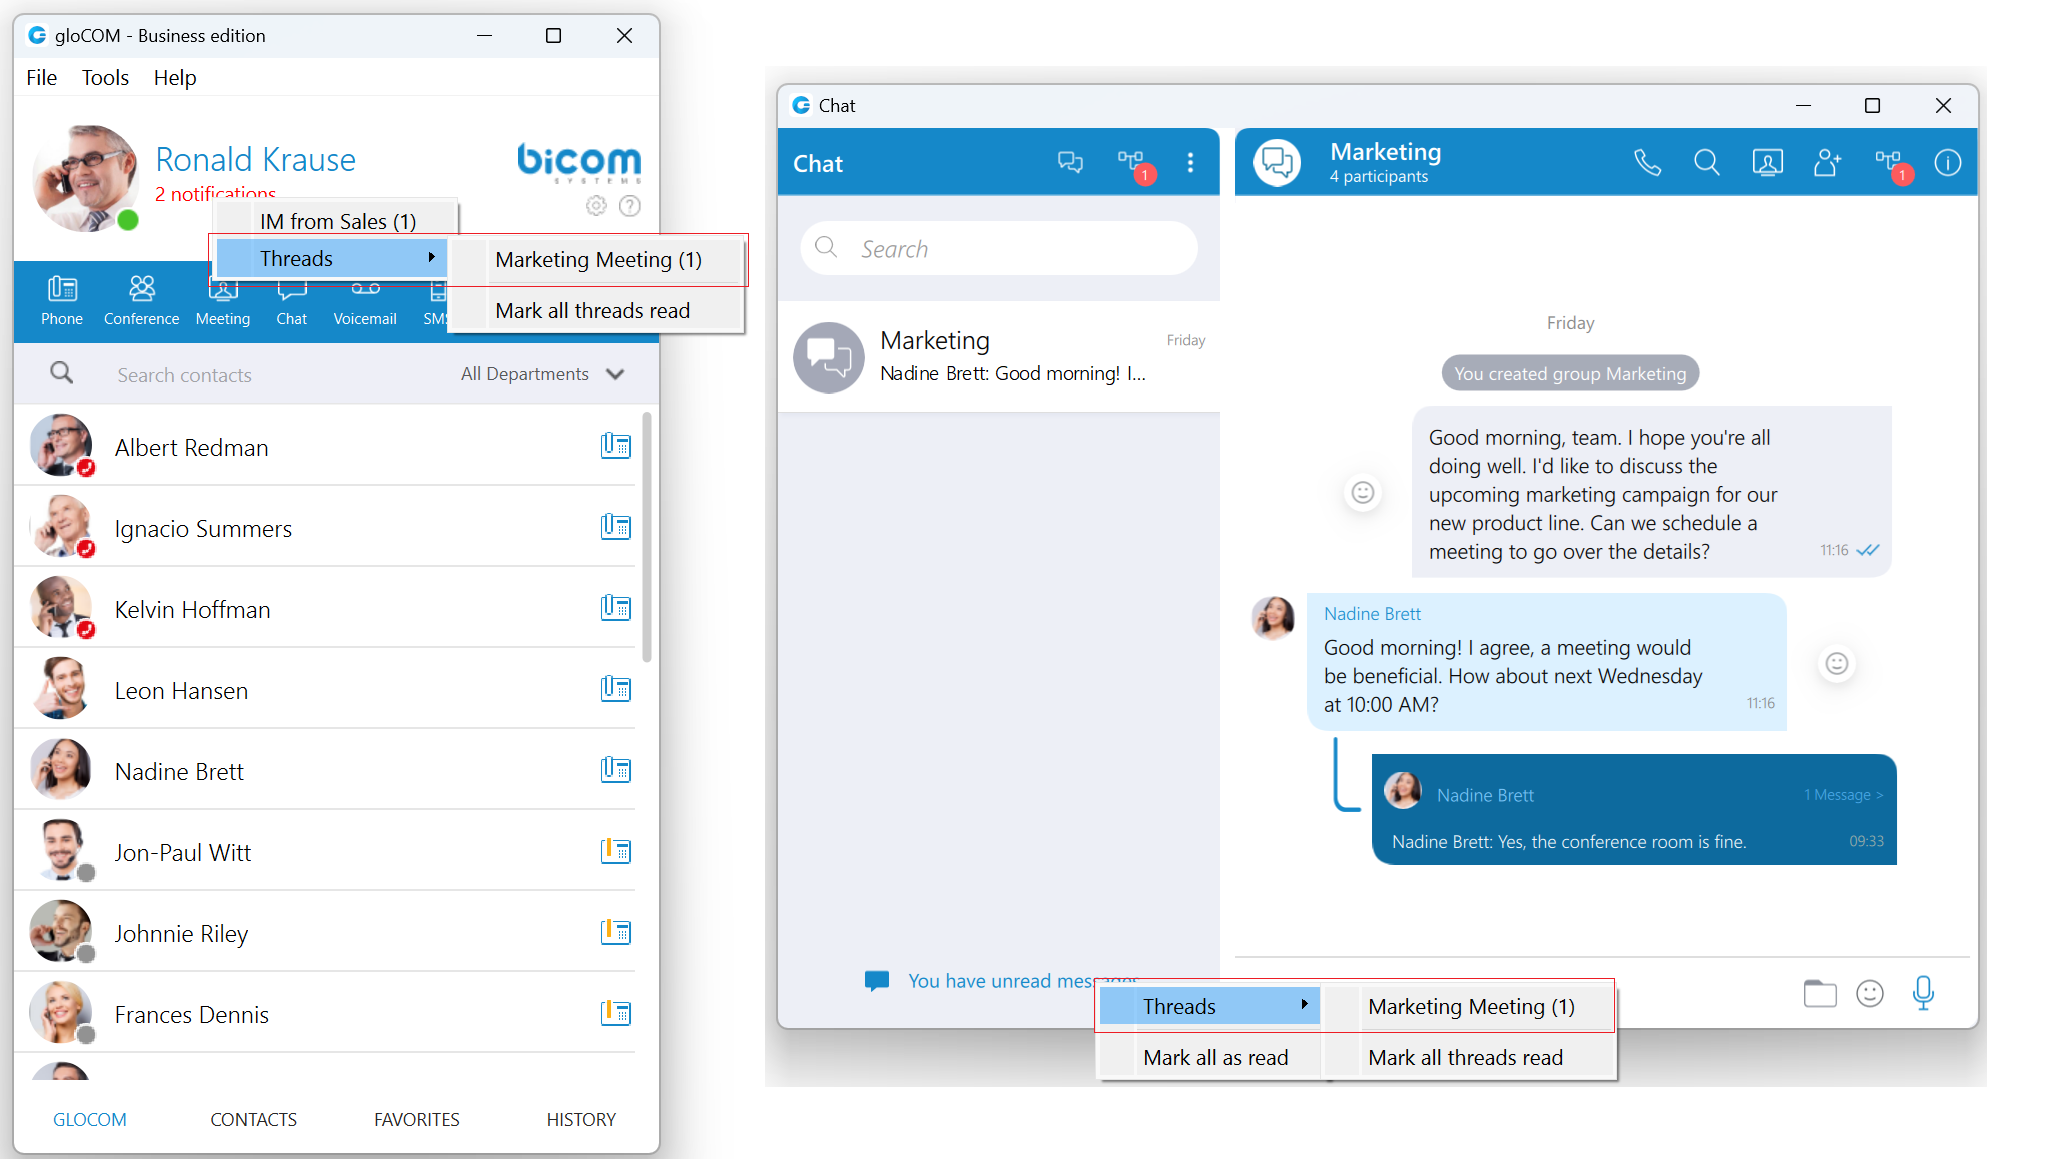
In that case, they need to navigate to Preferences -> Messaging and check the checkbox next to the “Show thread unread count in Main Window and Dock icon” option. By default, this option is disabled.
All newly created threads will be muted for all users except the creator until they send a message, unmute it manually, or if another participant mentions them.
Message states
For outgoing messages there is an indicator explaining the current state of the message:
 Sending: The message is on its way to the server.
 Sent: The message is sent and has reached the server.
 Delivered: The message is delivered to the other user(s).
 Seen: The message has been read by the other user(s).
 Failed: The message could not reach the server.
Text selection and context menu
You can select text inside of messages by pressing and dragging your mouse across the messages area. Click anywhere on the messages area to unselect all messages.
While there is any selected text in the messages area, right-clicking brings a context menu with the Copy option to copy all selected messages in the clipboard. You could also press CTRL+C on Windows, or Command(⌘)+C on macOS to copy all selected messages in the clipboard.
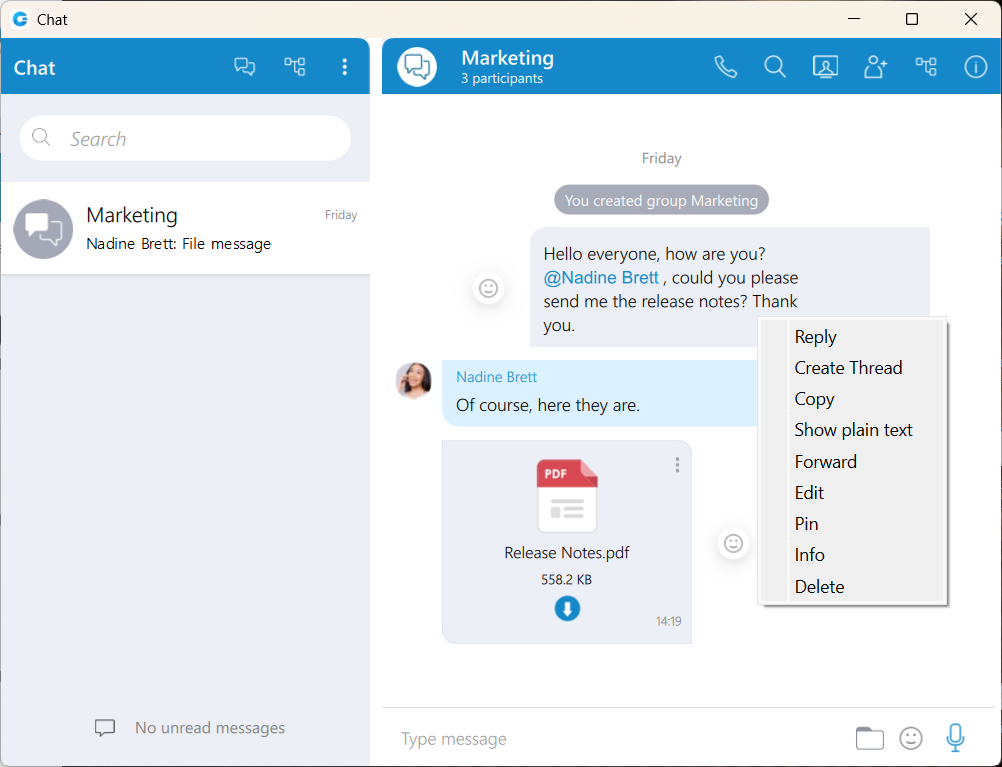
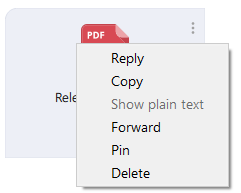
If you right click inside a message bubble (gray or blue rectangle) while there is no selected text, a context menu appears with the Reply, Create Thread, Copy, Show plain text, Forward, Pin, Info (only for groups), Edit(only for outgoing text messages) and Delete options.
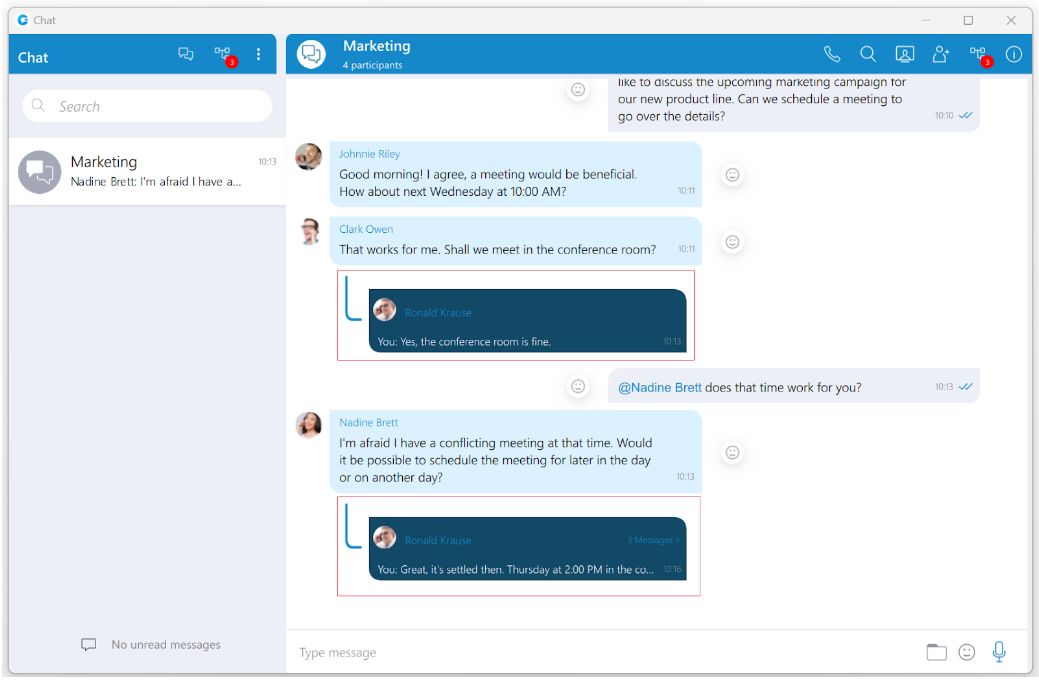
Reply option allows users to reply to a specific message. To reply to a message, hover over it, and click on the reply button, or right-click on the message, and from the drop-down menu, select the Reply option. As a result, the message that the user wants to reply to will appear above the input field. Clicking on the replied message inside the chat will take the user to the original message.
Create Thread allows users to start multiple conversations within group chat conversations, enabling parallel discussions within groups.
Copy option is used to copy all message content to the clipboard.
Show plain text option is used to disable all message formatting (links, emojis, etc.), to see the original message source. If the user right-clicks on the message again after they have pressed the Show plain text option, there is a Show rich text option to revert it and to see the formatted message with links and emojis.
Forward option is used to forward messages and files from one conversation to another. The user can forward the message or file up to 10 conversations at once.
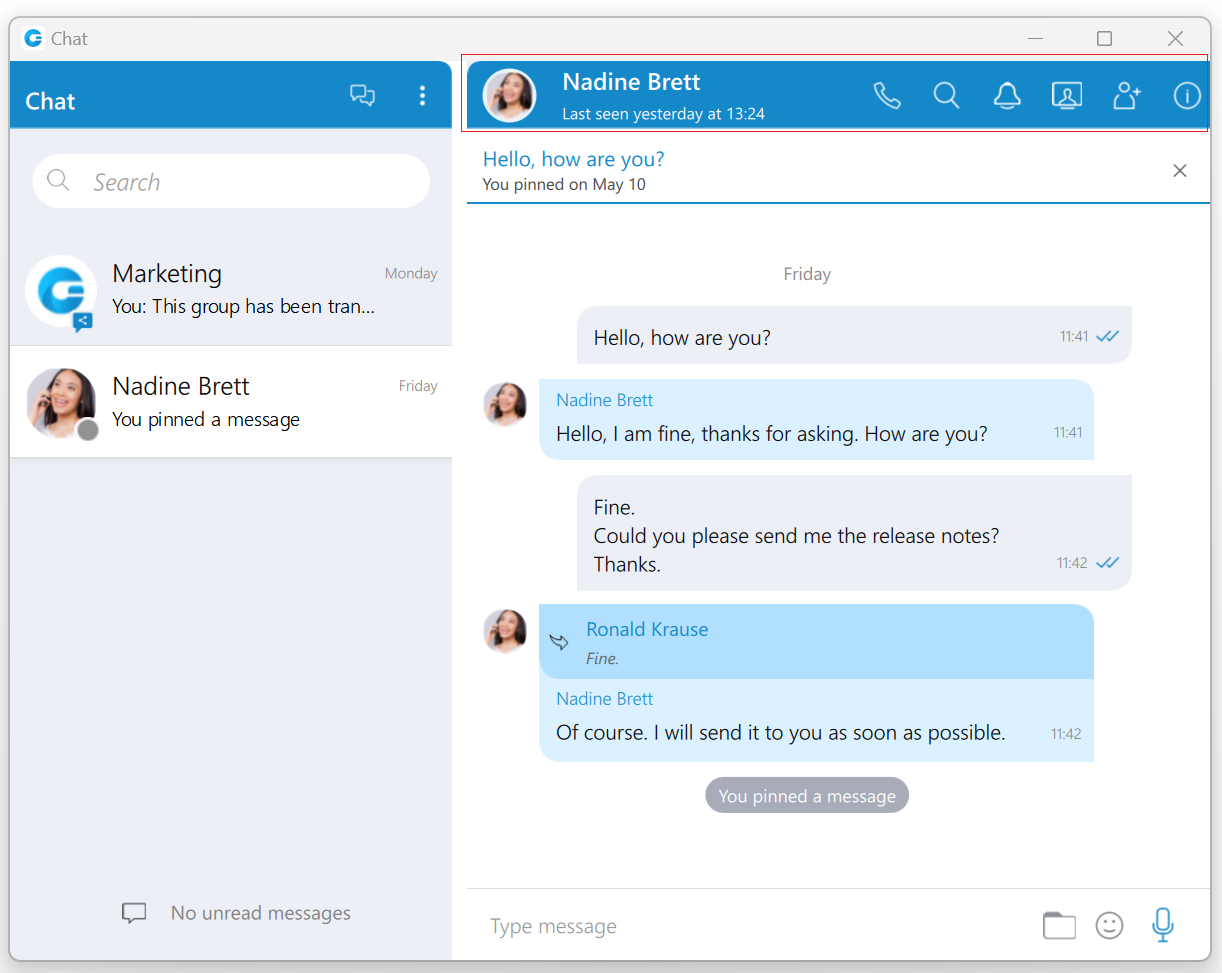
Pin/Unpin options are used to pin/unpin an important message or file message to the top of the conversation window. Anyone can pin/unpin the message inside the conversation. The user can pin one message at the same time. By clicking on the pinned message, will redirect the user to that message inside the conversation.
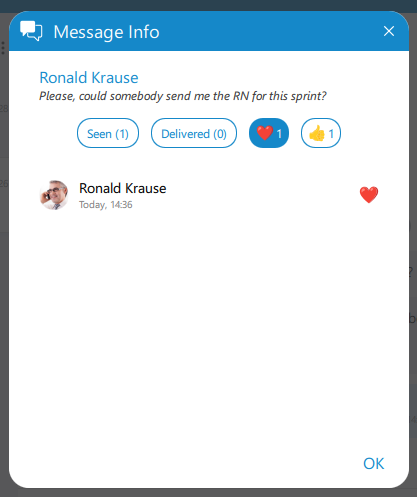
Info allows the user to see the information about the delivery and seen status of a single message within a group chat conversation.
After a certain period of time, information about the seen/delivered status will automatically clear from the server, and the following message will be displayed within the info message dialog: “Seen and delivered information is automatically cleared and may not be available after certain period of time.”
Edit option allows users to modify outgoing text messages. To edit a message, right-click on it and select the Edit option from the drop-down menu. The message that the user wants to edit will appear above the input field. By clicking on it will take the user to the original message.
Edited messages will have an Edited indicator displayed inside their bubble.
Delete allows users to delete text and file messages. To delete the desired message, users can just right-click on it, and from the drop-down menu, select Delete option.
After selecting the Delete option, the confirmation dialog will show up with two options for outgoing messages:
- Delete for myself with the following sub-content: This message will be deleted only for you. Other chat members will still be able to see it. Are you sure you want to proceed?
- Delete for everyone with the following sub-content: This message will be deleted for all participants. Are you sure you want to proceed?
And for incoming messages, there is only one option:
- Delete for myself with the following sub-content: This message will be deleted only for you. Other chat members will still be able to see it. Are you sure you want to proceed?
In addition to the options mentioned above, the confirmation dialog contains the Delete and Cancel buttons.
After deleting the message, the Message deleted indicator shows up.
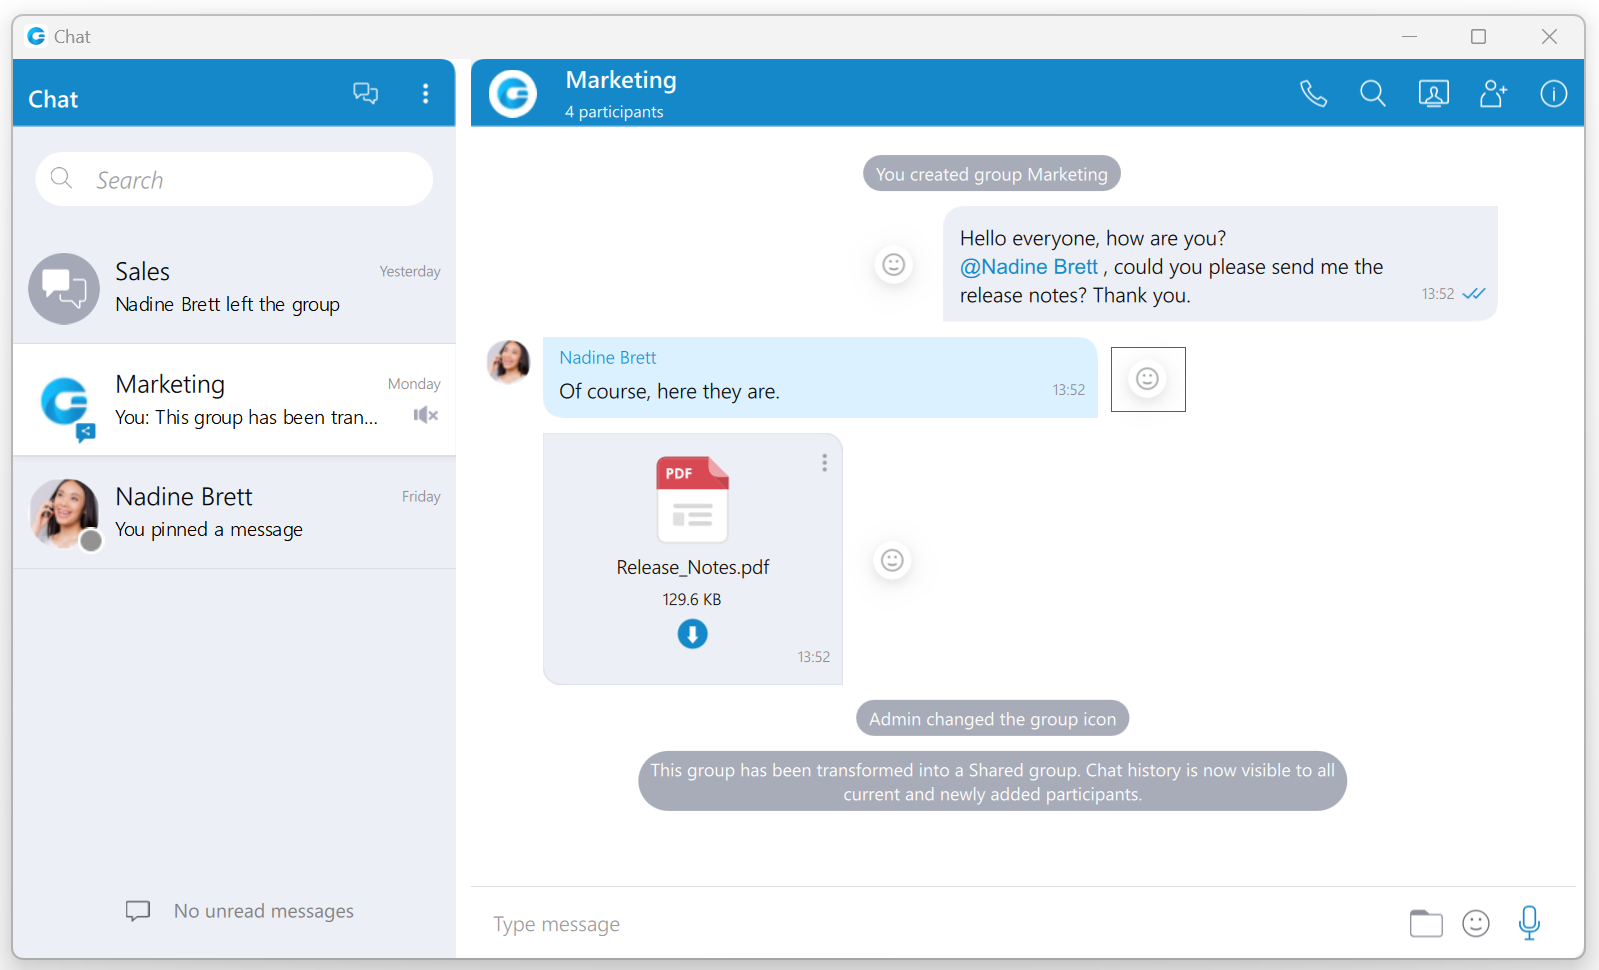
File message
Besides regular text messages, you can use the chat in gloCOM to share files.

For image and video files there is a thumbnail that is automatically downloaded. Under the thumbnail, there is information about the file name and the file size. At the bottom of the file message there is an icon used to open, download, show upload/download progress or retry file upload/download depending on the file status. This is explained in detail in the Files Overview section. Also, at the top right of the file message, there is a 3 dots icon. Clicking on the icon opens a menu with options to download, open, locate the file on the file system, or create a copy of the file.
Clipboard
gloCOM Desktop supports clipboard functionality for images and files. It means that the clipboard now can be used for copying/pasting images from the external app (such as image viewer, browsers, etc.) or for copying/pasting images and files from the File Explorer (Finder on macOS) directly into the chat session. With this at their disposal, users are no longer limited to just using an image/file picker and drag & drop feature for sending images and files.
While using clipboard functionality for sending images and files, instead of sending them immediately after pasting into the chat, the application creates an attachment list that includes thumbnails within the selected chat session. Clicking on the thumbnail opens the file in the proper viewer app (image viewer for the pictures, the default video player for videos, etc.). This way, users have the opportunity to double-check selected files and images before sending.
Adding files to the attachment list while using the clipboard can be done in two ways:
- Using CTRL(Cmd on macOS) + C/V for copying/pasting files or
- Using the mouse right-clicking to copy/paste files.
Every image sent using the clipboard will be saved into the gloCOM downloads directory.
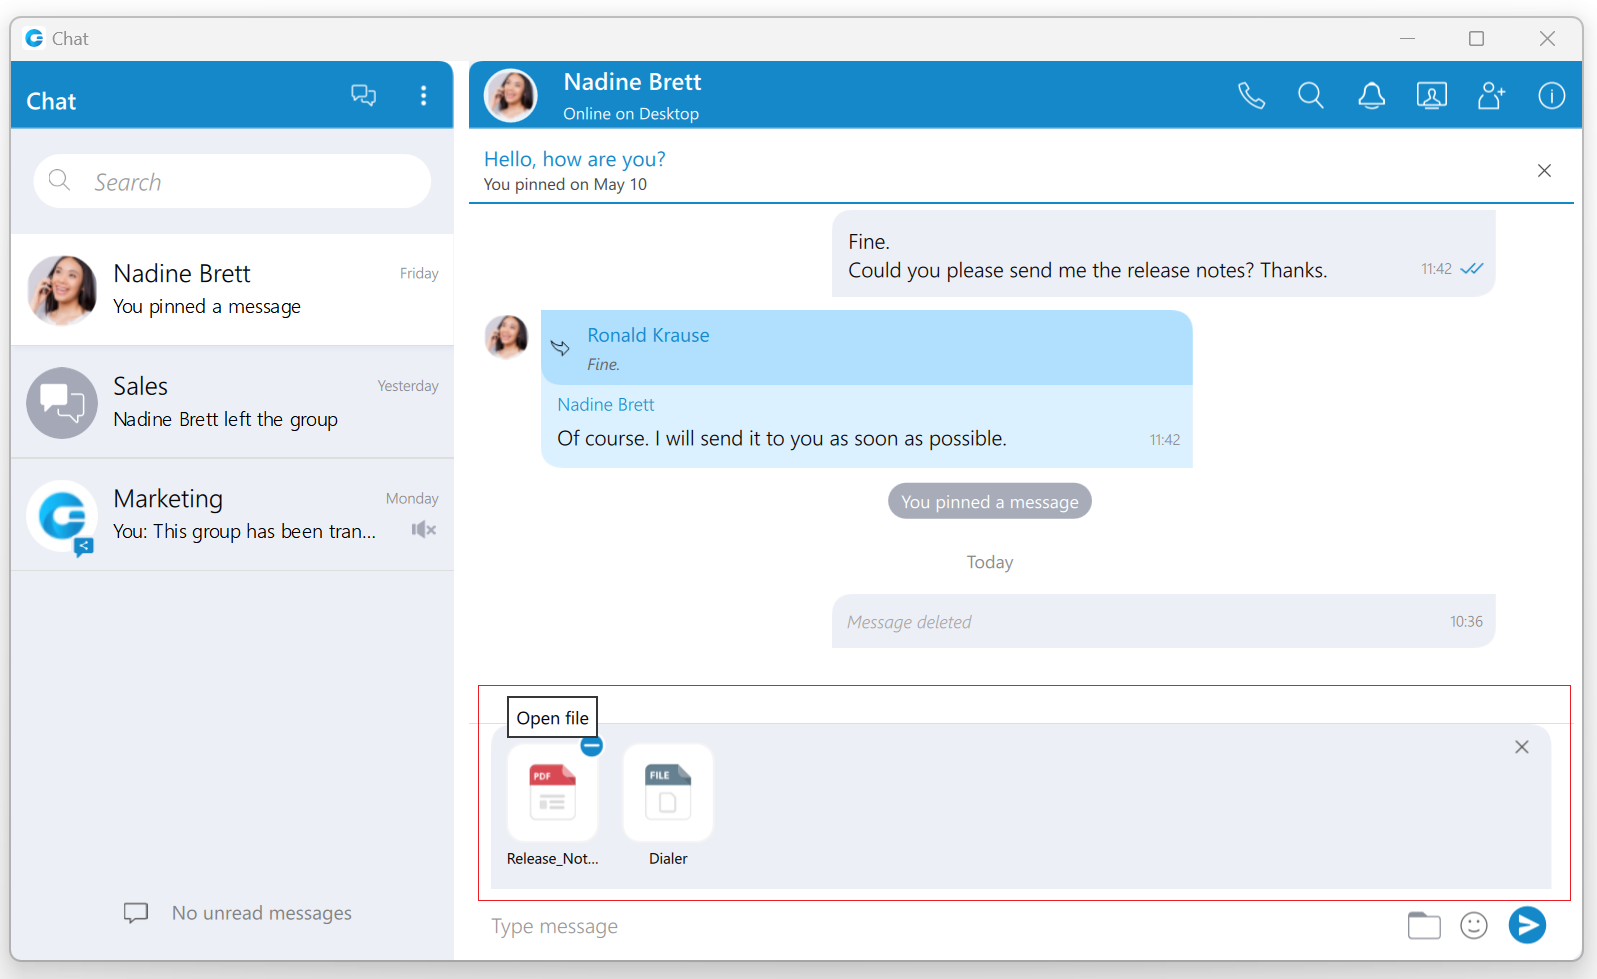
Furthermore, hovering over the file inside the attachment list displays a blue circle with the white dash at the thumbnail’s upper right corner. Click on it to discard the file from the list. Discarding all files from the list can be done by clicking the x button in the upper right corner of the attachment list.
While the attachment list is active and the user selects files using a file picker or drags them into the chat, they will be attached to the attachment list. Otherwise, the app will send them immediately.
In addition, while the attachment list is present within the selected chat conversation, the user can write a text message simultaneously. In that case, the app will send the text message first and then the attached files one by one.
The maximum number of files attached to the attachment list at once is limited to five (5). Once the limit is reached, a pop-up message will appear displaying the following: Could not add files since it would violate the maximum files limit! (Max. count of all attachments: 5).
For larger images, the copy operation will take a while. During this time, the application will change the cursor type to loading, indicating that the file is being copied.
Input field
Type message field on the bottom of the chat window is used to send messages to the currently selected conversation. After typing a message press the Enter (Return) key on your keyboard to send a message. To type in a new line press Shift + Enter or Ctrl + Enter (Command + Enter for macOS).

The length of the message that can be sent is limited to 10 000 characters.
 A folder icon allows the user to send files. Clicking on it opens up a dialog where the user can pick up to 5 files to be sent to the currently selected conversation. Also, the user can send files by dragging them from Windows Explorer (Finder on macOS) to the messages area within the chat window.

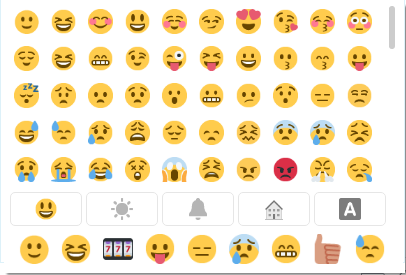
 An emoji icon allows the user to send emojis. Clicking on it shows an emojis window where the user can browse through emojis separated into categories. At the bottom of the emojis window is a list of the most recently used emojis.
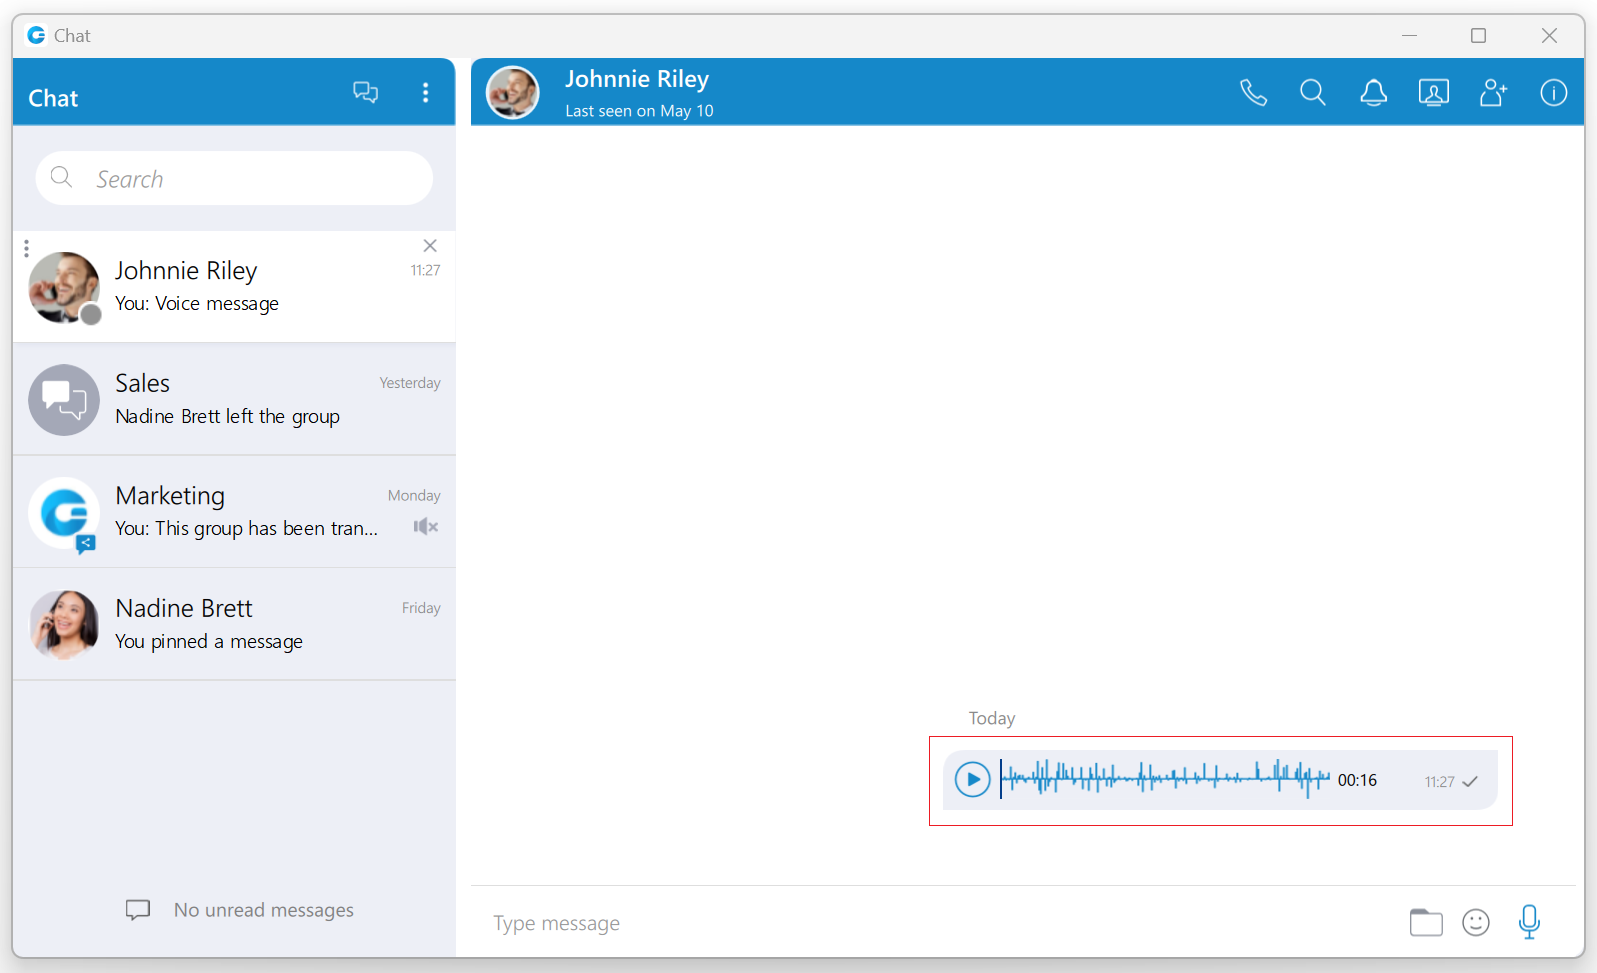
![]() A microphone icon allows the user to record voice messages for up to 2 minutes.
A microphone icon allows the user to record voice messages for up to 2 minutes.
While recording, the user has the ability to use the following options:
- Discard voice message: It will discard a voice message.
- Stop recording voice message: It will stop recording. This way, the user can listen to the voice message before sending or discarding it.
- Send voice message: It will stop the voice message and send it immediately without the chance to listen to it.

While recording is active, sending text and file messages will be disabled until the user sends or discards the voice message.
Playing voice messages is possible within a chat by pressing the play button. It is possible to go back and forth through a selected voice message by clicking on the waveform.
Some chat features that are described above can be enabled/disabled depending on the server settings.