Agents
Agents play a crucial role within contact centers, serving as the frontline representatives who interact directly with customers. These skilled individuals are responsible for handling various forms of customer communication, such as phone calls, emails, chats, or social media messages.
In a contact center environment, agents are typically assigned to specific queues or teams based on their expertise or the type of customer inquiries they are qualified to handle. This allows for efficient routing and allocation of customer interactions to the most suitable agents, ensuring optimal service delivery.
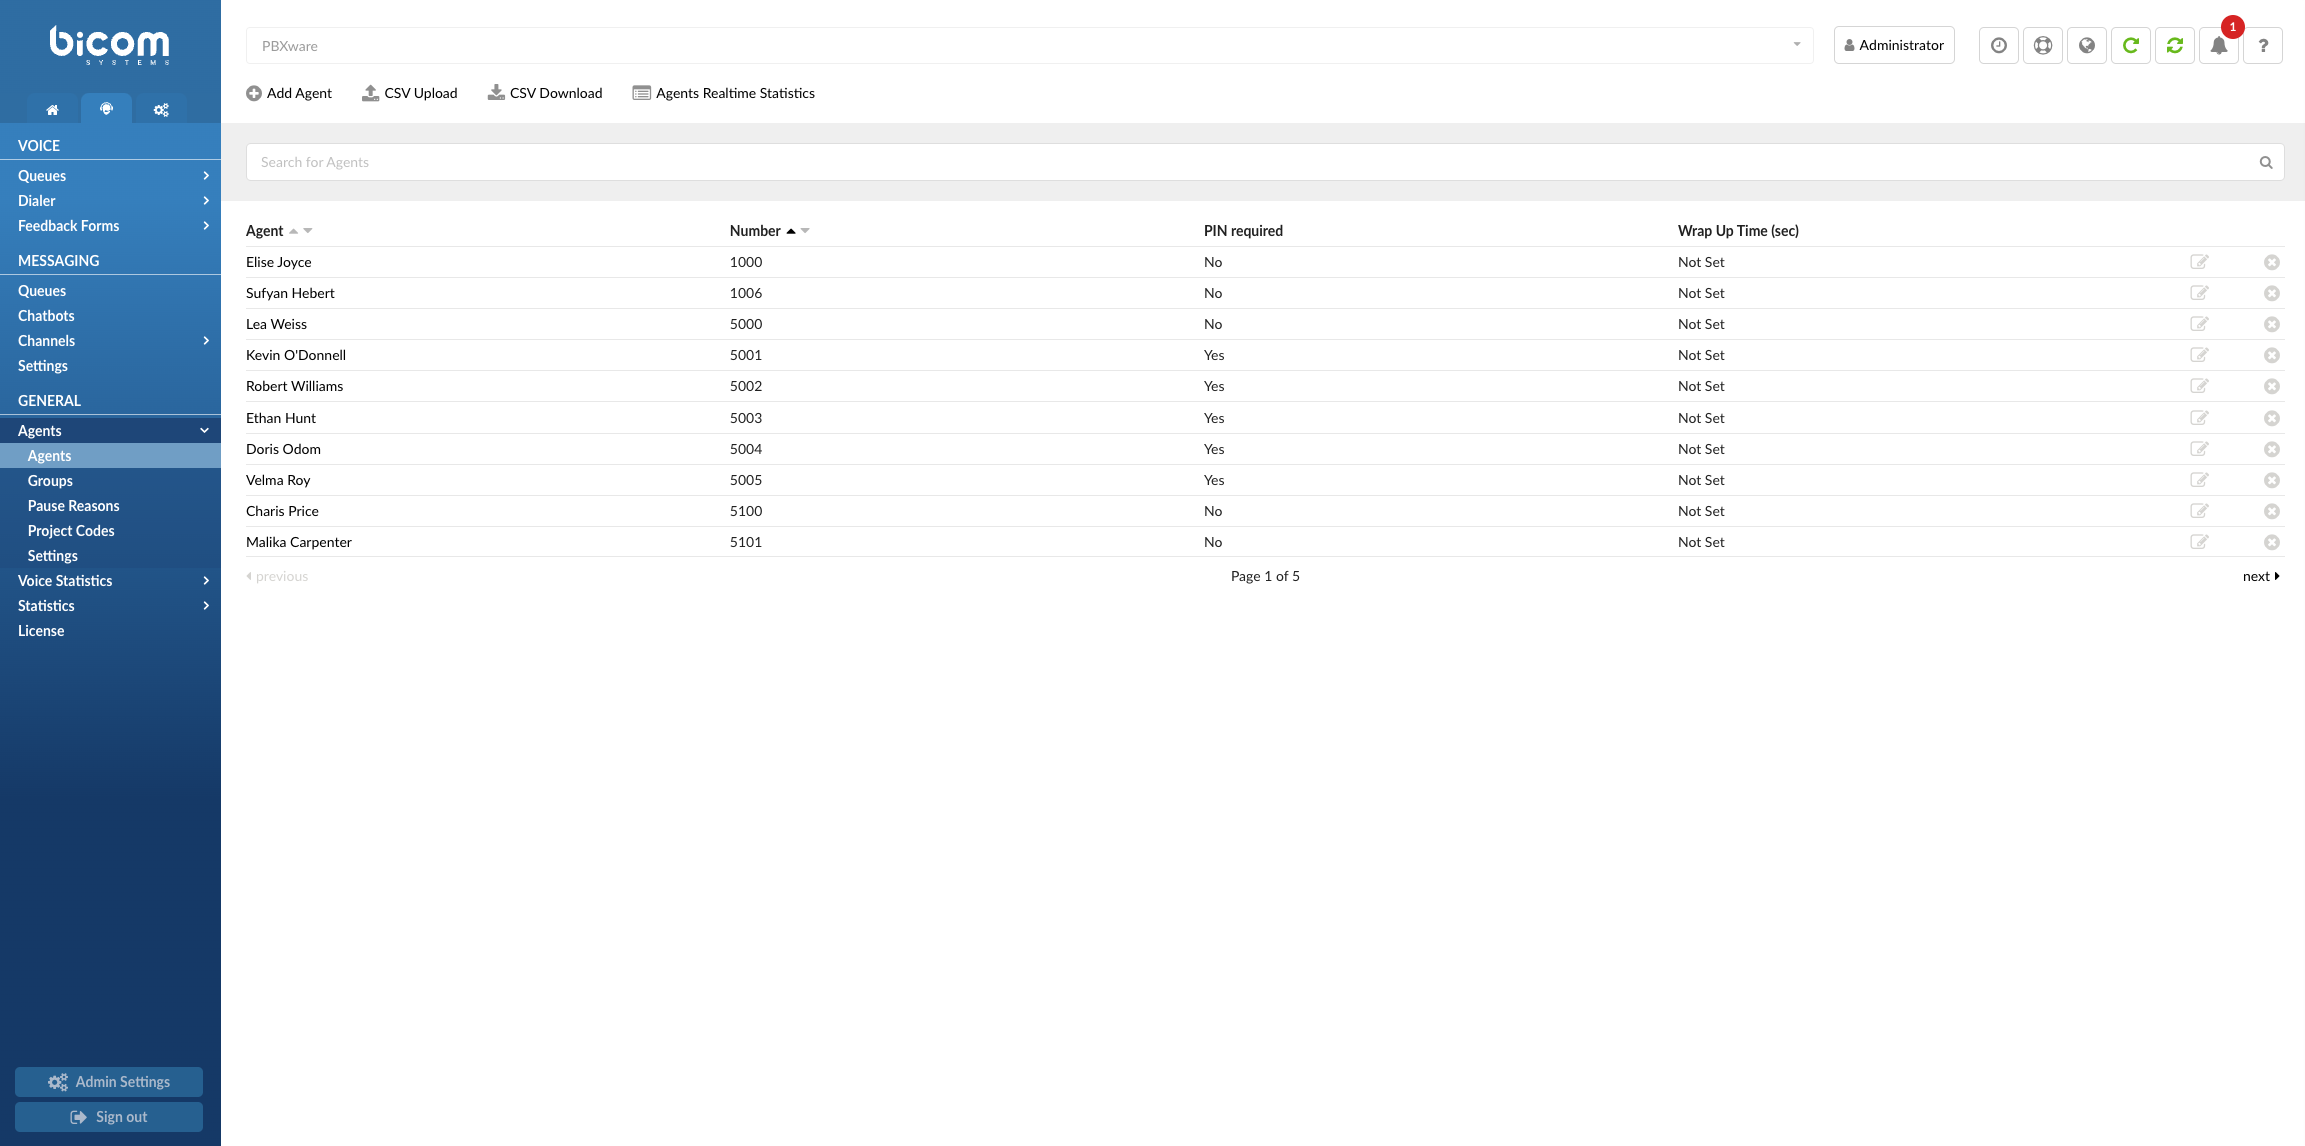
Agents Dashboard
The Agents Dashboard offers a comprehensive view of essential information for agents in a contact center.
- Agent
Displays the Agent’s full name.
(E.g., Elise Joyce)
(Display)
- Number
Shows the unique identification number assigned to the agent, helping in tracking and routing conversations accurately.
(E.g., 1000)
- PIN required
Represents the personal identification number associated with the agent, ensuring secure access and authentication within the system.
(E.g., 1234)
(Display)
- Wrap Up Time (sec)
Indicates the designated time for agents to complete post-interaction tasks, such as note-taking, updating records, or preparing for the next interaction.
(E.g., 20)
(Display)
NOTE: ‘Wrap Up Time (sec)’ refers to the time given to the Agent before a new call is transferred to their Extension.
- Edit Agents configuration

To make changes to the Agent configuration, simply click on the provided button. This action allows admins to access and modify agent’s settings and preferences according to their individual needs.
- Delete/Remove Agents

To delete an Agent, click on the designated button. This action permanently removes the Agent from the system and revokes their access to the contact center functionalities.
Deleting an Agent is a permanent action and should be done with caution, as it cannot be undone.
- Upload CSV files

To upload a CSV file, simply click on the designated button. This action allows you to select and upload a CSV (Comma-Separated Values) file from your local computer or specified location.
Ensure that the CSV file adheres to the required format and includes the necessary fields and data.
To streamline the process of adding multiple agents at once, you can utilize the ‘CSV Upload’ option. This allows you to upload a CSV (Comma-Separated Values) file containing agent information in bulk.
The following notes should be taken into consideration when creating a CSV file:
1. CSV Header: Name
When performing a CSV upload, it is crucial to include the ‘Name’ header in the CSV file. This header serves as a required field and must be accurately spelled and populated with the relevant information.
Failure to include or properly fill in the ‘Name’ header can result in the upload process failing.
2. CSV Header: Number
a) To ensure a successful upload and proper integration of data into the system, make sure to include the ‘Number‘ header in the CSV file and populate it accurately. This header is of utmost importance as it serves as a crucial identifier for agents.
b) When assigning an agent number, it is important to adhere to a specific format. The agent number must consist of four digits. Any deviation from this format may result in unexpected behavior or errors with uploading CSV file.
Populating CSV File
To import data using a CSV file, you need to ensure that the file is correctly formatted. The table below provides an overview of the required headers and their corresponding information:

Once successfully uploaded, the following message will appear: “Imported one record. Skipped 0 records.”. Please refer to the screenshot.

If users encounter situations where they need to skip entering data for certain headers in the CSV file, it is important to indicate this by adding double quotation marks (“) in the corresponding cells. Please refer to the example where a user only provided data for the ‘Name’, ‘Number’, ‘Surename’, ‘AllowDirectInWhenPaused’ and ‘WrapUpTime’ headers:

If a header does not have any data to be entered, it should still be represented by empty quotation marks (“”).
If a users do not enter double quotation marks for the entries they would like to skip, the following message will appear: “Imported 0 records. Skipped one record.” meaning that the upload was not successful. Please refer to the screenshot.

Entries for the first two headers (‘Name’ and ‘Number’) cannot be skipped when uploading a CSV file. If left empty, the upload will not be successful.
| CSV Header | Meaning | ||
|---|---|---|---|
| Name | Enter the Agent’s name | ||
| Number | Enter the Agent’s number | ||
| Surname | Enter the Agent’s surname | ||
| PIN | Enter the Agent’s PIN | ||
| BindExtension | Enter the Extension Number | ||
| DirectInRingTime | Enter the number of seconds | ||
| AllowDirectInWhenPaused | Select ‘Yes’ to enable calls for an Agent that is on the ‘Pause’ state | ||
| AllowDirectInWhenBusy | Select ‘Yes’ to enable calls for an Agent that is already on call/busy | ||
| DirectInBusyDestination | Select busy Destination | ||
| IsVoicemail | Select ‘Yes’ to redirect calls to Destination Voicemail | ||
| WrapUpTime | Enter the number of seconds | ||
| LiveChatLimit | Set the maximum number of live chat sessions that can be active simultaneously | ||
| MessagingLimit | Set the maximum number of messaging sessions that can be active at once | ||
| EmailLimit | Set the maximum number of concurrent email sessions allowed | ||
| AgentAutoLogout | Select yes or no to enable/disable feature | ||
| ScheduledTimer | Set the logout time (hours and minutes), following your system’s time format (e.g., 08:00 PM or 20:00) |
Downloading CSV File
To download a CSV file, simply click on the designated button. This button typically features an icon or label indicating its purpose. By clicking on it, the CSV file will be downloaded to your device.
Please refer to the example of a downloaded CSV file:

Agents Realtime Statistics
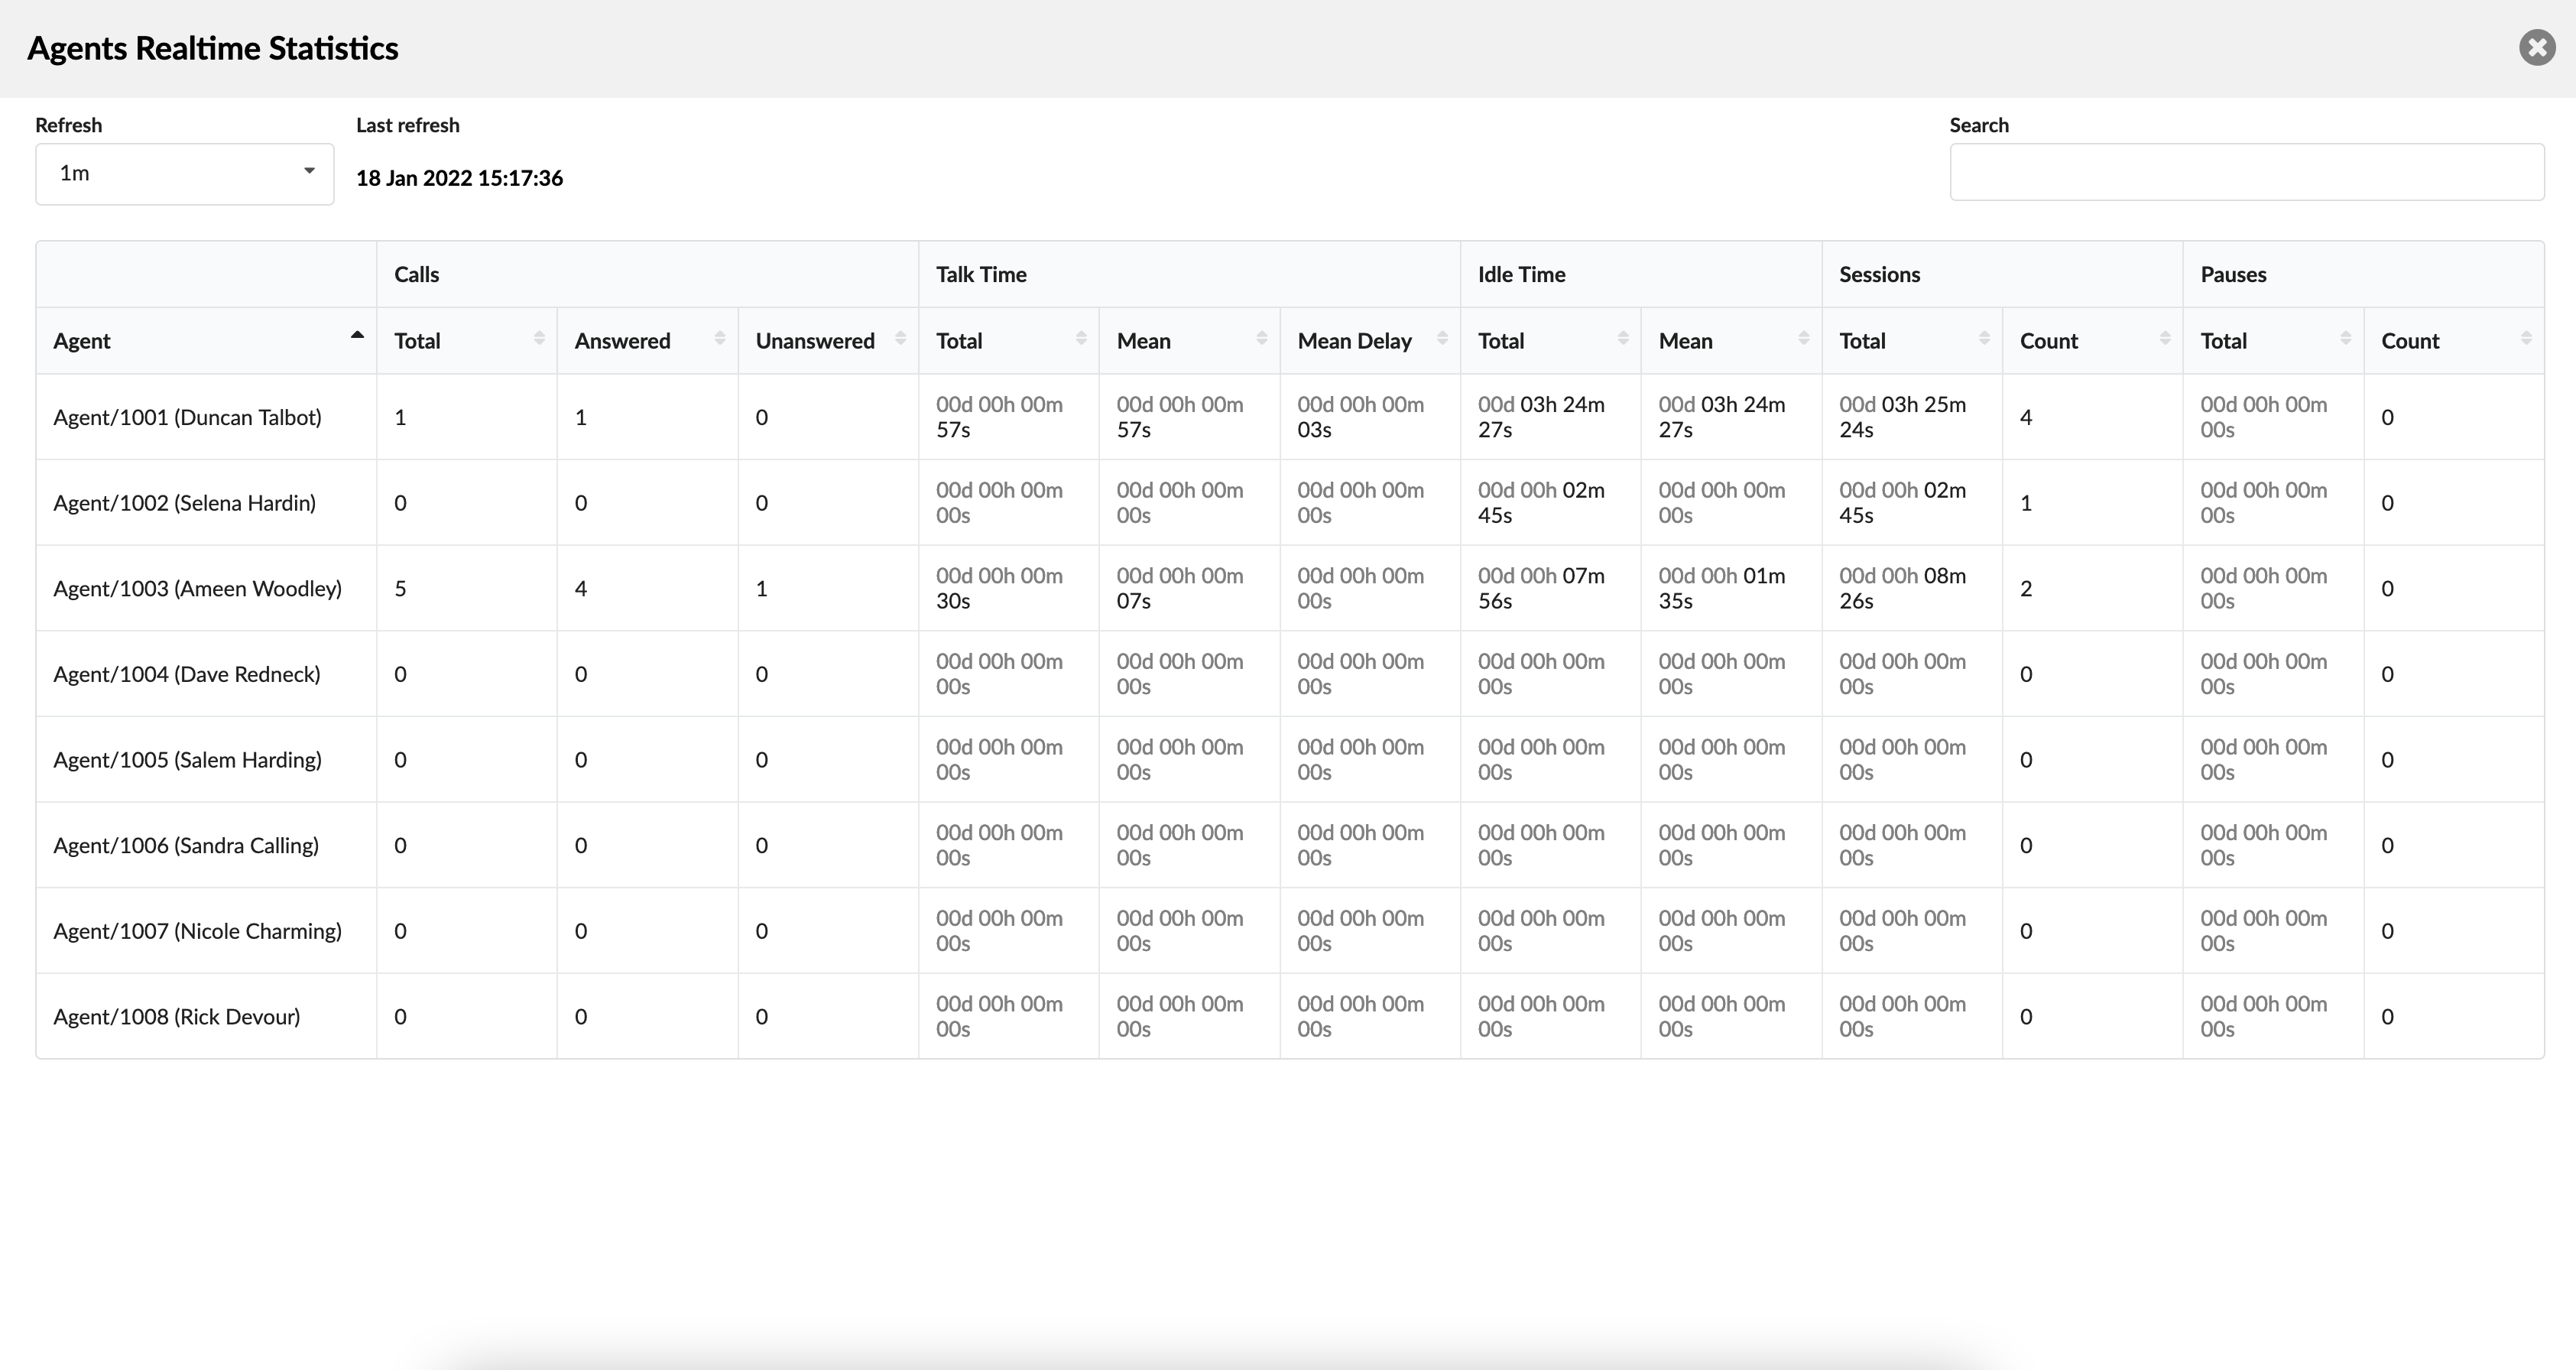
Agent real-time stats provide a comprehensive overview of an agent’s activity and performance during their time on the system. These stats include all types of calls made by the agent, such as inbound, outbound, and direct calls (both incoming and outgoing).
The agent stats page provides key metrics that give insights into the agent’s performance. These metrics include total talk time, idle time, login sessions, and full pause time.
Total talk time represents the cumulative duration of the agent’s conversations, while idle time shows periods of inactivity. Login sessions track the agent’s system logins, and full pause time records the duration of breaks taken by the agent. These metrics help monitor agent availability and performance.
To access agent real-time stats, you can use either the gloCOM supervisor application or PBXware.
Calculations are reset each day starting from midnight.
Search

To search for agents, simply enter the agent number or name in the search field. This allows you to quickly find specific agents based on their assigned number or their name.
- Search
To filter the agents and perform a search, enter a search phrase or the agent’s number in the provided search field. After entering the desired criteria, simply press the “Enter” key to initiate the search.
(E.g., Diane)
([a-z][0-9])
Add/Edit Agent
Agent section
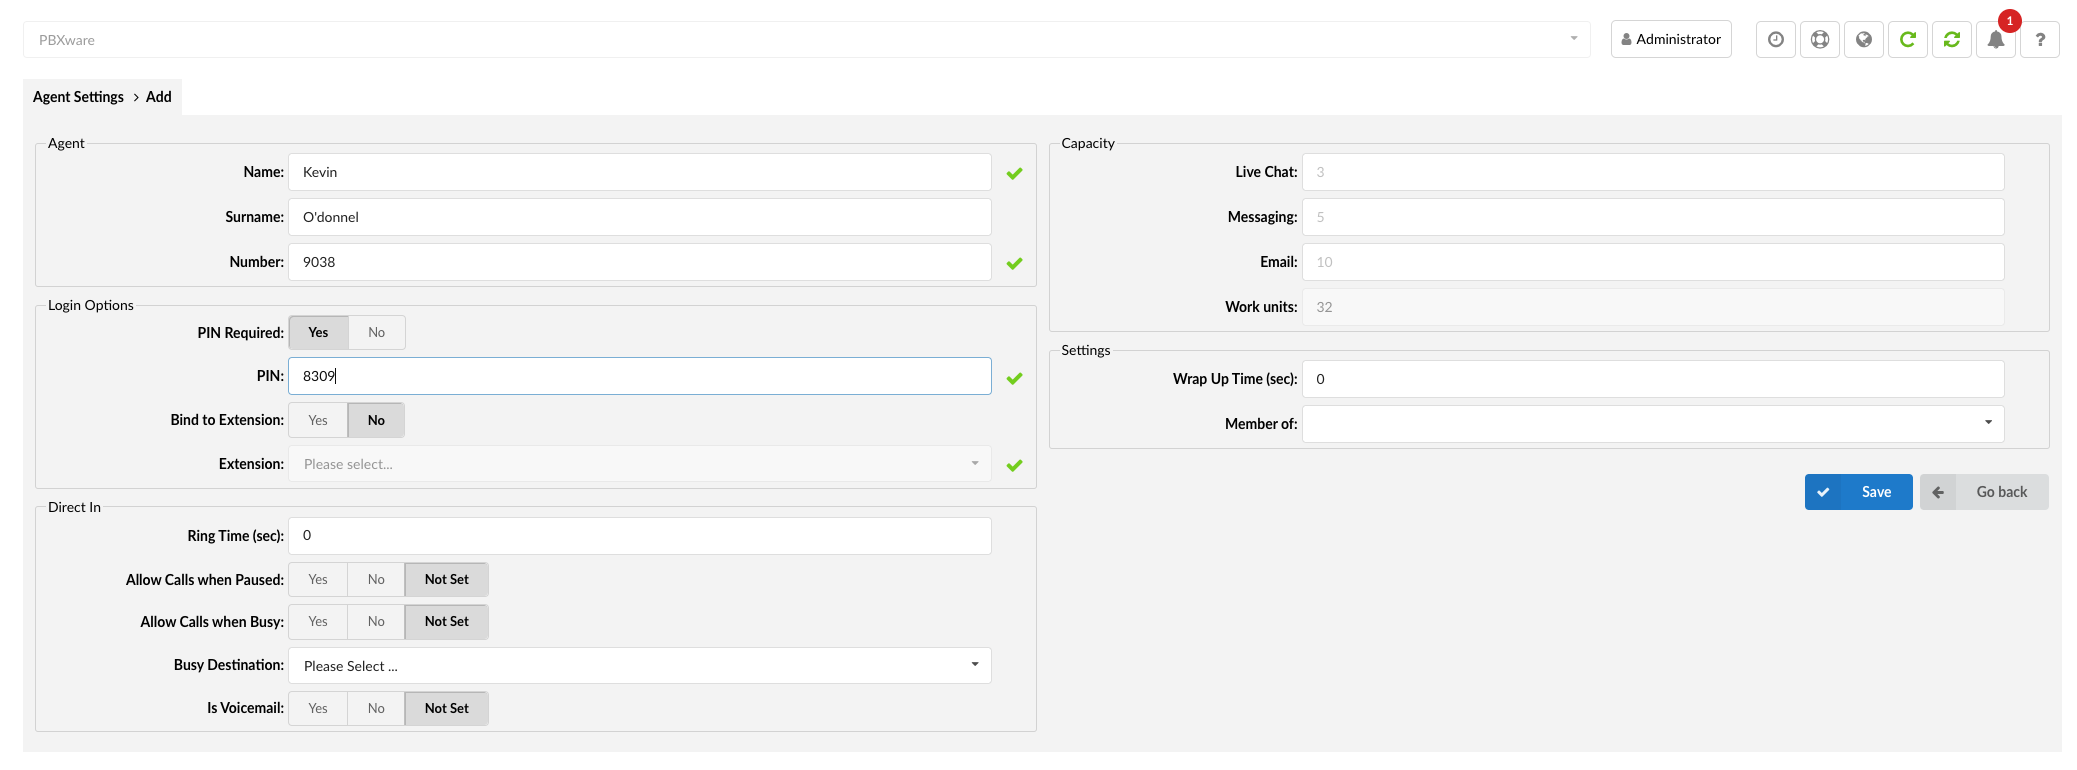
In this section, users have the ability to add a new agent or edit the settings for an existing agent.
To add a new agent, click on the “Add Agent” button and follow the prompted steps to provide the necessary details such as the agent’s name, number, and other relevant information.
For existing agents, admins can edit their settings by selecting the respective agent from the list. This opens up interface where admins can modify various settings related to the agent, such as their name, number, PIN, and other configurable options.
Populating the agent’s interface
- Name
Enter the first name of the agent.
(E.g., Diane)
([a-z])
- Surname
Enter the last name or surname of the agent.
(E.g., Smith)
([a-z])
- Number
Enter the unique identification number assigned to the agent in the system.
(E.g., 1006)
([0-9])
NOTE: This field is automatically populated by default, but it can be changed if necessary. For example, setting ‘1008’ here will create a new Agent with the same network number. Please note that the Agent number must be unique.
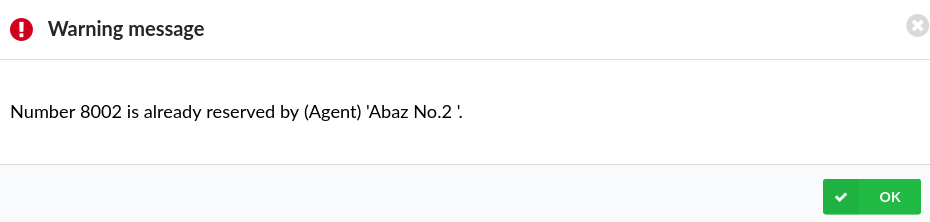
NOTE: Users can create a new Agent where the number would be automatically assigned, or they should enter a 4-digit number. If this number is already reserved, the system will notify a user via warning message: “Number 1234 is already reserved by (Agent) ‘ABC’.” and fill this field automatically with the first available number.
Login Options

In this section, users can configure settings for agent login sessions and extension binding.
- PIN Required
This setting can be toggled between “Yes” and “No” to determine whether agents need to enter a PIN during the login process.
- If set to “Yes”, agents will be prompted to enter their PIN when logging in.
- If set to “No”, agents will not be required to enter a PIN during the login session.
- PIN
Enter the Agent PIN in this field. The Agent PIN is a personal identification number provided by the Agent for authentication during the login process.
(E.g., 6583)
([0-9])
- Bind to Extension
Use the dropdown menu to select whether the system should bind this Agent to the specified Extension.
- When set to ‘Yes’, the system will allow logins for this Agent only from the Extension entered in the ‘Extension’ field.
- When set to ‘No’, the Agent can log in from any Extension.
Note: Enabling Extension binding provides an additional layer of security and restricts Agent logins to a specific Extension.
(Options button)
- Extension
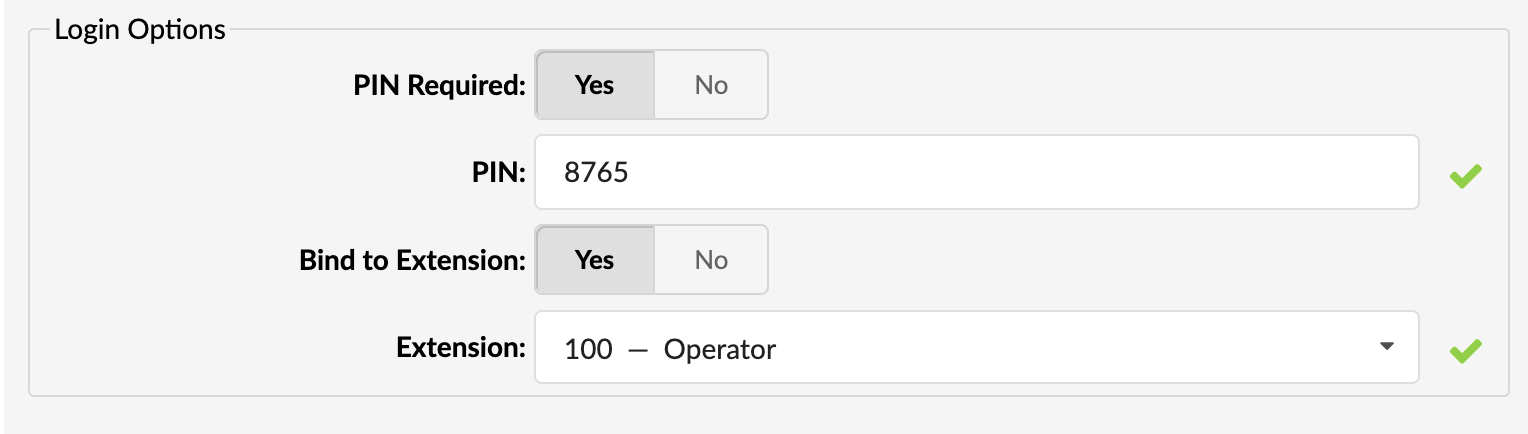
Enter the Extension from which the system will only allow logins for this Agent. This means that the Agent will be able to log in and access the system’s features only from the specified Extension.
For example, if you set the Extension to ‘100’, the system will restrict logins for this Agent to the ‘100’ Extension. This provides an added level of security and ensures that the Agent can only access the system from the designated Extension.
([0-9])
- Logging via Access Codes
The Agent can log in to a system by dialing into one system Extensions with the access code *203. By default, the system will prompt for the Agent number, Agent PIN, and the Number where the Agent is currently. This number could be a local Extension or some other remote Destination.
The Agent must log out with ‘*203’ to stop receiving calls.
Direct in Settings

This section allows users to configure settings related to ‘Direct In’ calls. ‘Direct In’ calls refer to inbound calls that are directly routed to a specific agent without going through a queue.
The ‘Not Set’ option has been added to the Agent Settings. By default, this option is automatically set by the system, which means that all configurations specified in the General Settings will be applied to the agent. However, if any changes are made to the agent’s settings, those changes will override the configurations from the General Settings.
- Ring Time (sec)
This option allows users to set ringing time for ‘Direct In’ calls.
(E.g.,This option is set to 32 sec. When direct in call is received, the agent will ring for 32 sec.)
([0-9])
- Allow Calls when Paused
When this option is set to ‘Yes’, users should be able to call an Agent in the ‘Pause’ state.
(E.g., Yes/No)
(Select box)
- Allow Calls when Busy
When this option is set to ‘Yes’, users should be able to call an Agent already on call/busy.
(E.g., Yes/No)
(Select box)
- Busy Destination
Direct in busy destination will let users redirect a call to another destination if the Agent is busy.
(E.g., Miley Garrett)
(Select box)
- Is Voicemail
This option will dial the Voicemail of the destination.
(E.g., Yes/No)
(Select box)
- Wrap Up Time (sec)

Indicates the designated time for agents to complete post-interaction tasks, such as note-taking, updating records, or preparing for the next interaction.
(E.g., 15)
([0-9])
If wrap up time is set for this Agent, it will override the value in ‘Settings’ → ‘General’ .
- Member of
Choose the relevant group from the dropdown menu to associate the agent with the designated group within your contact center setup.