System Requirements
What is needed to get PBXware up and running?
Server Hardware
Hardware Requirements for standalone PBXware installations
| Minimum | Suggested | |
|---|---|---|
| CPU | Quad Core x86 CPU1 | Quad Core or greater Xeon CPU |
| RAM | 2 GB2 | 4 GB |
| Storage | HDD 250 GB | SSD 250+ GB |
| NIC | 1 Gb NIC | 1 Gb NIC with OOBM3 on a dedicated NIC |
1 – Intel Gen 8 and newer desktop CPU (Gen 8 released 2017)
2 – 2 GB is minimum for Business edition, however Call Center (without Clickhouse) and Multi-Tenant editions require minimum of 4 GB RAM on standalone instalations.
3 – OOBM (Out Of Band Management) – IPMI, iDRAC, iLO or similar platform.
Please note, if the server will operate from a private LAN IP, the firewall must be set up to open/forward some ports. Visit our HOWTO Port Forwarding When System Behind A Router/Firewall for the full list of ports.
“The above hardware requirements should be adequate for systems with low to moderate usage, however, due to large number of variables like number of active extensions,
number of simultaneous calls, number of ring groups/enhanced ring groups, call recording, transcoding etc. the only way to establish if specific hardware would meet your
demands is to do an extensive testing or deploy a hardware that exceedes our suggested hardware requirements.
In addition, please make sure to take the system’s future expansion in consideration as every future hardware upgrade will cause a system downtime and possible service distruption to your users, so certain hardware overhead is strongly recommended for every standalone installation.
If you have any doubts about the hardware requirements for your next PBXware deployment feel free to contact us before you make the purchase and we will be glad to provide the necessary assistance to determine the best option based on your current and future demands.”
Please note, the only officially supported PBXware OS platforms are Gentoo and Artix (Arch-based) Linux distributions.
Support Requirements
In order to provide system support, we need access to the system server by SSH, HTTP/HTTPS protocols. The following is required:
- Access to system server as user ‘root’
- Networking setup and fully configured to port forward (or firewall opened) to ports 2020, 80, 81 and 443.
With the above in place, our technicians will be able to troubleshoot issues. We regret that we are not able to support systems that do not satisfy the above requirements.
If you are unsure how to install PBXware, we offer a professional installation service. Please contact sales or visit our web site for full details.
Installation Guide
PBXware can be installed by one of the following installation methods:
The CD ROM installation method is used to install PBXware onto a commodity PC/server hardware. This installation process installs a Linux operating system, PBXware, and all other necessary applications onto the system hard drive. Installation is easy, fast, and includes everything needed to successfully install and operate.
WARNING:
CDROM will install PBXware on the hard disk and erase all existing data, operating systems, and other files.
- The USB installation method is similar to the CD ROM method. The only difference is the boot medium which holds the PBXware installation files.
- VIRTUAL SERVER installation is a PBXware system contained within a VSERVER (also known as VPS) on Bicom Systems SERVERware installation.
Any of the above formats will start the machine/Vserver/image and all necessary software, allowing the administrator to login to this machine/Vserver from a browser. The Administrator can then license the system by entering the license number or use it in FREE mode. The system will contact our licensing server for authorization. Upon successful licensing, the system can be used normally by logging into the system.
CD ROM
To install the system using a CD ROM, do the following:
- Download and burn the CD image from http://bicomsystems.com/download
- Boot up the system, wait for the installer to start and follow the on-screen instructions
- The system will be installed and rebooted. Once the system is booted, the display will show the obtained IP address.
- Please login to the Setup Wizard using your favorite web browser by navigating to http://$IPADDRESS (For Example: http://192.168.1.2). The default username is “root”. The default password is “pbxware”
IMPORTANT:
- Before continuing, please read the System Requirements.
- The setup wizard asks for a security username/password to prevent unauthorized access. The defaults are: username: root and password: pbxware. The setup wizard will ask for the password to be changed in one of the setup wizard steps. After it is changed, It is very important to remember this password since it is the system root and setup wizard password.
USB
Installing the system from USB is no different than using the CD ROM version. The only difference is how you put the downloaded image on the USB:
- Download the USB image from http://bicomsystems.com/download
- Copy the USB image to a USB drive using one of the free bootable USB tools
- Set your machines BIOS to boot from the USB device
- Boot the system from the USB device
After the image boots from the USB device, everything else is the same as a system booted from a CD ROM.
IMPORTANT:
- Before continuing, please read the System Requirements.
- The setup wizard asks for a security username/password to prevent unauthorized access. The defaults are: username: root and password: pbxware. The setup wizard will ask for the password to be changed in one of the setup wizard steps. After it is changed, It is very important to remember this password since it is the system root and setup wizard password.
Vserver installation
Installing PBXware in a Vserver environment is only different at the beginning of the installation process.
- First create a Vserver in SERVERware. (See SERVERware documentation.)
- After Vserver with PBXware is created, go to the Setup Wizard and configure your PBX system.
IMPORTANT:
- Before continuing, please read the System Requirements.
- The setup wizard asks for a security username/password to prevent unauthorized access. The defaults are: username: root and password: pbxware. The setup wizard will ask for the password to be changed in one of the setup wizard steps. After it is changed, It is very important to remember this password since it is the system root and setup wizard password.
Obtaining IP Address
The PBXware IP address can be obtained by:
- Connecting a monitor to the PBXware unit and obtaining the IP from the command prompt by entering the ifconfig command
- Obtaining it from the DHCP server
Setup Wizard
The Setup Wizard is designed to collect essential data in order to get the system up and running. After the setup wizard has finished, the system should be fully licensed, fully operational, and ready for use.
In order to login to the setup wizard, please point your browser to: https://$IPADDRESS:81/ (For example:https://192.168.1.2:81/)
IMPORTANT:
The setup wizard asks for a security username/password to prevent unauthorized access. The defaults are username: root and password: pbxware. The setup wizard will ask for the password to be changed in one of the setup wizard steps. After it is changed, It is very important to remember this password since it is the system root and setup wizard password.
EULA
The EULA (End User License Agreement) is the first step in the setup wizard. Please read the EULA and type ‘”I agree”‘ to proceed.
NOTE: If you do not agree with the EULA, please remove the installation media and system software and return the issued license.
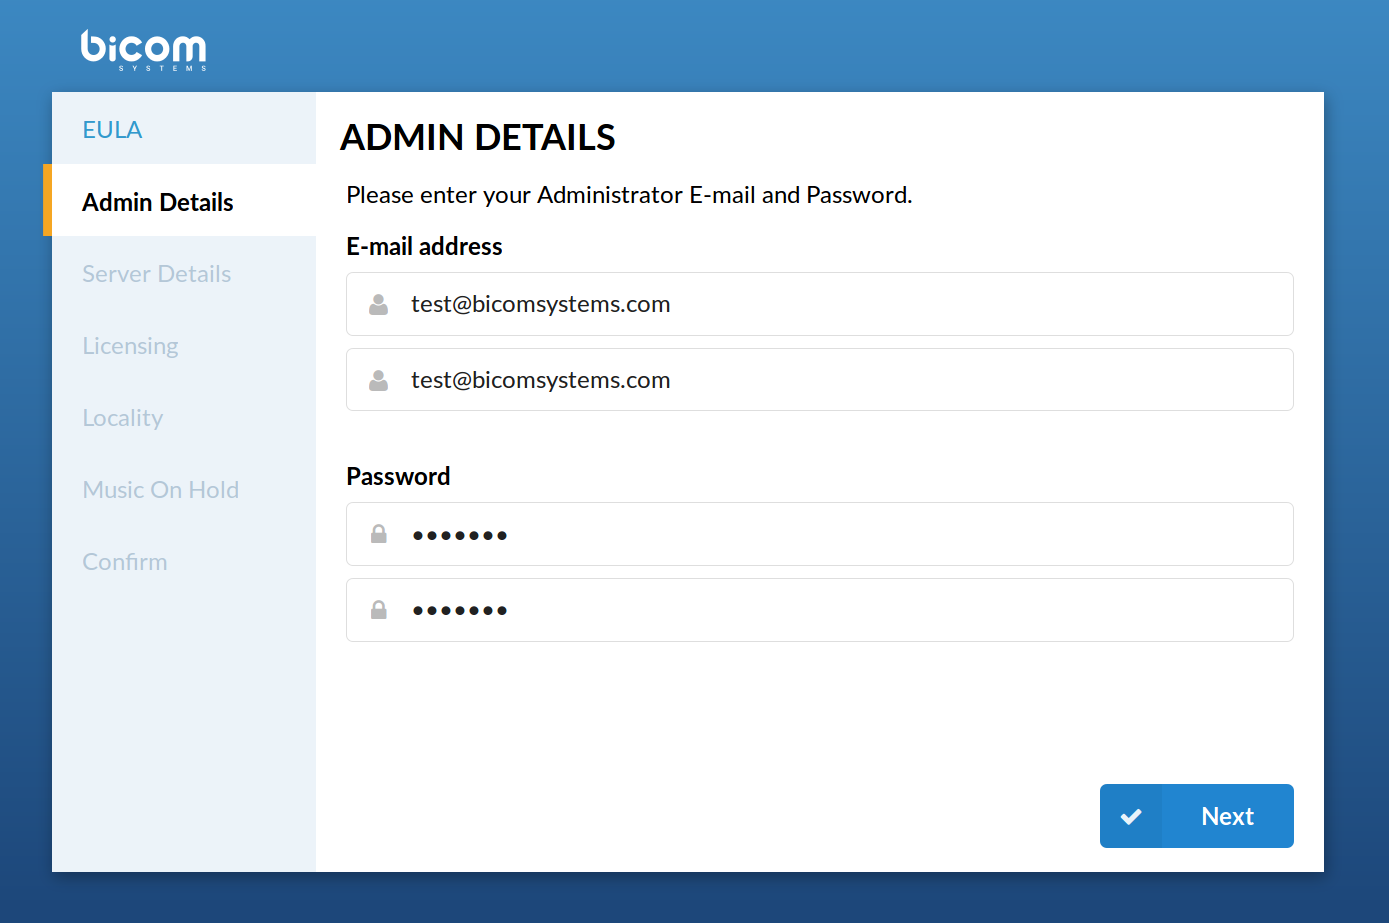
Administrator Details
Provide the details of the user who will administer the system. These values are used when logging into PBXware
Administrator Details
- E-mail/Confirm E-mail
The provided email address is used as a username for logging in.
([a-z] [0-9] [@_.-])
- Password/Confirm Password
The provided password is used for logging in.
([a-z] [0-9])
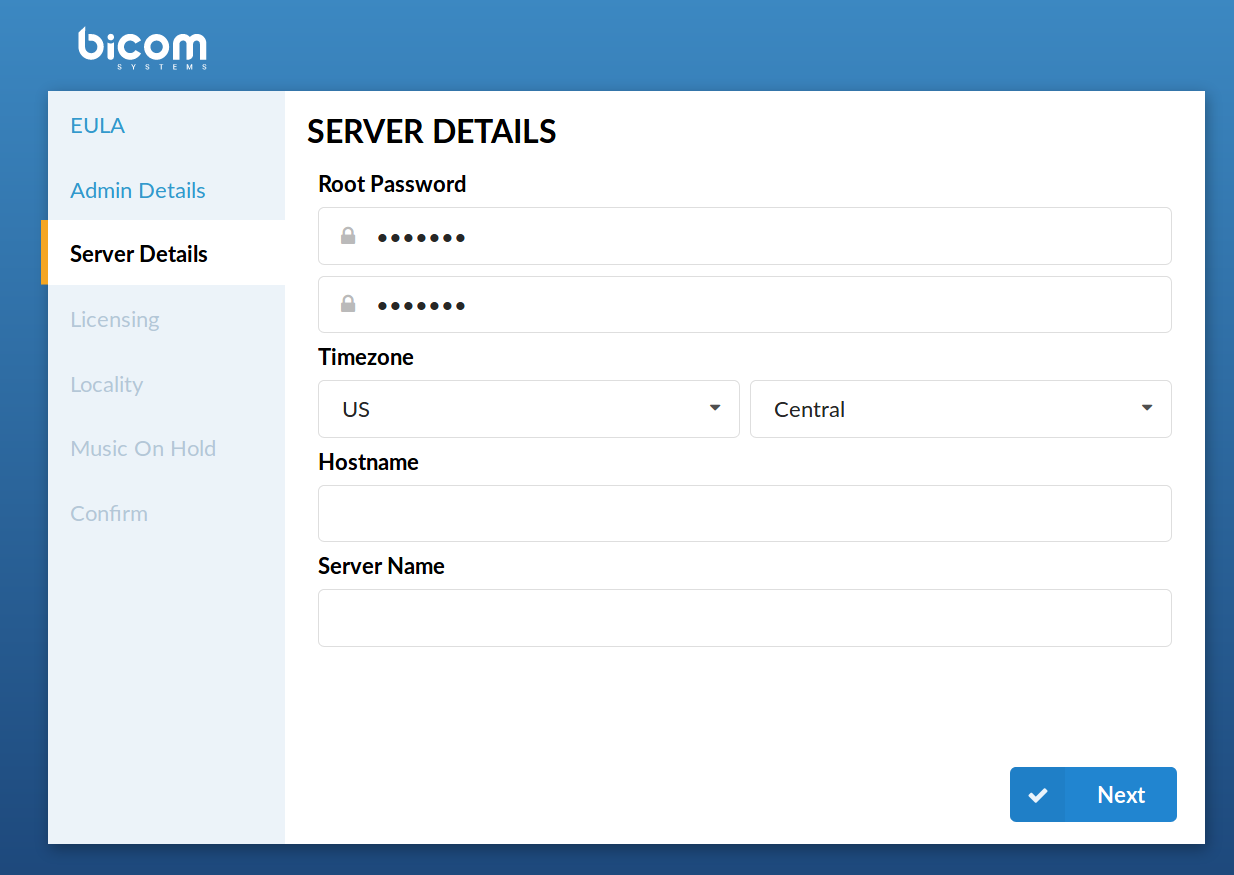
Server Details (CD ROM and USB version)
These are system and network fields necessary for proper system operation.
- Root Password
PBXware prompts for this password during the system/ssh login and when accessing system services through the interface.
- Confirm Password
Re-type the Root Password entered in the field above
- Time Zone
Select the time zone in which PBXware is located.
Server Details
- Hostname
The name given to the machine which will identify the system on the network (E.g., “myhost”)
([a-z] [0-9])
- Interface
The interface that PBXware uses (LAN/WAN). If PBXware is in the LAN interface, select it here. If PBXware is installed on appliances in WAN mode, select WAN here.
(Select box)
- Use DHCP
Whether PBXware is using DHCP or a static IP address. It is always recommended to set PBXware on a static IP address, in which case this option should be set to ‘No’.
(Option buttons)
- IP Address
If PBXware is in a LAN interface, provide its static IP address here.
([0-9])
- Netmask
This field is calculated automatically and contains your IP address Netmask.
([0-9])
- Gateway
If PBXware is located in a LAN interface, set the gateway IP address here.
(E.g., 192.168.1.1)
([0-9])
- DNS server
If PBXware is located in a LAN interface, set the preferred DNS server IP address here.
(E.g. 192.168.1.1)
([0-9])
- DHCP Server
If there is no DHCP server on LAN, PBXware can start its own and provide UADs/Phones with this service. Choose’ No’ if you already have a DHCP server on your network.
([0-9])
Server Details (Vserver version)
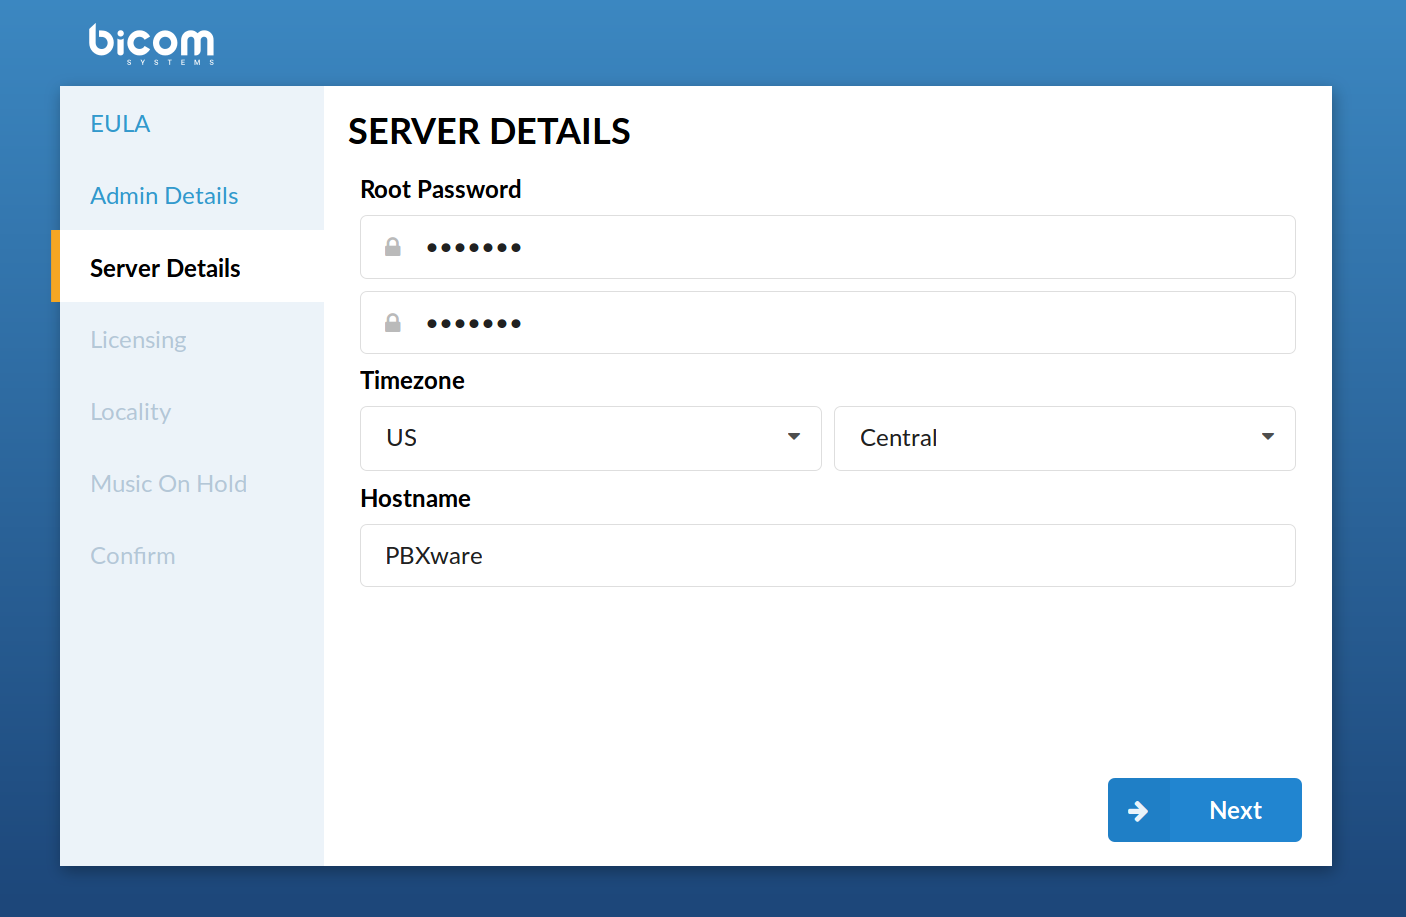
Server Details (Vserver version)
These are system and network fields necessary for proper system operation.
- Root Password
PBXware prompts for this password during the system/ssh login and when accessing system services throughout the interface.
(E.g. do34ffjk)
([a-z] [0-9])
- Confirm Password
Re-type the Root Password entered in the field above.
(E.g. do34ffjk)
([a-z] [0-9])
- Time Zone
Select the time zone in which PBXware is located, E.g., USA/East-coast.
(USA/East-coast)
(Select box)
- Hostname
The name given to the machine will identify the system on the network, E.g., myhost.
(E.g. myhost)
([a-z] [0-9])
- Server name
Virtually the same as the ‘Hostname’ field, only this name will appear during system notifications, sent emails, etc.
([a-z] [0-9])
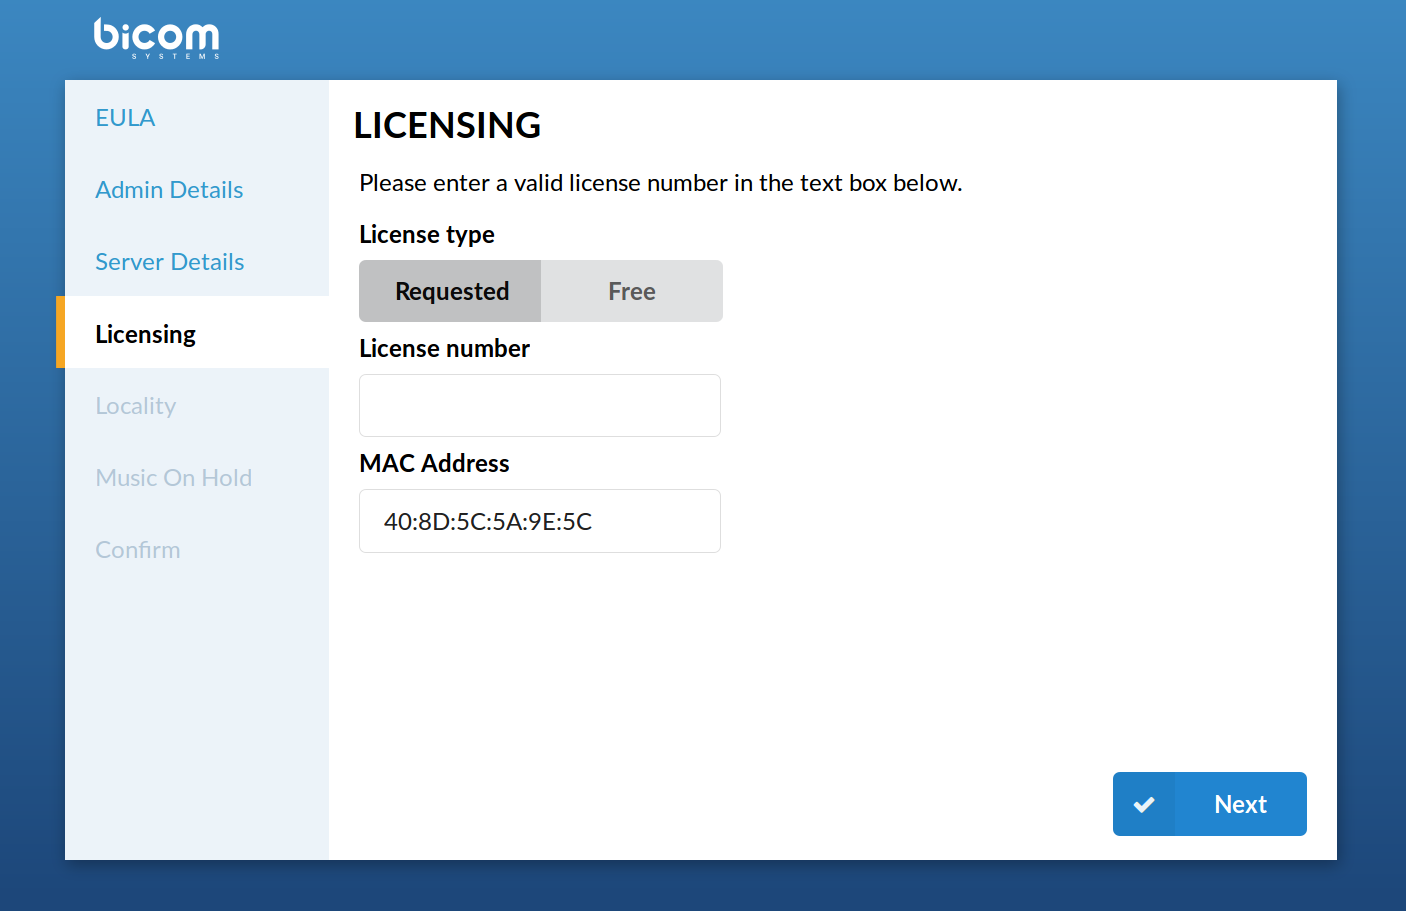
Licensing
Licensing allows you to enter a valid non-active license and displays the MAC address with which the license will be valid. If the system has more than one network adapter, this will show all found MACs for selection.
NOTE: PBXware licensing in version 6.0 has been slightly changed, and PBXware license now must have a matching PBXware version number assigned. In case of license does not have a matching version set, PBXware will not be able to start. Once you log in to GUI, you will see a warning message informing you that the license is not valid. In case this happens, please contact your account manager.
Licensing
- License Type
Select a system license type. The system comes with two license types: FREE license and ‘Requested License’.
(Select box)
- License Number
Enter the PBXware license number, select the MAC address if more than one is present, and click ‘Next’ to register PBXware.
([a-z] [0-9])
NOTE: PBXware 6.0 also lets you relicense your PBXware from the terminal.
To do that, use ssh to log in to your PBXware and execute these commands:
cd /opt/pbxware sh/license_refresh
This command will take your current license and check the licensing server for any changes that might be made since it was applied.
In case you need to relicense your server with a new license number, use these commands:
cd /opt/pbxware sh/license_refresh ABCD1234
Make sure to replace ABCD1234 with the correct license number you would like to apply to the system.
- MAC
The MAC address is associated with PBXware.
NOTE: The system must have access to a fully operational Internet connection to license the system. If more than one MAC address is present, select the one you wish to associate with PBXware and click ‘Next’.
(Select box)
Locality
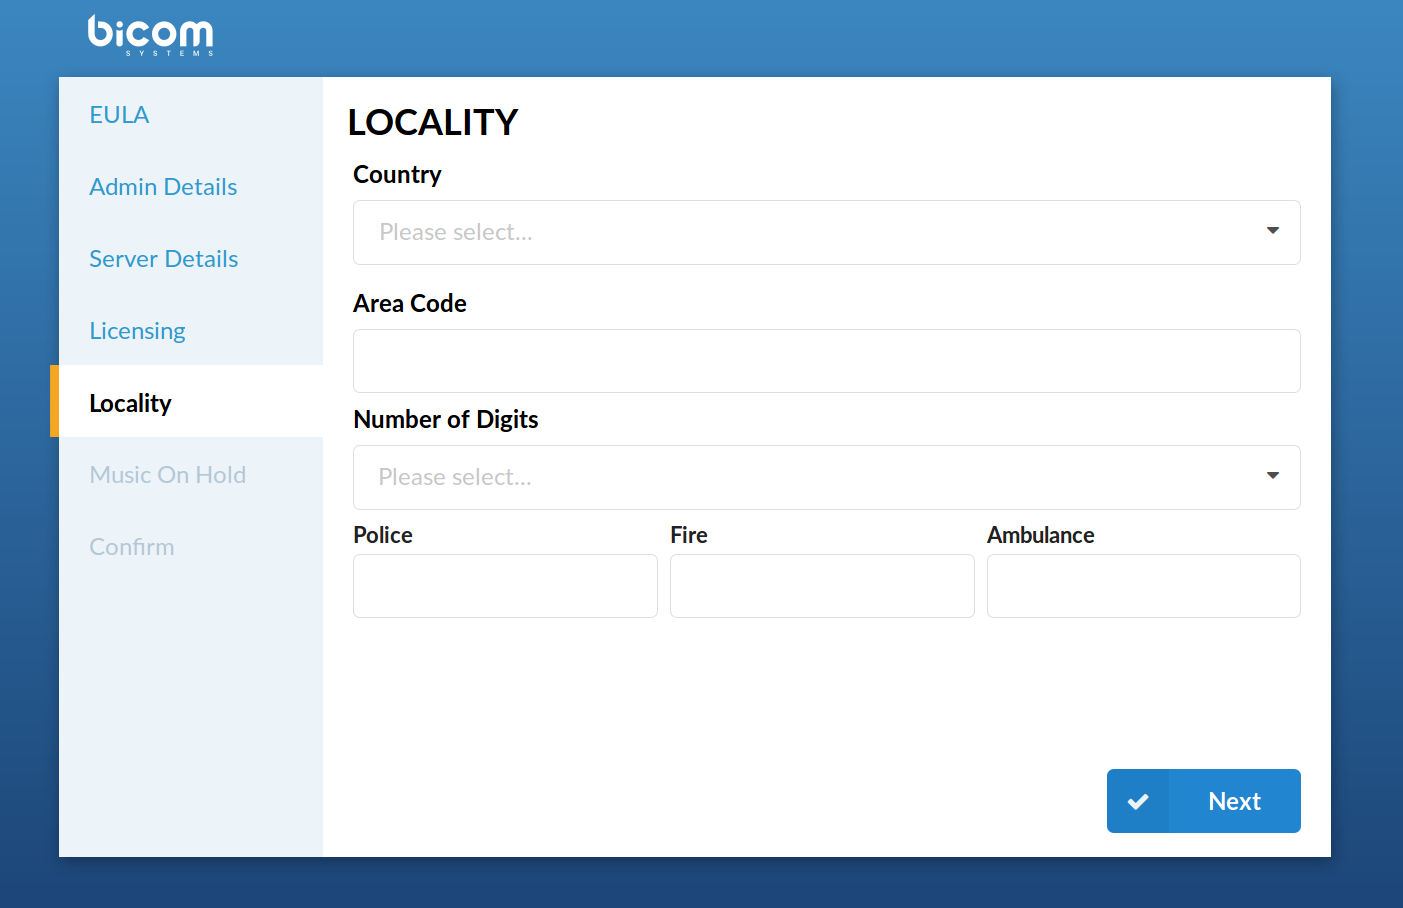
Locality
Locality allows for the ‘local’ system values to be entered to set up all the necessary values for normal system operation.
- Country
Select the country in which PBXware is located, E.g., United Kingdom.
(Select box)
- Indications
Typical telephony sounds PBXware will use. Different signals are heard when the handset is picked up in different countries. This field will be set automatically. If your country is not on the list, select ‘Other’.
(Select box)
- Area Code
The area code is determined by PBXware location. For example, if PBXware is in New York, you would set ‘212’ here.
([0-9])
- Number Of Digits
The number of digits PBXware will associate with local extensions. If this field is set to ‘4’, all local extensions will have a range from 1000-9999.
(0-9)
WARNING: After you create the first extension, queue, or agent on your system, you will no longer be able to change this setting.
- Police/Fire/Ambulance
The phone number for Emergency Services. PBXware has an option to dial these emergency services through certain trunks. If all trunk channels are busy, an active call will get dropped to dial these numbers.
(If in the USA, for example, set these fields to ‘911’)
(Select box)
Music On Hold
The system has a default ‘silence’ sound file for Music On Hold. It can also be changed to a royalty-free music file.
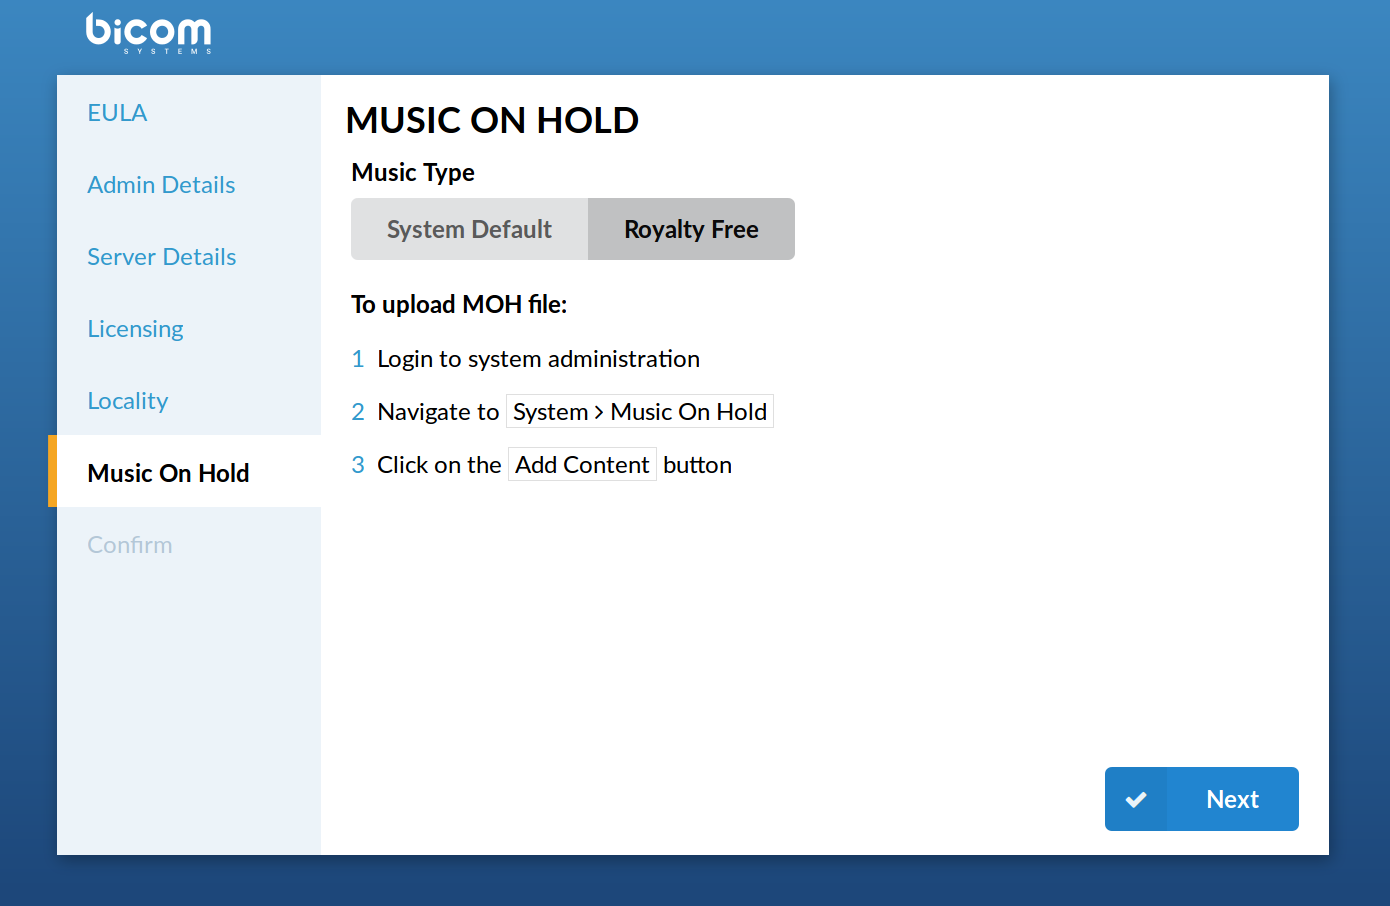
Music on Hold
TIP:
This field is available for: Virtual Server, CD, and Appliance PBXware packages.
- Royalty Free Music On Hold
This will upload royalty-free music, which can be used as the default for Music On Hold. It can be changed again later.
(Option button)
Confirm
Finally, the confirmation step lets you double-check all values and either finish the wizard or start all over from the beginning. If you click “Confirm and finalize”, the setup wizard will end, and the browser will be redirected to the system login screen.
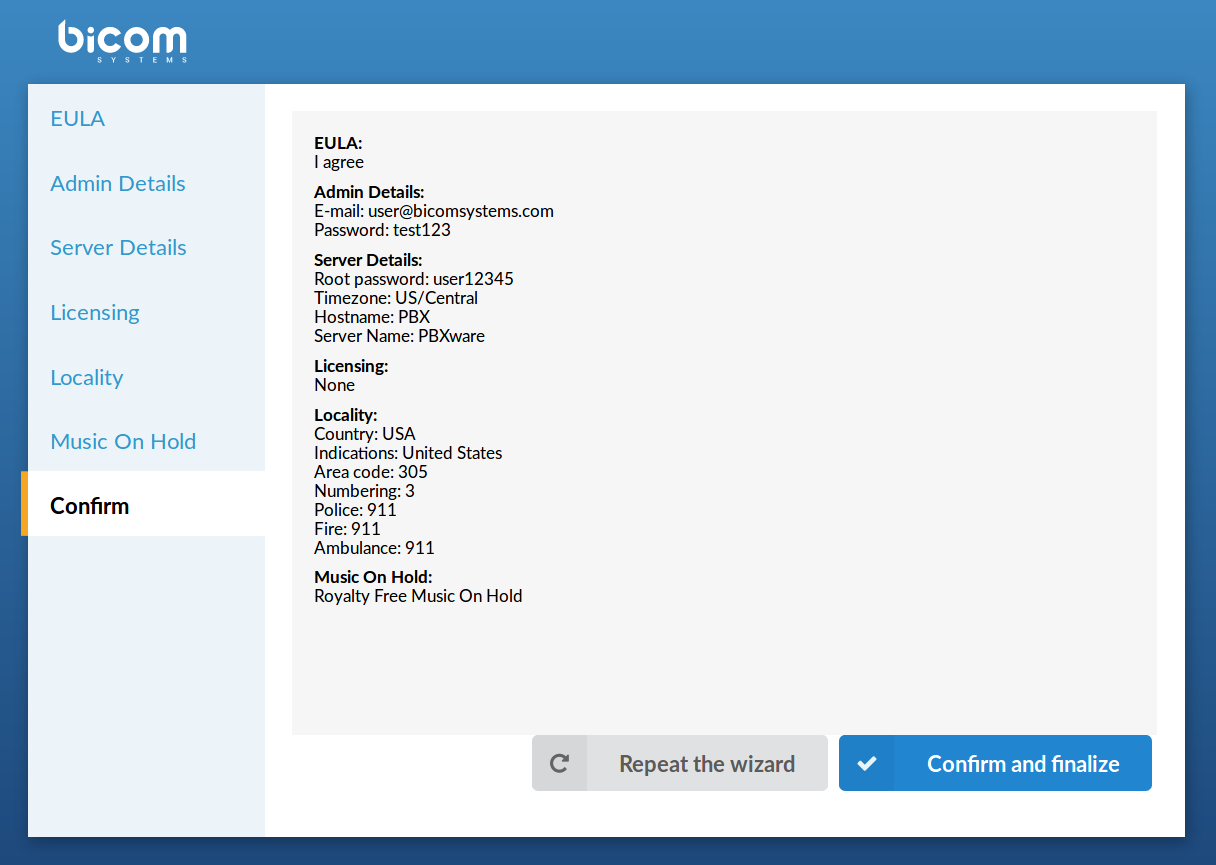
Confirm
- Repeat the wizard
If you click this button, all of the provided details will be reset, and you will return to step one.
(Command button)
- Confirm and finalize
Click this button to confirm the data provided in the setup wizard and finalize the installation. All provided details will be applied, and the setup wizard will redirect you to the PBXware login screen.
(Command button)
Logging into the system
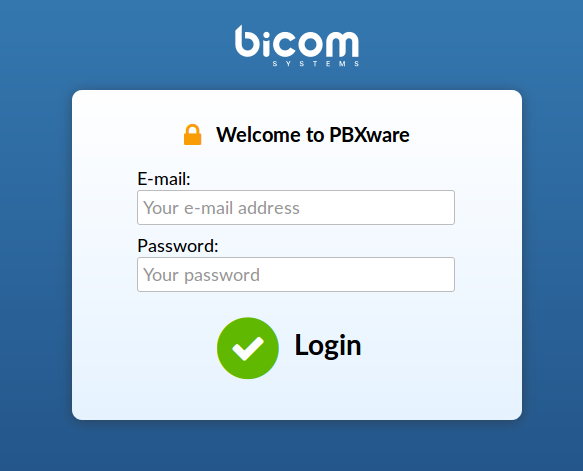
Login screen
In order to login to the system, point your browser to: http://$IPADDRESS/ (for example:http://192.168.1.2/)
This is the administrator’s e-mail address, twhich you have set in the initial setup wizard.
([a-z] [0-9] [@_.-])
- Password/PIN
This is the administrator’s password, which you have set in the initial setup wizard.
([a-z] [0-9])
Updates
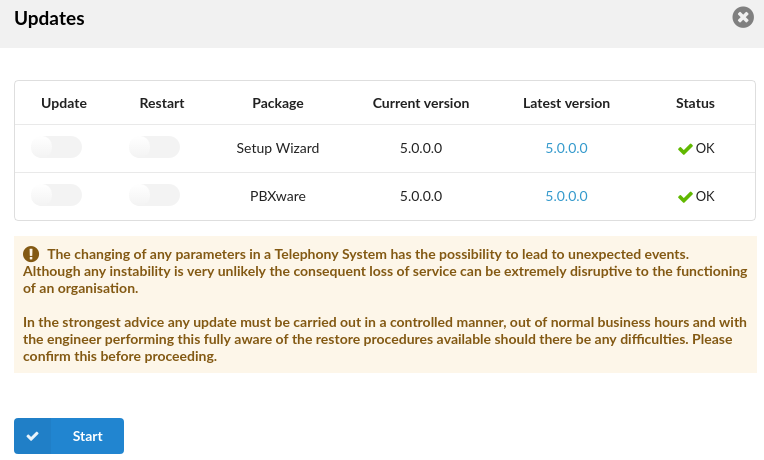
Updates
To update PBXware to the latest version, follow these steps:
- Log in to the PBXware web interface
- Navigate to ‘Admin Settings: Updates’ and click on the ‘Updates’ button
- Enter the system password
- Click on ‘Start’ and wait until the system shows the interface again
License Updates
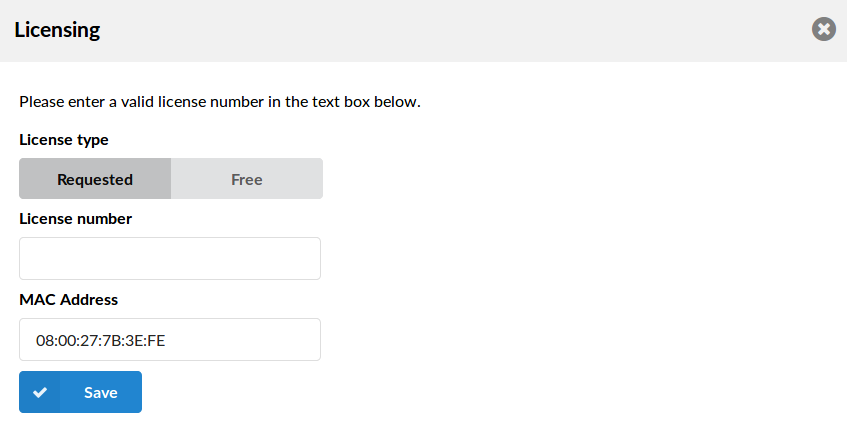
License Updates
To upgrade your PBXware license, do as follows:
- Log in to the PBXware web interface
- Navigate to ‘Admin Settings: ‘Licensing’
- Enter the system password
- Enter the license number in the ‘License Number’ field (E.g., 0A9DS8F7)
- Click on the ‘Save’ button