DIDs are used to route all inbound calls (entering the system through trunks) to a preferred system destinations.
- Search:
In search section you can find your DIDs by Tenant Name, DID number, Destination, Country, State, City and Area Code.

Here you can create multiple DIDs on the fly by uploading a .csv file with DID details, or you can download csv for present DIDs and review or edit them.
To upload, click on the ‘Browse’ button, select a .csv file from your computer, click ‘Open’ and then the ‘CSV Upload’ button.
CSV file must be in the following format:
tenant,nr1,nr2,dest,ext,replace_cid,trunk,status,strip_N_digits,queue_priority,codec,E164nr1,E164nr2,area_code,did_name
Required fields:
- Tenant
- DID/Channel (start)
- Trunk
- Destination
- E-mail/Extension/Value
All other fields also must be defined in csv but they can contain empty values.
- Download CSV Template
This option will allow you to download the CSV template Download CSV Template that already contains necessary headers which should help you create CSV file that can be used to upload large number of DID entries at once.
NOTE: In PBXware v6.7.4 we added the option to upload the DID name using a CSV file.
The DID template now includes did_name field. To download the updated DID template navigate to the DID section and click on the Download CSV Template button.
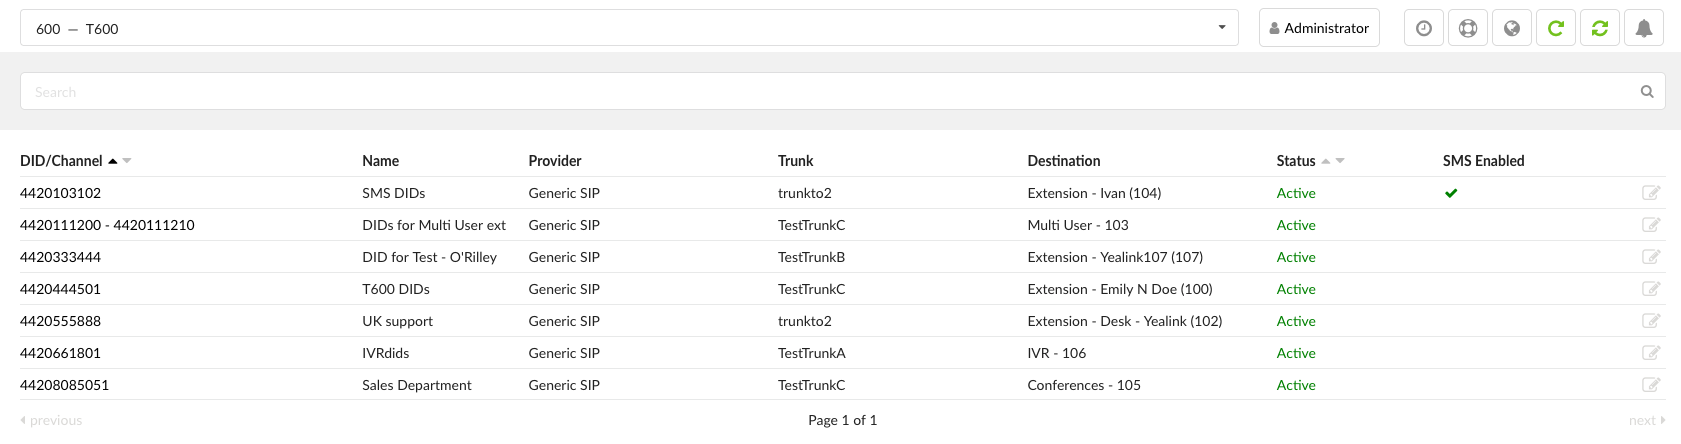
DIDs Main Screen
DIDs are configured on master tenant and assigned to a slave tenant on which they are going to be used. This screen lists all system DIDs on all tenants with the following details
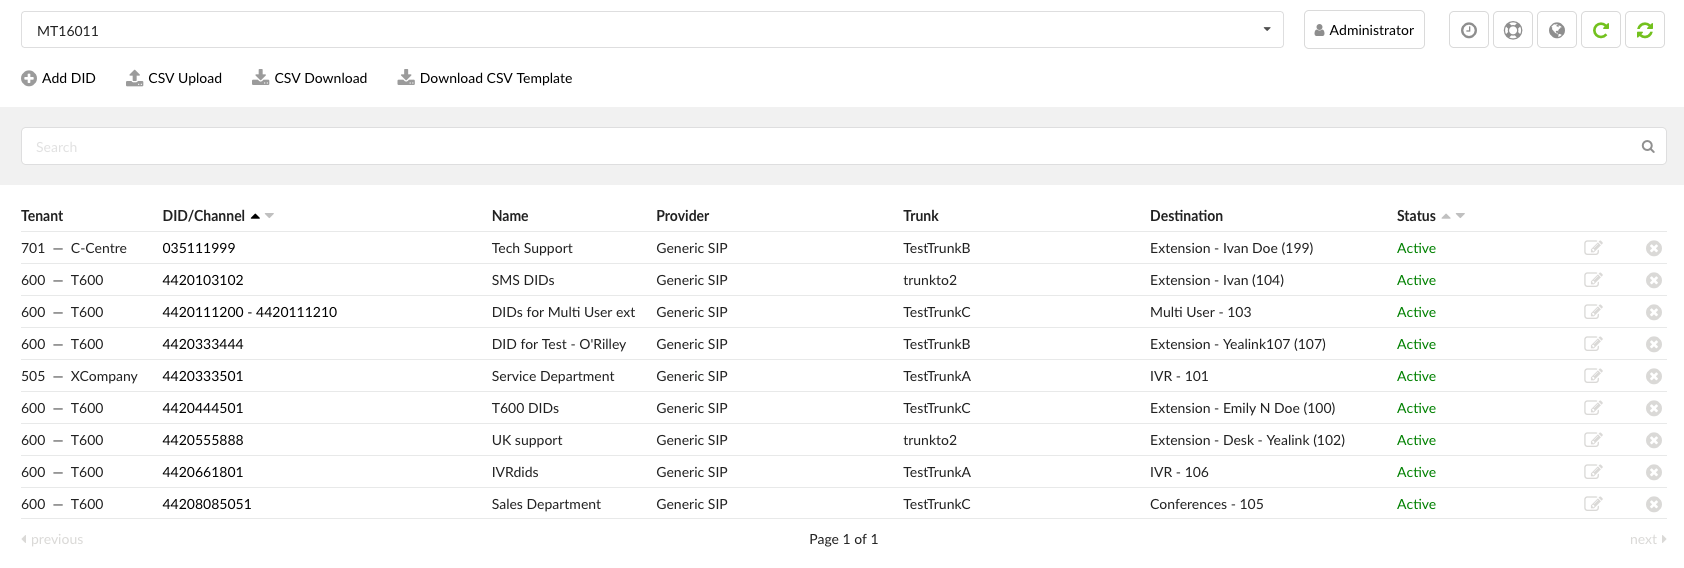
- Tenant
Which tenant is using a DID.
(E.g. 202 – TestTenant, where 202 is tenant code)
- DID/Channel
DID number or a PSTN channel slot number.
(E.g. 1000/1)
- Name (6.6)
Displays the name of a DID for easier navigation
(E.g. Tech Support)
NOTE: Please note that this feature is part of the beta release and is only visible to beta testers. Once the stable version is released, it will be available for general use.
- Provider
Provider name
(E.g. Generic SIP)
- Trunk
Trunk used by a DID
(E.g. Trunk1)
- Destination
Trunk destination and destination network number
(E.g. Extension – 5000)
- Status
Refers both to the status of DID and SMS service
(E.g. Active/Inactive)
NOTE: Please take a look at the table for further explanation of what happens when the status is either ‘Active’ or ‘Inactive’.
| Active | Calls and SMS messages both go through . |
| Inactive | Calls do not go through, but SMS messages still go through. |
EXAMPLE: In case a user adds a DID, and following this, enables SMS for this DID on Slave Tenant, the number will be added to the list of SMS numbers and its status will be displayed as ‘Active’ which means that both the calls and SMS messages will go through. In case a user changes settings on Master Tenant, and the status changes to ‘Inactive’, this action will make it unable for calls to go through, however, SMS messages will still go through since the number stays on the list of SMS numbers regardless of the status change.
Edits the DID configuration
Deletes a DID from the system
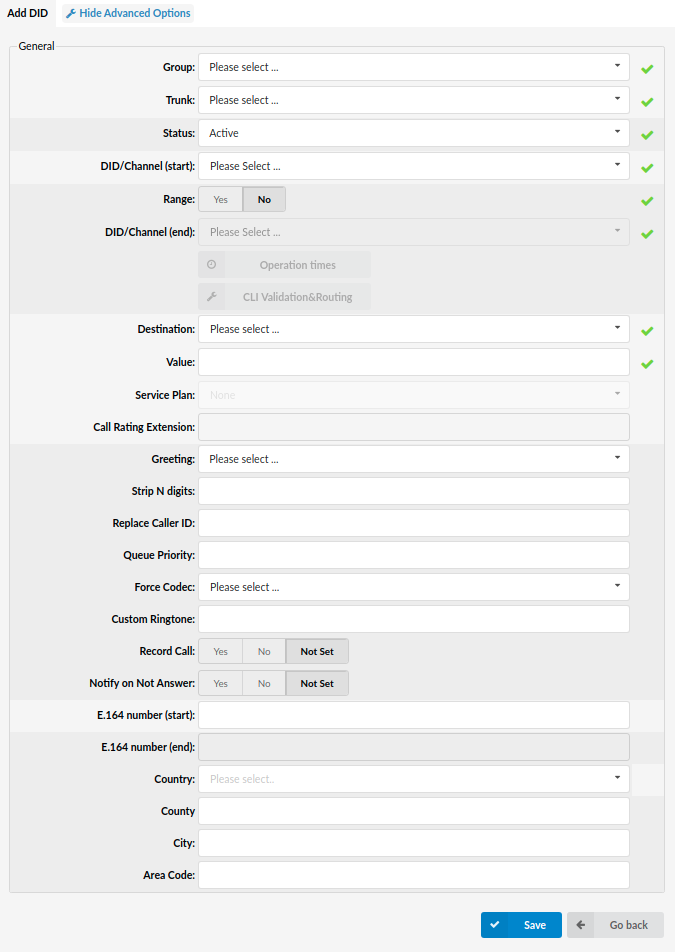
Add/Edit DID
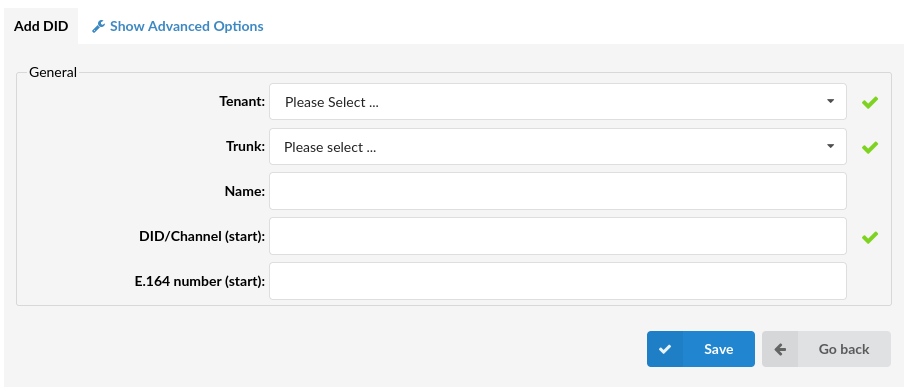
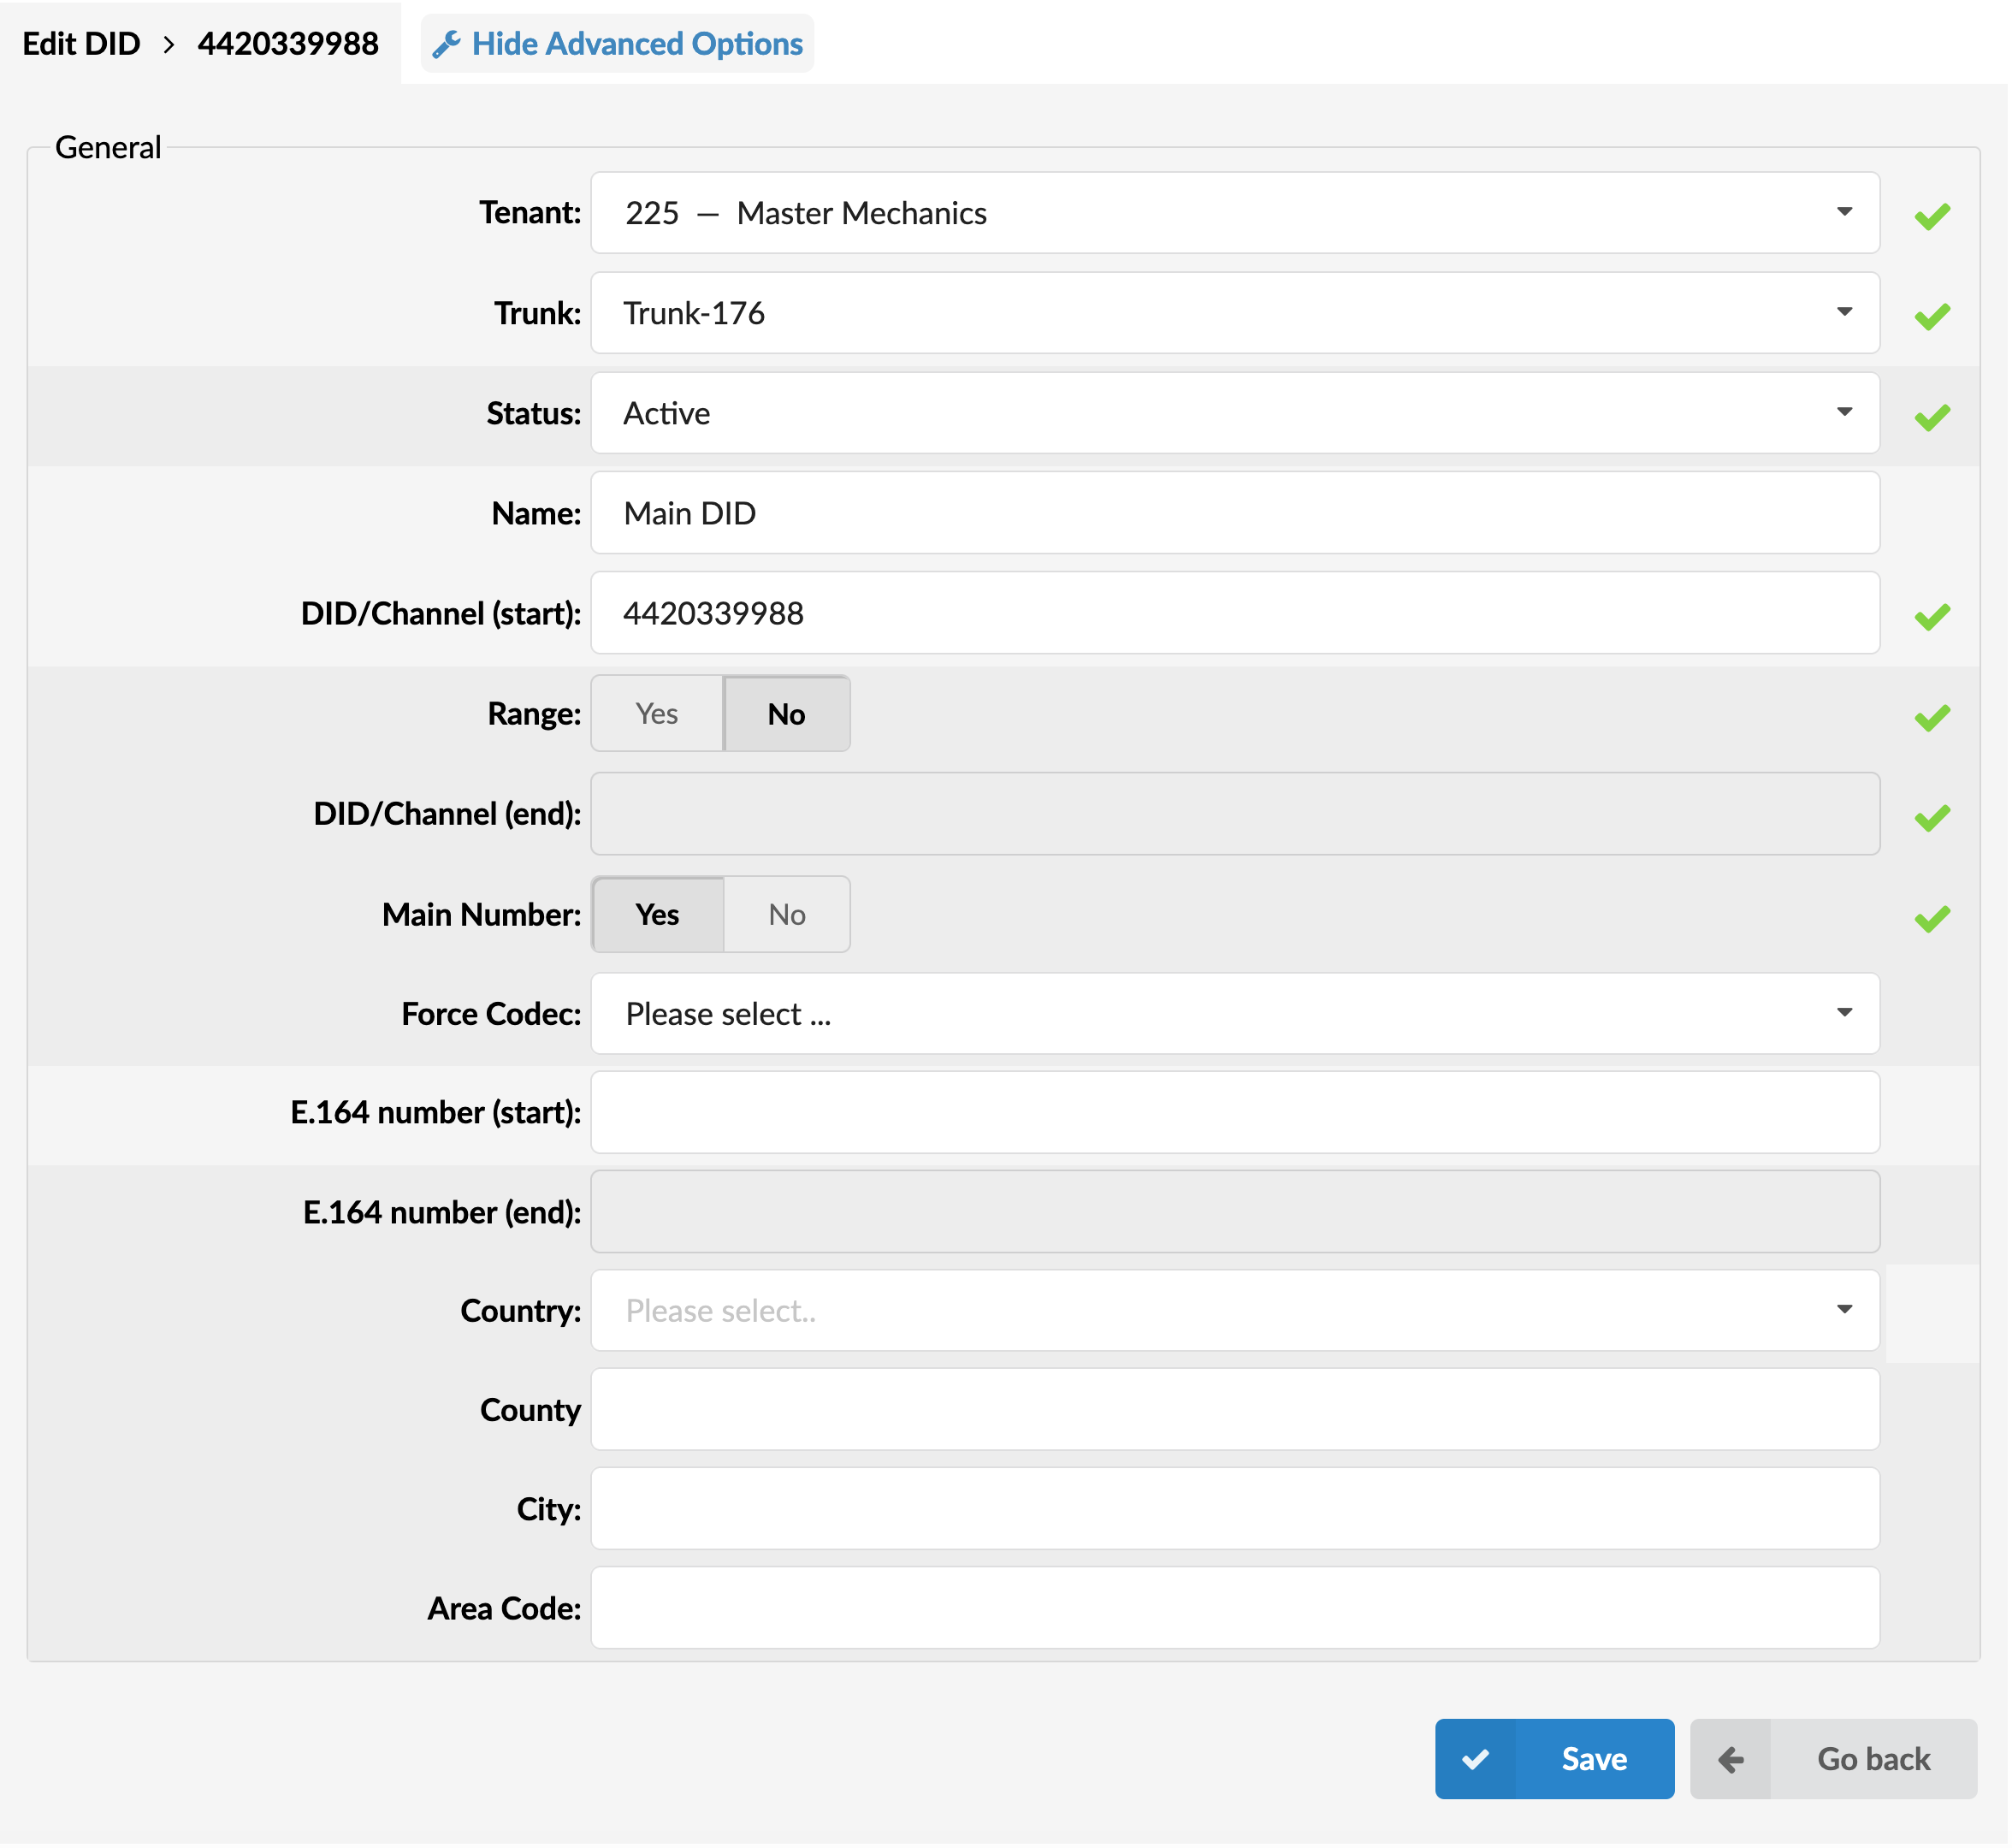
To add a DID on the system you need to be on the master Tenant where you can add and set DID options in regard to the tenant which will use it, the trunk from which the DID is dialed, etc. Clicking on ‘Add DID’ will open standard DID options
General
- Tenant
Select which tenant will use this DID.
(E.g. TestTenant)
- Trunk
Select which trunk the DID will pick up calls from.
(E.g. If you select ‘2554433’ for example, DID will wait for any incoming calls over that trunk and then will pass the call further based on the settings below).
- Name (6.6)
Displays the name of a DID for easier navigation
(E.g. Tech Support)
NOTE: Please note that this feature is part of the beta release and is only visible to beta testers. Once the stable version is released, it will be available for general use.
- DID/Channel (start)
Provide a DID number here
(E.g. 55510205).
- E.164 number (start)
A DID number in E.164 format ‘INTERNATIONAL PREFIX + AREA CODE + PHONE NUMBER’ ( 1 212 555 9876 ). If provided here, this number will be used by ‘PBXware MT: Networks’ and will be dialed over the Internet rather than the PSTN trunk. If the ‘Range’ field is set to ‘Yes’, provide the DID/Channel (start) number in E.164 format here
(E.g. If your DID number = 5559876, and you live in NewYork/USA, your E.164 number is 12125559876)
Advanced Options
A click on the ‘Advanced Options’ button will open more detailed DID options
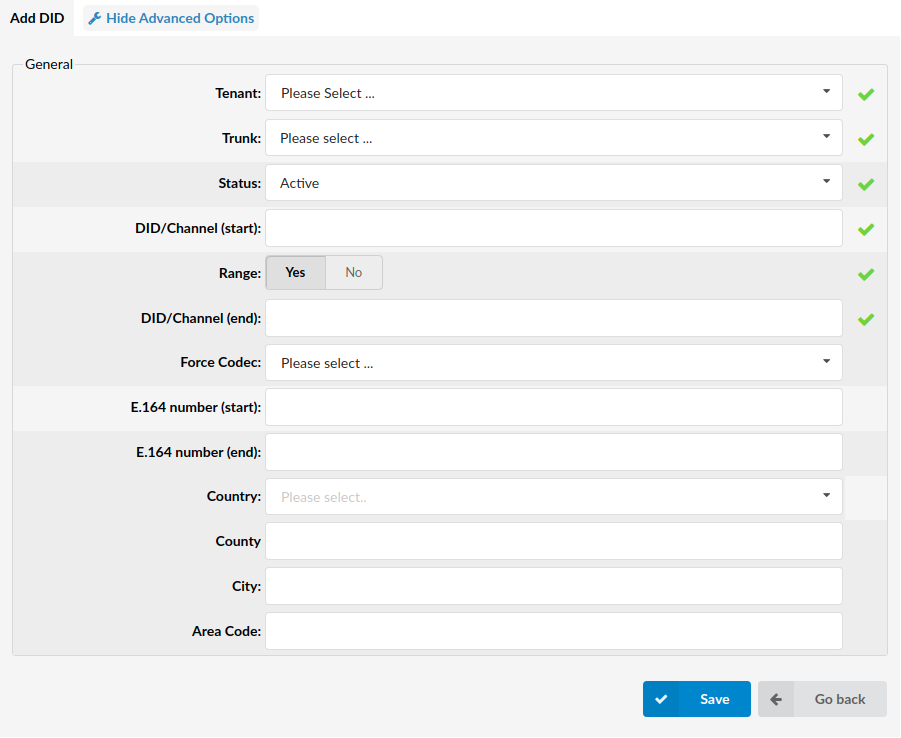
General
- Status
Set the DID status on the network.
(E.g. Rather than deleting the DID you can deactivate it by selecting ‘Not Assigned’ and restore it back with ‘Active’)
(Select box)
- Range
If enabled, users may utilize a range of DIDs and point it to one or many Endpoints. Users may then enter their desired DID/Channel (start) and DID/Channel (end) and/or E.164 number (start) and E.164 number (end) which gives them an opportunity to limit the beginning of the Range and its end. If this feature is not enabled, users may enter only DID/Channel (start) and/or E.164 number (start) meaning that there will be no range, but only one standard DID.
- DID/Channel (end)
Some providers offer a range of numbers over a single trunk. Set whether this DID should be used to transfer a range of numbers to some PBXware MT destination.
(E.g. John has bought 10 DID numbers from a provider (55510205 – 55510215) and wants all calls coming from these to be transferred to the lobby queue. He needs to set ‘Range’=’Yes’. Set 55510205 to (start) and 55510215 to this field. Set ‘Destination’=’Queues’ and ‘Value’=Queue number(e.g. 1000)).
(E.g. 55510222).
- Force Codec
Force a codec to all calls going over this DID
(E.g. Select G.711 ulaw from the list to force all calls going over this DID to this codec)
- E.164 number (end)
A DID number in the E.164 format ‘INTERNATIONAL PREFIX + AREA CODE + PHONE NUMBER’ (e.g. 1 212 555 9876). If ‘Range’ field is set to ‘Yes’, provide the DID/Channel end here.
(E.g. If your DID number is in range 5559876 – 559885, and you live in NewYork/USA, your E.164 end number is 12125559885)
- Country
Select the country that this DID number belongs to
(E.g. If the DID number is in the USA format (e.g. 1212****), select USA here)
- State/County
The state that the DID number belongs to
(E.g. If the DID number is in the USA format (e.g. 1212****), 212 is for New York, so type NY here)
- City
The city that the DID number belongs to
(E.g. If the DID number is in the USA format (e.g. 1212****), 212 is for New York, so type New York here)
- Area Code
The area code that the DID number belongs to
(E.g. If the DID number is in the USA format (e.g. 1212****), type 212 (the area code for New York))
DID Groups
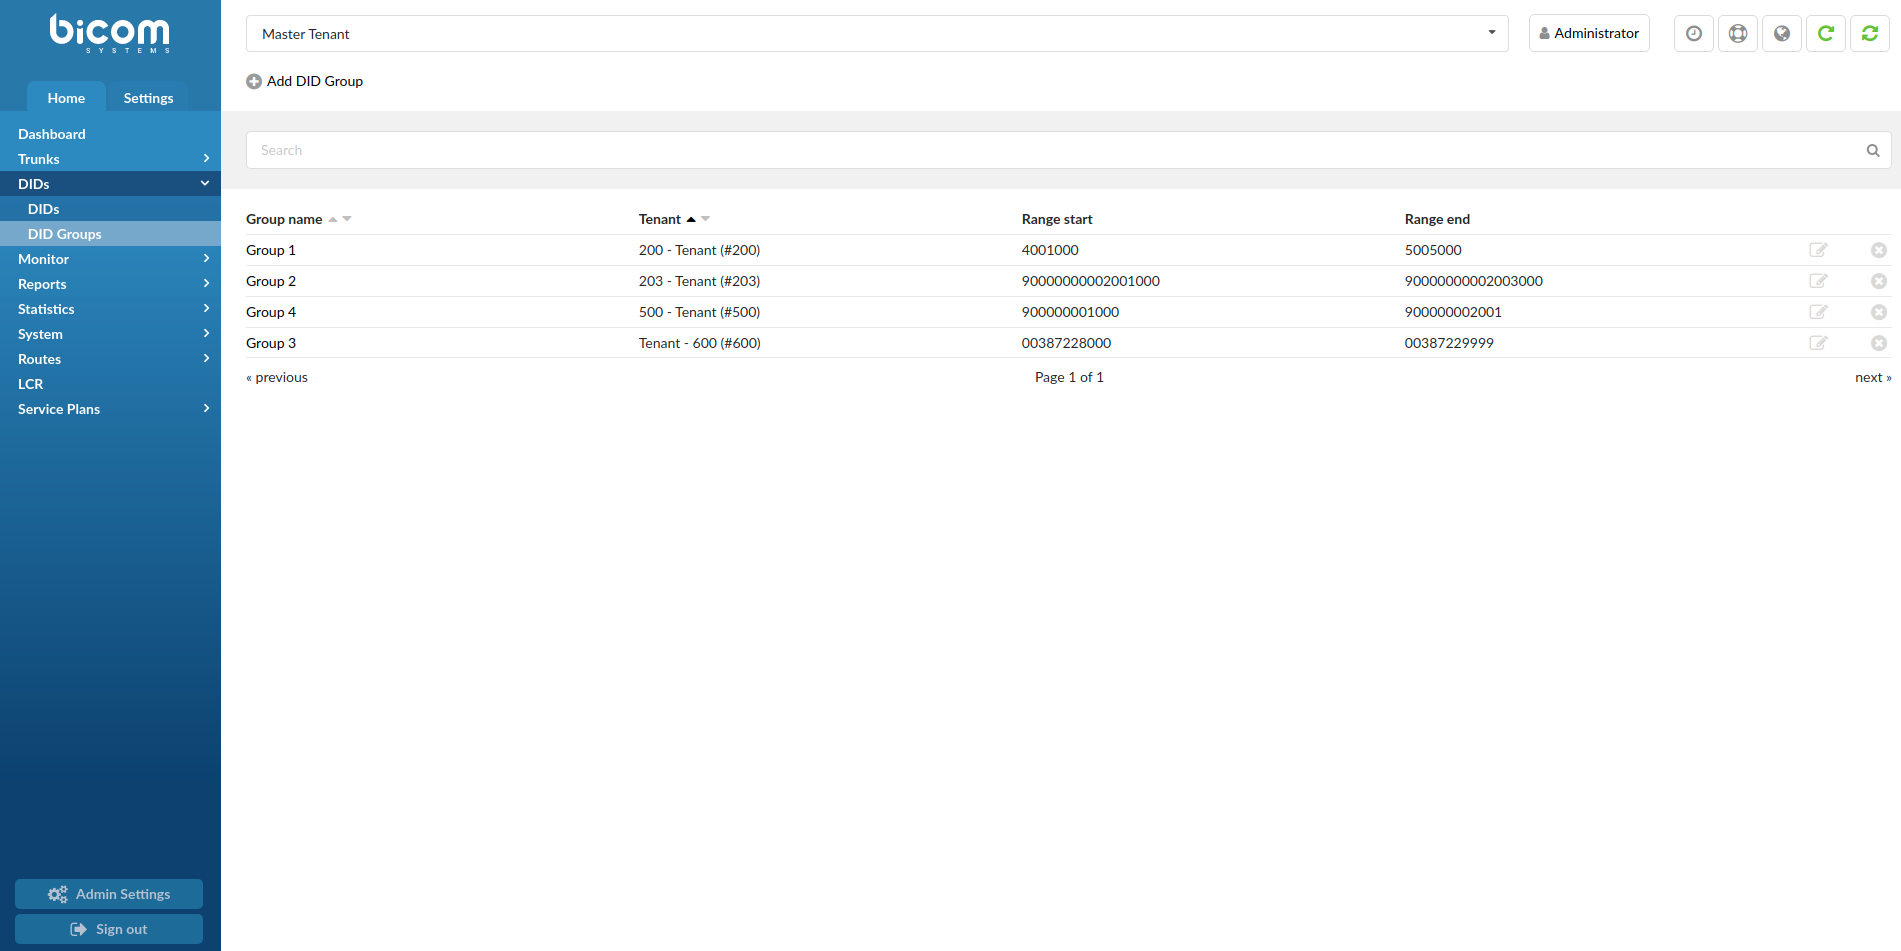
The MT PBXware DID section has a simplified feature that should make DID management easier for master administrator users. When the DID mode is set to “groups” (under master tenant settings) administrator can assign a range of DID numbers to a DID group which can later be assigned to a particular tenant. The tenant administrator can later distribute and set up DID numbers from this group in a preferred way (single DID or range of numbers) without the need for PBXware administrator assistance as was the case previously.
NOTE: To enable this option go to Master Tenant -> Settings -> Tenants -> Edit Master Tenant -> Show Advanced Options -> General Settings: DID mode – Groups.
DID Groups Main screen
This screen lists all system DID Groups with the following details
- Group Name
Group name.
(E.g. Group 1)
- Tenant
Select which tenant will use this DID Group.
(E.g. Tenant 200)
- Range start
Starting number of the DID range in Group
- Range end
Ending number of the DID range in Group
Edits the DID Group configuration
Deletes a DID Group from the system
Add/Edit DID Groups

General
Group Name
Unique name of the DID Group.
(E.g. DID Group 1)
Tenant
Select which tenant will use this DID Group.
(Select box)
DID range start
Starting number of the DID range in Group.
(E.g. 061100200)
DID range end
Ending number of the DID range in Group.
(E.g. 061100300)
DIDs on Tenants
After creating a DID on a master tenant edits and additional settings are available in the slave tenant to which the DID is assigned to.

This option allows you to download the CSV file, which contains the list of DIDs and their settings, including necessary headers, created on the tenant. The downloaded CSV file can be used to re-create these DIDs on a different standalone PBXware system/tenant.
- DID/Channel:
DID number or a PSTN channel slot number.
(E.g. 00201200103)
- Name (6.6)
Displays the name of a DID for easier navigation
(E.g. Tech Support)
NOTE: Please note that this feature is part of the beta release and is only visible to beta testers. Once the stable version is released, it will be available for general use.
- Provider:
Provider name
(E.g. Generic SIP)
- Trunk:
Trunk used by a DID
(E.g. Trunk1)
- Destination:
Trunk destination and destination network number
(E.g. Extension – 5000)
- Status
Refers both to the status of DID and SMS service
(E.g. Active/Inactive)
NOTE: Please take a look at the table for further explanation of what happens when the status is either ‘Active’ or ‘Inactive’.
| Active | Calls and SMS messages both go through . |
| Inactive | Calls do not go through, but SMS messages still go through. |
EXAMPLE: In case a user adds a DID, and following this, enables SMS for this DID on Slave Tenant, the number will be added to the list of SMS numbers and its status will be displayed as ‘Active’ which means that both the calls and SMS messages will go through. In case a user changes settings on Master Tenant, and the status changes to ‘Inactive’, this action will make it unable for calls to go through, however, SMS messages will still go through since the number stays on the list of SMS numbers regardless of the status change.
Edit DID
By clicking the edit button you will be given additional editing options which weren’t available on master tenant.
General
- Destination
PBXware MT destination to which DID will transfer all calls.
(E.g. Extensions)
NOTE: From version 7.3, when Multi-user is selected as a destination type, the Value field will allow one or more extensions to be assigned. If more than one extension is assigned, the extensions will ring in the order they were added, and if the first extension does not answer, the call will roll over to the next extension in line once the ringtime timeout is reached.
- Value
Destination value to which all DID calls will be transferred
(E.g. If ‘Destination’=’Extension’, set the extension number here(e.g. 1002). In case ‘Destination’=’IVR’, set the IVR extension number here)
TIP: If using ‘Fax to E-mail’ as ‘Destination’, set the ‘Value’ field to an email address (email@domain.com) or extension number (1002). If an extension number is used, the fax will go to the email address associated with the extension. The email which arrives to the specified address will contain both TIFF and PDF versions of the FAX.
- Service Plan
This option is used so you can bill inbound calls to IVRs, Conferences, Queues, and Voicemail. If these are selected as Destination, they will be billed as ‘Local destinations’ from Service Plan.
If Extension/Multi-User is selected, call will be billed as per incoming price set for E.164 number in DID. Balance on Extension could be set as + or – value so you can decrease or increase balance for that extension when it receives the call.
For other Destination Types Service Plan is disabled
(E.g. National Service Plan)
- Call Rating Extension
Extension which is charged for inbound call rating set on DID.
(E.g. 1005)
Advanced Options
General
- Operation Times:
Set the DID operation time
- CLI Validation & Routing
Configure Validation & Routing
- SMS Enabled
Enable the SMS service for this DID
(E.g. Yes/No)
NOTE:
Scenario I: If this option needs to be enabled and editable, then the Destination must be set to ‘Extension’ and a certain ‘Value’ has to be provided. Otherwise, if any other Destination is set, this field will be uneditable. Also, a number has to be in a valid E.164 format. Please refer to the table.
Scenario 2: Please note that if ‘DID Range’ is enabled on Master Tenant, the ‘SMS Enabled’ button will be disabled. Please refer to the table.
| Editable Field (Extension) | Uneditable Field (Other Destination) |
|---|---|
 |  |
For more on how to successfully complete the SMS configuration, please refer to the Add SMS Number page.
- Main Number (7.3)
This option allows you to indicate that the DID number is assigned as the main number and mark it in green on the DID page for easier navigation. If more than one DID is configured as a “Main Number” these DIDs will be displayed at the top of the DID list and sorted by number in descending order.
By default, the “Main Number” option is set to No.
Once the ‘Main Number’ is set to ‘Yes’ and changes are saved, the DID list will display the number marked in green color.
- Preserve original Caller ID (6.6.1)
When External Number is selected as a DID destination, Preserve original Caller ID option will be exposed. Setting this option to Yes will ensure that originating Caller ID will be displayed on remote end. In case No is selected, Caller ID set in the Trunk settings will be used instead.
NOTE: The value set in the ‘Replace Caller ID’ field still has the highest priority. Only that value overwrites the original Caller ID.
- Greeting
Greeting which is played when calling this DID
When uploading a greeting for DID, the name of the sound file must start with “greeting-did-“
- Strip N digits
Here you can set the number of digits which will be stripped from the beginning of the incoming call.
(E.g. 3)
- Replace Caller ID
Replaces the caller id with the custom data provided here. This is used when you want all incoming DID calls to have this value displayed as a caller id information. Along with the custom data, you can use the ‘%CALLERID%’ variable, which displays the calling party phone number.
NOTE: Please make sure you enter this information as it is written down, otherwise, it will not work properly.
(E.g. Providing a ‘USDID’ here, will display ‘USDID’ on your phone display, for all calls coming through this DID. Providing ‘USDID %CALLERID%’, will display ‘USDID 55510205’ on your phone display, where 55510205 is calling party phone number).
- Queue Priority
Set the Queue priority
(E.g. If this DID redirects all calls to the queue, set ‘1’ here to give all calls over this trunk the highest queue priority).
- Custom Ringtone
If you are directing calls to an extension on which a supported UAD is registered, you could set a Custom Ringtone with which the phone will ring. Read more on this in the Custom Ring Tones HOWTO
(E.g. <Simple-3>)
- Record Call
If this option is turned on the incoming call on this DID will be recorded. When this option is turned on, a complete call will be recorded, whenever it goes or whatever happens to it
- Notify on Not Answer
If set to ‘Yes’ – any calls that are not answered on this DID will be logged for the next notification e-mail.
- Auto Fax Detection (v6.7.1)
This feature allows you to enable automatic fax detection on DID, and forward incoming fax calls to an extension number different from the main destination configured on DID.
- Fax Destination (v6.7.1)
Extension number incoming fax calls will be forwarded to when a fax call is detected. This field will be inactive unless Auto Fax Detection is enabled.
.
Operation Times
Set the system open/closed times. Depending on the time when the call is received, the call can be redirected to different PBXware MT destinations.
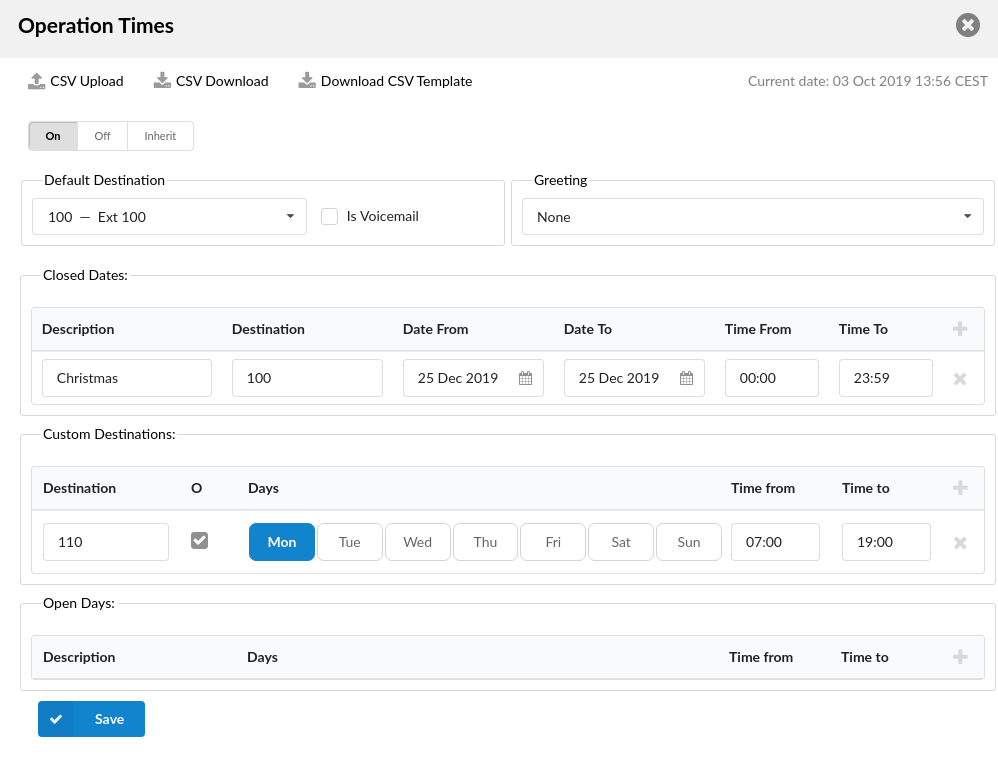
- CSV Upload
Click on this button to upload Operation Times configuration from csv file
- CSV Download
Click on this button to download Operation Times configuration to csv file
- Download CSV Template
Download CSV Template button will present you with a file that already contains necessary headers which should help you create CSV file easier
- Enable operation times
Enable operation times
(E.g. Yes, No, Inherit)
Default Destination
- Default Destination
PBXware MT extension to which all calls are redirected during the closed time hours
(E.g. 1000)
- Is Voicemail
Choose if Default Destination is voicemail
Greeting
- Greeting:
Greeting sound file played to callers during the closed times
(E.g. greeting-***)
Options
- Closed dates Sets the specific date/s when all calls are redirected to the ‘Default Destination’. If the ‘Destination’ field in the Closed dates is set, calls will not go to the ‘Default Destination’ but to this number.
- Custom Destinations: Redirects all calls received during non-working hours (e.g. weekend) to the PBXware MT extension provided here.
- Open dates: Sets the working hours during which the DID is to redirect calls as set in the DID Add/Edit window. If any call is received during the hours not set here the call is redirected to ‘Default Destination’.
CLI Validation & Routing
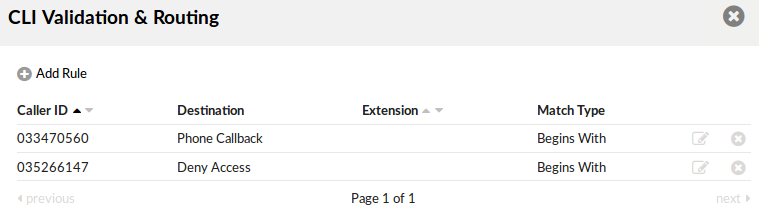
This option is used to fine tune the functionality of the DID by adding rules which send the calls to different destinations based on Caller IDs. For example, if the caller’s ID begins with 203, you can send all those calls to the IVR, if the CallerID is specifically number 063456789 then send that call to extension 4444 etc.
Once you click on CLI Validation & Routing button on Edit DID page, new window with following option will be shown:
- CSV Upload
Click on this button to upload CLI Validation & Routing configuration from csv file
- CSV Download
Click on this button to download CLI Validation & Routing configuration to csv file
- Download CSV Template
Download CSV Template button will present you with a file that already contains necessary headers which should help you create CSV file easier
- Caller ID
The Caller ID which is matched in the rule.
(E.g. 063456789)
- Destination
The type of destination to which the call will be directed.
(E.g. IVR)
NOTE: From version 7.3, when Multi-user is selected as a destination type, the Value field will allow one or more extensions to be assigned. If more than one extension is assigned, the extensions will ring in the order they were added, and if the first extension does not answer, the call will roll over to the next extension in line once the ringtime timeout is reached.
- Extension
Extension of the destination or selection where the call should go.
(E.g. 2222)
- Match Type
How the Caller ID is matched.
(E.g. If we set Match explicitly to ‘yes’ here will be written ‘Explicit Match’. If we set this option to ‘No’ or ‘Not Set’ here will be written ‘Begins With’.)
Edits the CLI Validation & Routing configuration
(Button)
Deletes CLI Validation & Routing Rule from the system
Add/Edit CLI Validation & Routing Rule
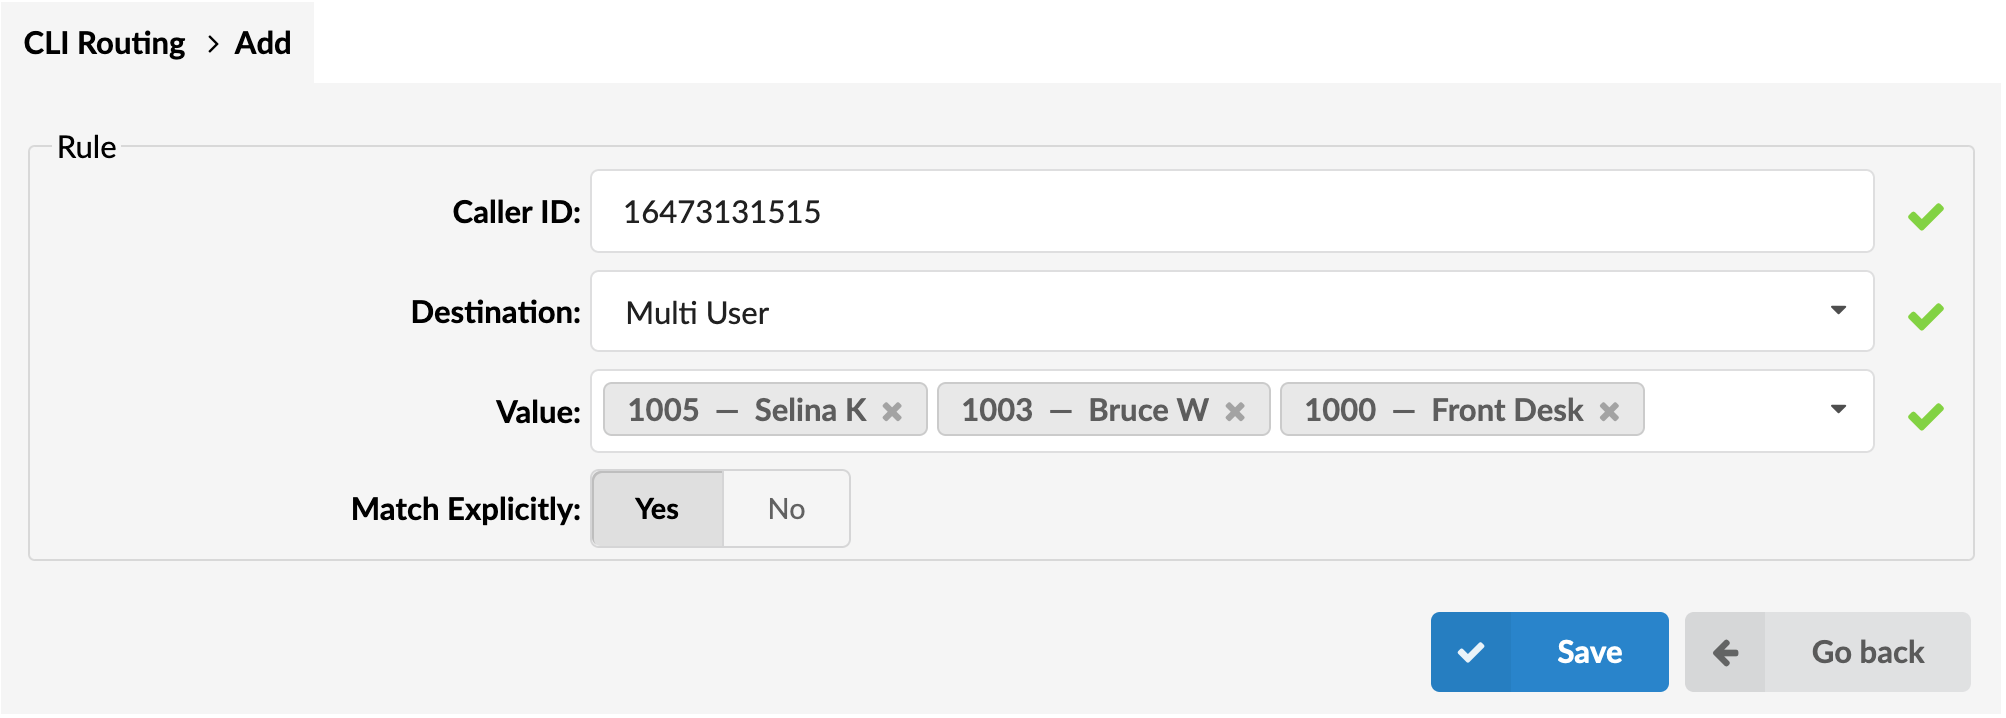
- Caller ID
The Caller ID which is matched in the rule.
(E.g. 063456789)
- Destination
The type of destination to which the call will be directed.
(E.g. Queue)
NOTE: From version 7.3, when Multi-user is selected as a destination type, the Value field will allow one or more extensions to be assigned. If more than one extension is assigned, the extensions will ring in the order they were added, and if the first extension does not answer, the call will roll over to the next extension in line once the ringtime timeout is reached.
- Extension
Value of the destination or selection where the call should go.
- Match Explicitly
Is Caller ID going to be matchet ‘explicitly’ or with ‘begins with’.
(E.g. Yes, No, Not Set)
Add DID (Group Mode)
When DID Groups mode is active, DIDs are created on Slave tenant instead of Master tenant. Fields are almost the same as for creating on Master Tenant. The only difference is that instead of ‘Tenant’ field you have ‘Group’ field.
The following things have changed:
- After you have chosen a group, the DID/Channel field will be changed to a drop-down, depending on some rules (written below)
- The drop-down will be used as an autocomplete feature and will show available DIDs from the chosen group.
- Maximum of 10 DID numbers are shown at a time so in order to narrow your choice you need to type in more characters.
- The drop-down will only show the available DIDs, meaning that those already reserved/created will not be shown.